Unreal Engine Module - Quick Match with DS - Add quick play menu
This tutorial isn't yet applicable for the AccelByte Gaming Service (AGS) Starter tier. It requires the Armada, a dynamic game server manager feature, which isn't currently supported on AGS Starter.
To support both server mode at once, Peer to Peer (P2P) and Dedicated Server (DS), we separate the menu widget and the widget that actually connects to the matchmaking services which will be shown inside the menu widget. Those widgets, in order, are the Quick Play widget and Matchmaking DS widget. The widget that you're going to prepare is the Matchmaking DS. But, we will still explain what the Quick Play widget do.
About the Quick Play UI
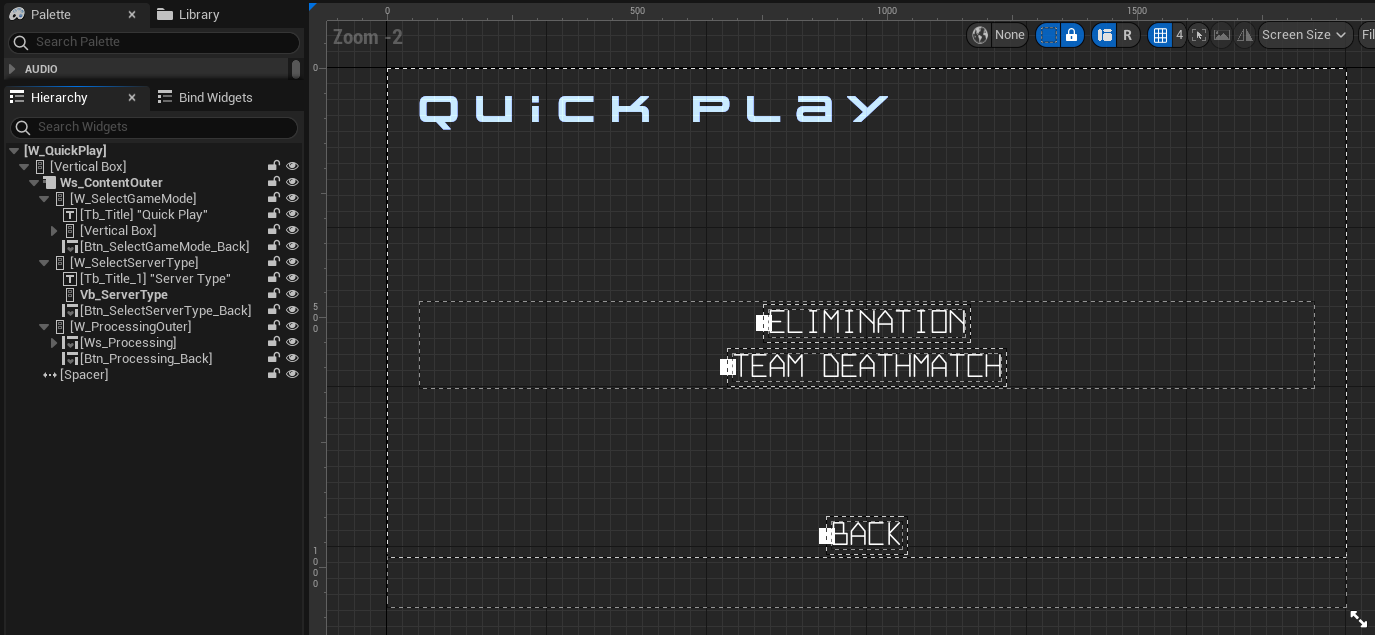
In the Byte Wars project, Quick Play is a widget to play the game by using matchmaking. In this widget, there are two types of game modes to select, the Elimination and the Team Deathmatch mode. The Elimination game mode is basically a game mode consisting of 4 players competing against each other, while the Team Deathmatch mode is a 2v2 team where each team consists of 4 players at maximum. This widget is defined in the following files.
- Header file can be found in
/Source/AccelByteWars/TutorialModules/Play/MatchmakingEssentials/UI/QuickPlayWidget.h. - CPP file can be found in
/Source/AccelByteWars/TutorialModules/Play/MatchmakingEssentials/UI/QuickPlayWidget.cpp. - Blueprint widget can be found in
/Content/TutorialModules/Play/MatchmakingEssentials/UI/W_QuickPlay.uasset.
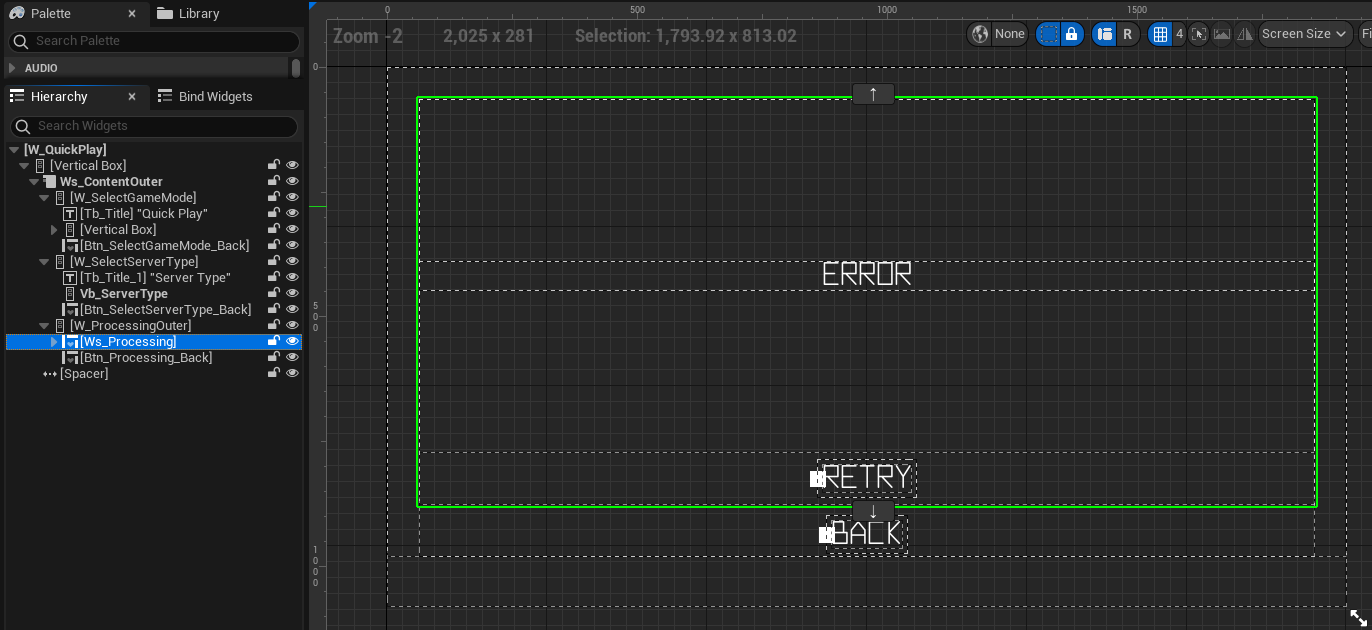
If you open the Quick Play widget Blueprint file, you will see how the widget is constructed.

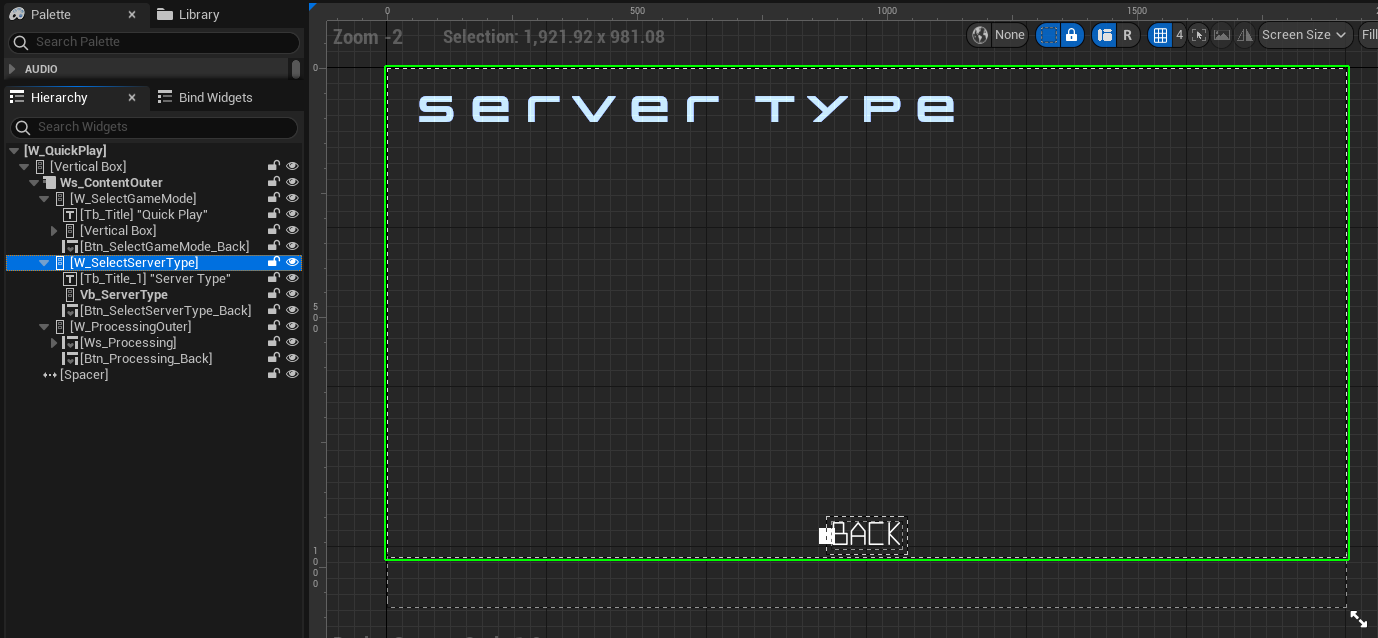
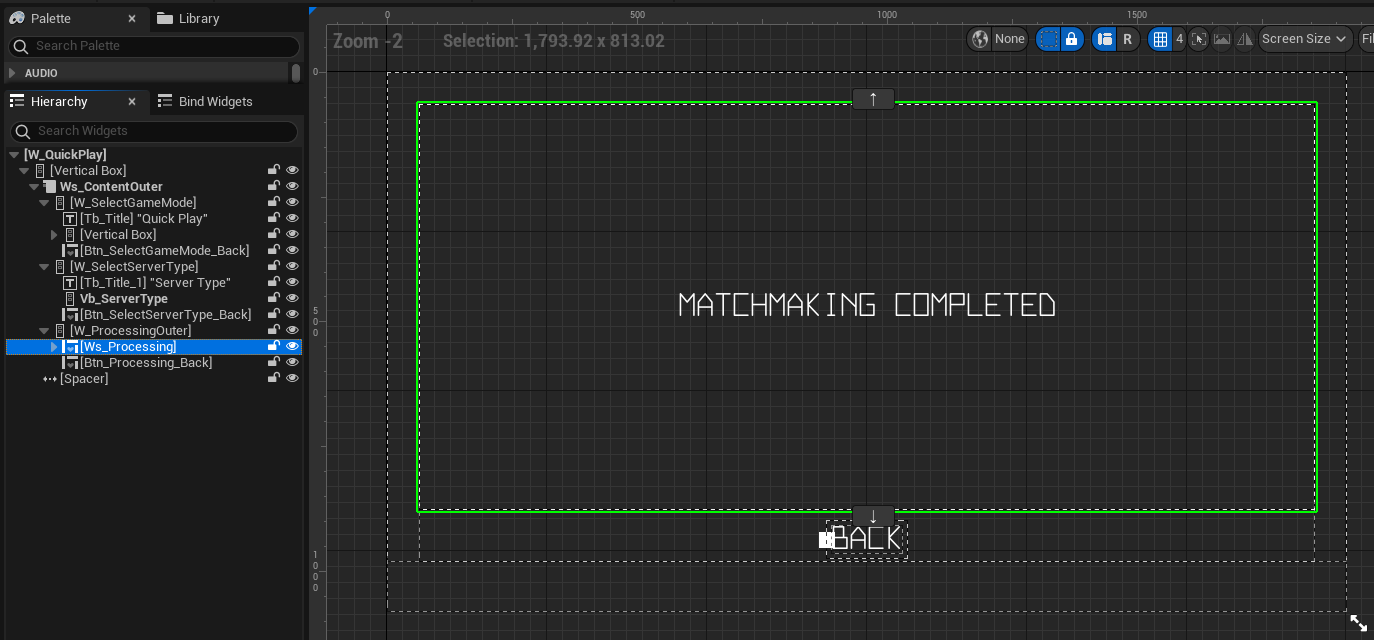
This widget has different states to show the relevant UI based on the matchmaking state.
- Select Game Mode: showing buttons to select game mode.
- Select Server Type: showing buttons to select what type of server to match make. In this module, you will spawn a button for matchmaking using a dedicated server (DS).
- Success: showing matchmaking success message.
- Loading: showing a spinner to show current matchmaking status (e.g. matchmaking started, finding a match).
- Error: showing the matchmaking error message.
To change between those states, the Quick Play widget uses a combination of Unreal UMG's Widget Switcher and our AccelByteWarsWidgetSwitcher. The AccelByteWarsWidgetSwitcher is a custom Widget Switcher with predefined states, there are empty, loading, error, and success states. Here are the declarations of the mentioned components in the header file.
private:
    UPROPERTY(BlueprintReadOnly, meta = (BindWidget, BlueprintProtected = true, AllowPrivateAccess = true))
    UWidgetSwitcher* Ws_ContentOuter;

    UPROPERTY(BlueprintReadOnly, meta = (BindWidget, BlueprintProtected = true, AllowPrivateAccess = true))
    UAccelByteWarsWidgetSwitcher* Ws_Processing;
To switch between states, the Quick Play widget has the following function.
void UQuickPlayWidget::SwitchContent(const EContentType State)
{
    bool bShowBackButton = true;
    UWidget* FocusTarget = Btn_SelectGameMode_Back;
    UWidget* WidgetTarget = W_SelectGameMode;
    UWidget* BackButtonTarget = Btn_SelectGameMode_Back;
    EAccelByteWarsWidgetSwitcherState ProcessingState = EAccelByteWarsWidgetSwitcherState::Loading;

    switch (State)
    {
    case EContentType::SELECTGAMEMODE:
        bShowBackButton = true;
        FocusTarget = Btn_Elimination;
        WidgetTarget = W_SelectGameMode;
        BackButtonTarget = Btn_SelectGameMode_Back;
        CameraTargetY = 600.0f;
        InitializeFTEUDialogues(true);
        break;
    case EContentType::SELECTSERVERTYPE:
        bShowBackButton = true;
        FocusTarget = Btn_SelectServerType_Back;
        WidgetTarget = W_SelectServerType;
        BackButtonTarget = Btn_SelectServerType_Back;
        CameraTargetY = 750.0f;
        break;
    case EContentType::LOADING:
        bShowBackButton = false;
        FocusTarget = Ws_Processing;
        WidgetTarget = W_ProcessingOuter;
        BackButtonTarget = Btn_Processing_Back;
        ProcessingState = EAccelByteWarsWidgetSwitcherState::Loading;
        CameraTargetY = 800.0f;
        DeinitializeFTUEDialogues();
        break;
    case EContentType::ERROR:
        bShowBackButton = true;
        FocusTarget = Ws_Processing;
        WidgetTarget = W_ProcessingOuter;
        BackButtonTarget = Btn_Processing_Back;
        ProcessingState = EAccelByteWarsWidgetSwitcherState::Error;
        CameraTargetY = 800.0f;
        DeinitializeFTUEDialogues();
        break;
    case EContentType::SUCCESS:
        bShowBackButton = false;
        FocusTarget = Ws_Processing;
        WidgetTarget = W_ProcessingOuter;
        BackButtonTarget = Btn_Processing_Back;
        ProcessingState = EAccelByteWarsWidgetSwitcherState::Not_Empty;
        CameraTargetY = 800.0f;
        break;
    }

    FocusTarget->SetUserFocus(GetOwningPlayer());
    Ws_ContentOuter->SetActiveWidget(WidgetTarget);
    Ws_Processing->SetWidgetState(ProcessingState);

    BackButtonTarget->SetVisibility(bShowBackButton ? ESlateVisibility::Visible : ESlateVisibility::Collapsed);
    bIsBackHandler = bShowBackButton;
}
Now that you have already understood how the Quick Play states are implemented, let's discuss each state in detail.
Select Game Mode State
This state displays buttons to select the game mode before matchmaking. There are two game modes, the Elimination and the Team Deathmatch mode.
The buttons above are declared in the header file.
private:
    UPROPERTY(BlueprintReadOnly, meta = (BindWidget, BlueprintProtected = true, AllowPrivateAccess = true))
    UCommonButtonBase* Btn_Elimination;

    UPROPERTY(BlueprintReadOnly, meta = (BindWidget, BlueprintProtected = true, AllowPrivateAccess = true))
    UCommonButtonBase* Btn_TeamDeathMatch;
The selected game mode can be accessed through the following function. It will return either EGameModeType::FFA for Elimination or EGameModeType::TDM for Team Deathmatch.
EGameModeType UQuickPlayWidget::GetSelectedGameModeType() const
{
    return SelectedGameModeType;
}
Select Server Type State
This state displays buttons to select server type to match make using the selected game mode. By default, this state contains an empty container. You will use this container to generate a button to trigger matchmaking with a dedicated server (DS) later.
Success State
This state displays a message indicating the matchmaking is complete. There is nothing special about this state as when the matchmaking is completed, your game will immediately travel to the match lobby of the dedicated server (DS).
Loading State
This state displays a spinner and a message to show the current matchmaking processes.
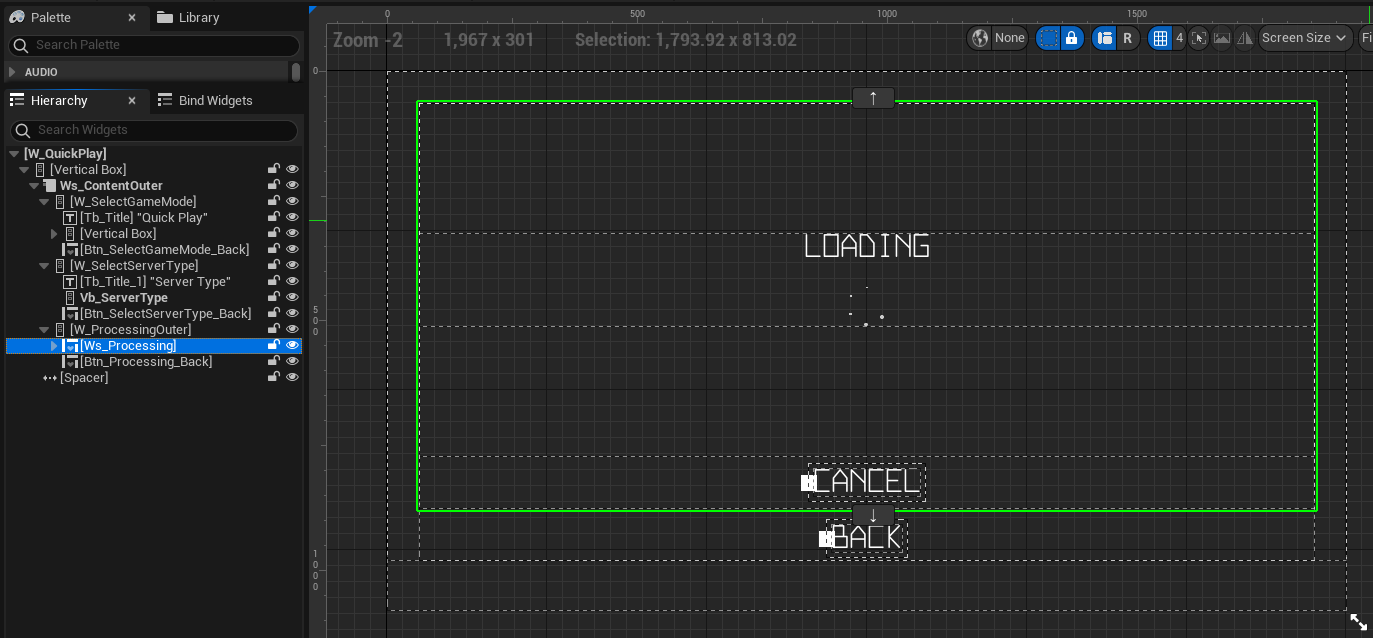
To set the loading message text, the Quick Play widget has the following function. What it does is replace the message text and toggle to enable the cancel button or not. You will use the cancel button to trigger some events later. For now, you don't need to worry about it.
void UQuickPlayWidget::SetLoadingMessage(const FText& Text, const bool bEnableCancelButton) const
{
    Ws_Processing->LoadingMessage = Text;
    Ws_Processing->bEnableCancelButton = bEnableCancelButton;
}
Error State
This state displays the matchmaking error messages.
To set the error message text, the Quick Play widget has the following function. What it does is replace the message text and toggle to show the retry button or not. You will use the retry button to trigger some events later. For now, you don't need to worry about it.
void UQuickPlayWidget::SetErrorMessage(const FText& Text, const bool bShowRetryButton) const
{
    Ws_Processing->ErrorMessage = Text;
    Ws_Processing->bShowRetryButtonOnError = bShowRetryButton;
}
About the Dedicated Server Selection UI
As we mentioned before, the Quick Play widget has the server selection state. You will generate a button to be added to that state, so your player can trigger to start matchmaking using a dedicated server. To do this, you will be working with the MatchmakingDSWidget_Starter class that is defined by the following files.
- Header file can be found in
/Source/AccelByteWars/TutorialModules/Play/MatchmakingDS/UI/MatchmakingDSWidget_Starter.h. - CPP file can be found in
/Source/AccelByteWars/TutorialModules/Play/MatchmakingDS/UI/MatchmakingDSWidget_Starter.cpp. - Blueprint widget can be found in
/Content/TutorialModules/Play/MatchmakingDS/UI/W_MatchmakingDS_Starter.uasset.
If you open the widget's Blueprint file, you will see how the widget is constructed.
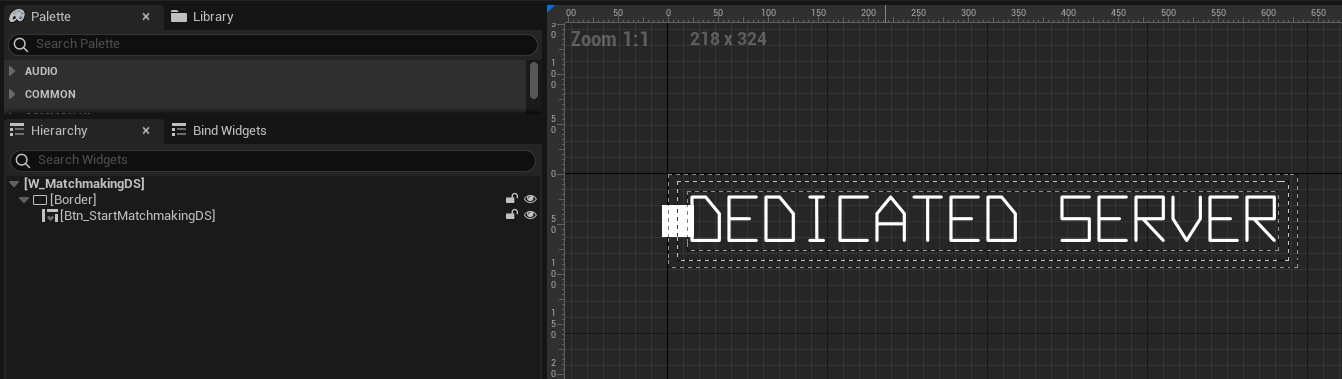
As you can see, it is basically a button that you can use to trigger the start of matchmaking with DS. You can check the definition of that button in the header file.
private:
    UPROPERTY(BlueprintReadOnly, meta = (BindWidget, BlueprintProtected = true, AllowPrivateAccess = true))
    UCommonButtonBase* Btn_StartMatchmakingDS;
Ready the UI
In this section, you are going to prepare the MatchmakingDSWidget_Starter widget class, so it is displayed in the Quick Play widget.
First, let's declare some functions to be called to trigger matchmaking events. Open the
MatchmakingDSWidget_Starterheader file and add the following code.protected:
void StartMatchmaking() const;
void CancelMatchmaking() const;Next, open the
MatchmakingDSWidget_StarterCPP file and define theStartMatchmaking()function. Later, you will trigger to start the matchmaking. But for now, add the following dummy function. TheW_Parentvariable is a reference to the parent widget, which is the Quick Play widget. This way, you can switch the Quick Play's state.void UMatchmakingDSWidget_Starter::StartMatchmaking() const
{
// Show dummy loading with cancel button.
W_Parent->SetLoadingMessage(TEXT_FINDING_MATCH, true);
W_Parent->SwitchContent(UQuickPlayWidget::EContentType::LOADING);
// TODO: Start matchmaking using a dedicated server (DS)
}Then, define the
CancelMatchmaking()function. Later, you will trigger to cancel the matchmaking. But for now, add the following dummy function.void UMatchmakingDSWidget_Starter::CancelMatchmaking() const
{
// Dummy cancel matchmaking and back to the server selection.
W_Parent->SetLoadingMessage(TEXT_CANCEL_MATCHMAKING, false);
W_Parent->SwitchContent(UQuickPlayWidget::EContentType::SELECTSERVERTYPE);
// TODO: Cancel matchmaking using a dedicated server (DS)
}Now, back to the
MatchmakingDSWidget_Starterheader file, and let's declare some additional functions. These functions will handle the callback when the matchmaking events are completed.protected:
void OnStartMatchmakingComplete(FName SessionName, bool bSucceeded) const;
void OnMatchmakingComplete(FName SessionName, bool bSucceeded) const;
void OnCancelMatchmakingComplete(FName SessionName, bool bSucceeded) const;Open the
MatchmakingDSWidget_StarterCPP file and let's define theOnStartMatchmakingComplete()function. This function handles the callback when the start matchmaking process is completed to switch the Quick Play widget to a relevant state. TheOnlineSessionvariable is a reference to the current active online session. We will discuss more about online sessions in a later section.void UMatchmakingDSWidget_Starter::OnStartMatchmakingComplete(FName SessionName, bool bSucceeded) const
{
// Abort if not a game session.
if (!SessionName.IsEqual(OnlineSession->GetPredefinedSessionNameFromType(EAccelByteV2SessionType::GameSession)))
{
return;
}
// Show finding match loading message if starting matchmaking is successful.
if (bSucceeded)
{
W_Parent->SetLoadingMessage(TEXT_FINDING_MATCH, true);
W_Parent->SwitchContent(UQuickPlayWidget::EContentType::LOADING);
}
// Show start matchmaking error message if starting matchmaking is failed.
else
{
W_Parent->SetErrorMessage(TEXT_FAILED_FIND_MATCH, true);
W_Parent->SwitchContent(UQuickPlayWidget::EContentType::ERROR);
}
}Next, define the
OnMatchmakingComplete()function. This function handles the callback when the matchmaking process is completed to switch the Quick Play widget to a relevant state.void UMatchmakingDSWidget_Starter::OnMatchmakingComplete(FName SessionName, bool bSucceeded) const
{
// Abort if not a game session.
if (!SessionName.IsEqual(OnlineSession->GetPredefinedSessionNameFromType(EAccelByteV2SessionType::GameSession)))
{
return;
}
// Show joining session if matchmaking is successful.
if (bSucceeded)
{
W_Parent->SetLoadingMessage(TEXT_JOINING_MATCH, false);
W_Parent->SwitchContent(UQuickPlayWidget::EContentType::LOADING);
}
// Show error message if matchmaking is failed.
else
{
W_Parent->SetErrorMessage(TEXT_FAILED_FIND_MATCH, true);
W_Parent->SwitchContent(UQuickPlayWidget::EContentType::ERROR);
}
}Then, define the
OnCancelMatchmakingComplete()function. This function handles the callback when the cancel matchmaking process is completed to switch the Quick Play widget to a relevant state.void UMatchmakingDSWidget_Starter::OnCancelMatchmakingComplete(FName SessionName, bool bSucceeded) const
{
// Abort if not a game session.
if (!SessionName.IsEqual(OnlineSession->GetPredefinedSessionNameFromType(EAccelByteV2SessionType::GameSession)))
{
return;
}
// Back to server selection if cancel matchmaking is successful.
if (bSucceeded)
{
W_Parent->SwitchContent(UQuickPlayWidget::EContentType::SELECTSERVERTYPE);
}
// Show error message if cancel matchmaking is failed.
else
{
W_Parent->SetErrorMessage(TEXT_FAILED_CANCEL_MATCH, false);
W_Parent->SwitchContent(UQuickPlayWidget::EContentType::ERROR);
}
}Now, let's bind the buttons to start and cancel the matchmaking. In the
NativeOnActivated()function, add the following code. In this code, we bind the dedicated server button and the retry button to start matchmaking. Also, we bind the cancel button to cancel the matchmaking process.void UMatchmakingDSWidget_Starter::NativeOnActivated()
{
Super::NativeOnActivated();
UOnlineSession* BaseOnlineSession = GetWorld()->GetGameInstance()->GetOnlineSession();
if (!ensure(BaseOnlineSession))
{
return;
}
OnlineSession = Cast<UAccelByteWarsOnlineSessionBase>(BaseOnlineSession);
ensure(OnlineSession);
W_Parent = GetFirstOccurenceOuter<UQuickPlayWidget>();
if (!ensure(W_Parent))
{
return;
}
// Bind buttons.
Btn_StartMatchmakingDS->OnClicked().AddUObject(this, &ThisClass::StartMatchmaking);
W_Parent->GetProcessingWidget()->OnCancelClicked.AddUObject(this, &ThisClass::CancelMatchmaking);
W_Parent->GetProcessingWidget()->OnRetryClicked.AddUObject(this, &ThisClass::StartMatchmaking);
// TODO: Bind events to listen to matchmaking callbacks.
}Next, you need to unbind those buttons when the widget is not active. In the
NativeOnDeactivated()add the following code.void UMatchmakingDSWidget_Starter::NativeOnDeactivated()
{
Super::NativeOnDeactivated();
// Unbind buttons.
Btn_StartMatchmakingDS->OnClicked().RemoveAll(this);
W_Parent->GetProcessingWidget()->OnCancelClicked.RemoveAll(this);
W_Parent->GetProcessingWidget()->OnRetryClicked.RemoveAll(this);
// TODO: Unbind events from listening matchmaking callbacks.
}Now, build your project and open it in the Unreal Engine Editor. Navigate to
/Content/TutorialModules/Play/MatchmakingDS/. There, you will find a data asset calledDA_MatchmakingDSEssentials. Open it and enable theIs Starter Mode Active. Then, save the data asset again. This will activate the widgets we discussed before, so you can navigate through them when you play the game.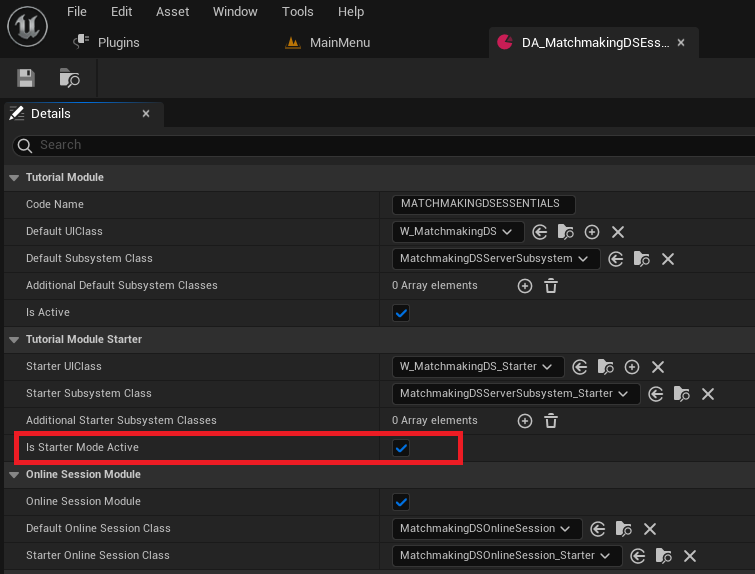
Now, try to play the game in the Unreal Engine Editor. From the Main Menu, try to navigate to Play Online > Quick Play > Elimination > Dedicated Server. You should be able to see the loading state and can cancel it to back to the server selection state.
Congratulations! You set up the widgets correctly. You are now ready to move to the next section.
Resources
The files used in this tutorial section are available in the Byte Wars GitHub repository.
- AccelByteWars/Content/TutorialModules/Play/MatchmakingEssentials/UI/W_QuickPlay.uasset
- AccelByteWars/Source/AccelByteWars/TutorialModules/Play/MatchmakingEssentials/UI/QuickPlayWidget.h
- AccelByteWars/Source/AccelByteWars/TutorialModules/Play/MatchmakingEssentials/UI/QuickPlayWidget.cpp
- AccelByteWars/Content/TutorialModules/Play/MatchmakingDS/UI/W_MatchmakingDS_Starter.uasset
- AccelByteWars/Source/AccelByteWars/TutorialModules/Play/MatchmakingDS/UI/MatchmakingDSWidget_Starter.h
- AccelByteWars/Source/AccelByteWars/TutorialModules/Play/MatchmakingDS/UI/MatchmakingDSWidget_Starter.cpp