Set up PlayStation Network as an identity provider
Overview
This guide helps PlayStation developers connect PlayStation Network (PSN) accounts to AccelByte Gaming Services (AGS). You may need to set up additional features within PlayStation services that we haven't listed here, depending on your game. For more information about setting up PlayStation services, we recommend contacting your PlayStation representative and reviewing the PlayStation documentation.
Goals
To enable the PSN authentication method for your game with the AGS Game SDK and your publisher website with the AGS Player Portal.
Prerequisites
Web login integration
- In order to create a Playstation product, you must have a Partnership with Playstation. For more details about registering a Playstation Partnership, please refer to the PlayStation Partners page.
- You may need to create/invite your teammates to your organization. To do so, please read the Creating New Users in PlayStation Partners guide.
- You may need to create/invite your teammates to your content pipeline. To do so, please read Managing Users and Roles in Content Pipeline guide.
- An app server/wWebsite product on Playstation 4 DevNet / Playstation 5 DevNet
- An AGS Admin Portal Account to set up authentication and manage permissions.
- If you haven't done so already, set up a publisher namespace for your Player Portal and Launcher.
- You have a Player Portal.
In-game login integration
- In order to create a Playstation product, you must have a Partnership with Playstation. For more details about registering a Playstation Partnership, please refer to the PlayStation Partners page.
- You may need to create/invite your teammates to your organization. To do so, please read the Creating New Users in PlayStation Partners guide.
- You may need to create/invite your teammates to your content pipeline. To do so, please read Managing Users and Roles in Content Pipeline guide.
- If you are using Unreal Engine, you need to activate the OnlineSubsystem Oculus plugin.
- If you are using Unity, you need:
- A (Unity Engine Pro License).
- The Unity PlayStation Add-On. Choose the proper version with your Unity Engine.
- The PlayStation SDK (installed via the SDK Manager). The SDK Manager is used for online and offline installing and configuration of the SDK and Development environment onto your Windows PC.
- The PlayStation Unity Plugin.
- For PS4, use NPToolKit.
- For PS5, use PlayStation Network Unity Plugin.
- An AGS Admin Portal account to set up authentication and manage permissions.
- A game namespace.
- A Unity or Unreal game project with an imported AccelByte Game SDK.
- The latest version of the AGS Unity SDK or Unreal SDK.
- Familiarity with AGS IAM Clients.
Set up PlayStation DevNet
AGS is able to handle PSN web login for PSN 4 or PSN 5. If your PSN product only builds for PS4, please follow PSN 4 Web Login Integration. If your PSN product only builds for PS5, please follow PSN 5 Web Login Integration. If your PSN product builds for both PS4 and PS5, you can use one of them to be used as a third-party login method configuration in the AGS Admin Portal.
PS4
Web login integration (PS4)
There are two things that need to be prepared to enable web login using a PSN 4 account:
- An app server/website product on PlayStation 4 DevNet.
- A PSN web login method on the AGS Admin Portal.
Please follow instructions below to set up a PSN 4 web login flow. For more information about setting up Playstation Network Services (e.g., titles, products, and service requests), please refer to the PSN Service Setup Guide.
Create a Playstation 4 DevNet - App Server/Website (web)
This will be used for our Identity and Access Management (IAM) to do service-to-service (S2S) calls to the PSN 4 server. This will enable users to log in to an IAM using a PSN account following the web flow. Follow the Creating a New Product guide. Use the App Server/Website product type and fill in these Redirect URIs into the Client ID configuration:
https://<Base-URL>/iam/v3/platforms/ps4web/authenticate/https://<Base-URL>/https://<Base-URL>/player/account/linked-accountshttps://<Base-URL>/iam/v3/platforms/psnweb/authenticate/https://<Base-URL>/iam/v3/public/namespaces/accelbyte/users/me/platforms/ps4web/web/link/establishhttps://<Base-URL>/iam/v3/public/namespaces/accelbyte/users/me/platforms/psnweb/web/link/establishhttps://<Base-URL>/account/linked-accounts
Base-URL is your domain address. Example: https://development.accelbyte.io
In-game login integration (PS4)
There are several things that need to be prepared to enable in-game login using a PSN 4 account.
Content pipeline configuration (PS4)
Create a game concept in the content pipeline. Follow the Creating a Game Concept in Content Pipeline guide. After your concept gets accepted, create the product inside the concept. For more details, read the Concepts, Product Groups, and Products in Content Pipeline documentation.
Create a PlayStation 4 DevNet - App Server/Website (in-game)
This will be used for our Identity and Access Management (IAM) to do service-to-service (S2S) calls to the PSN 4 server. This will enable users to log in to an IAM using a PSN account following the web flow. Follow the Creating a New Product guide. Use the App Server/Website product type and fill in these Redirect URIs into the Client ID configuration:
https://<Base-URL>/iam/v3/platforms/ps4web/authenticate/https://<Base-URL>/https://<Base-URL>/player/account/linked-accountshttps://<Base-URL>/iam/v3/platforms/psnweb/authenticate/https://<Base-URL>/iam/v3/public/namespaces/accelbyte/users/me/platforms/ps4web/web/link/establishhttps://<Base-URL>/iam/v3/public/namespaces/accelbyte/users/me/platforms/psnweb/web/link/establishhttps://<Base-URL>/account/linked-accounts
Base-URL is your domain address. Example: https://development.accelbyte.io
Product setup - App (PS4)
This product will be used to fill in the game configurations needed to be able to get auth code from in game using the PlayStation SDK. Follow the Creating a New Product guide and use App as the product type. For more information about setting up PlayStation Network services (e.g., titles, products, and service requests), please refer to PSN Service Setup Guide.
PS5
Web login integration (PS5)
There are two things that need to be prepared to enable web login using a PSN 5 account:
- An app server product on PlayStation 5 DevNet
- A PSN web login method on the AGS Admin Portal.
Please follow instructions below to set up a PSN 5 web login flow. For more information about setting up Playstation Network Services (e.g., titles, products, and service requests), please refer to the PSN Service Setup Guide.
Create a PlayStation 5 DevNet - App Server/Website (web)
This will be used for our Identity and Access Management (IAM) to do service-to-service (S2S) calls to the PSN 5 server. This will enable users to log in to an IAM using a PSN account following the web flow. Follow the Creating a New Product guide. Use the App Server/Website product type and fill in these Redirect URIs into the Client ID configuration:
https://<Base-URL>/iam/v3/platforms/ps4web/authenticate/https://<Base-URL>/https://<Base-URL>/player/account/linked-accountshttps://<Base-URL>/iam/v3/platforms/psnweb/authenticate/https://<Base-URL>/iam/v3/public/namespaces/accelbyte/users/me/platforms/ps4web/web/link/establishhttps://<Base-URL>/iam/v3/public/namespaces/accelbyte/users/me/platforms/psnweb/web/link/establishhttps://<Base-URL>/account/linked-accounts
Base-URL is your domain address. Example: https://development.accelbyte.io
In-game login integration (PS5)
There are several things that need to be prepared to enable in-game login using a PSN 5 account.
Content pipeline configuration (PS5)
Create a game concept in the content pipeline. Follow the Creating a Game Concept in Content Pipeline guide. After your concept gets accepted, create the product inside the concept. For more details, read the Concepts, Product Groups, and Products in Content Pipeline documentation.
Create a PlayStation 5 DevNet - App Server (in-game)
This will be used for our Identity and Access Management (IAM) to do service-to-service (S2S) calls to the PSN 5 server. This will enable users to log in to an IAM using a PSN account following the web flow. Follow the Creating a New Product guide. Use the App Server product type and fill in these Redirect URIs into the Client ID configuration:
https://<Base-URL>/iam/v3/platforms/ps4web/authenticate/https://<Base-URL>/https://<Base-URL>/player/account/linked-accountshttps://<Base-URL>/iam/v3/platforms/psnweb/authenticate/https://<Base-URL>/iam/v3/public/namespaces/accelbyte/users/me/platforms/ps4web/web/link/establishhttps://<Base-URL>/iam/v3/public/namespaces/accelbyte/users/me/platforms/psnweb/web/link/establishhttps://<Base-URL>/account/linked-accounts
Base-URL is your domain address. Example: https://development.accelbyte.io
Product setup - App (PS5)
This product will be used to fill in the game configurations needed to be able to get auth code from in game using the PlayStation SDK. Follow the Creating a New Product guide and use App Server as the product type. For more information about setting up PlayStation Network services (e.g., titles, products, and service requests), please refer to PSN Service Setup Guide.
Additional steps
Request IP whitelisting from PlayStation for non-production (other than np) environments (PS4/PS5 DevNet)
In order to test your PSN login during the development or testing (PSN certification) phase, it is necessary to create a support request IP whitelisting for your IAM service and your network (e.g your office/VPN network) that is used by the PSN DevKit static IP’s address to the PSN partner center. You are also able to request other private support to PSN in the same way as this request.
If you are not sure where you can find the static IP address of your IAM service, reach out to AccelByte Support.
- Open your PS4/PS5 SIE DevNet and click on Support > Private support.
- Post a new issue and choose general support.
- Write down your request summary and the static IP Address of your IAM service and your office/VPN to get whitelisted.
- Wait until the PSN team answers your request and gets permission to access the testing (sp-int/prod-qa) environment.
Add a test user to the app product (PSN4 and PS5 DevNet)
The process will be the same for both PS4 and PS5 App products. Please keep in mind that the test user's email must already be signed up for PSN.
- Go to your app product under PSN DevNet and open your app.
- Scroll down and click Title Admin/Title Dev.
- Fill the Sign-In ID with the user PSN account email. Give the Role as Title Dev and click Add.
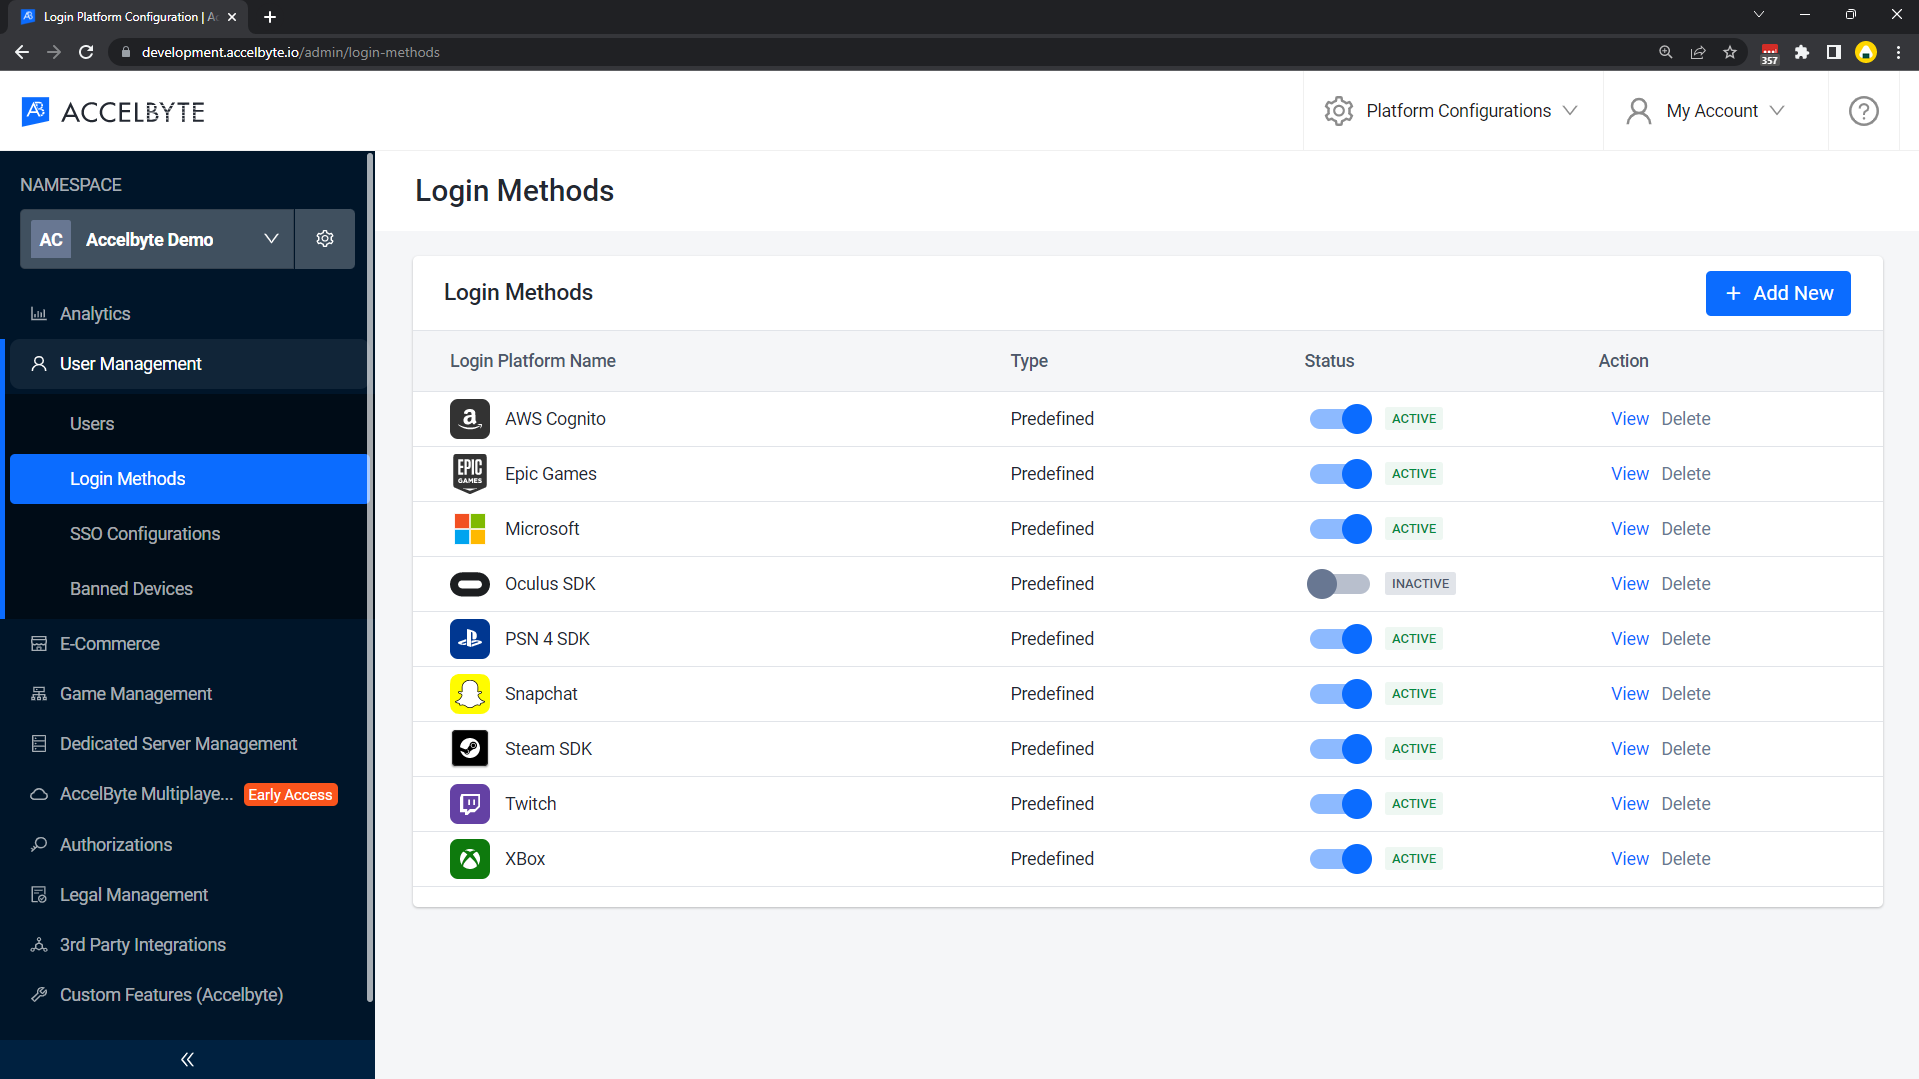
Set up the PSN login method
PSN web login
Use the following steps to set up PSN logins on your player portal website. This will allow your players to sign in to your player portal website using their PSN accounts. You can use client credentials from either PSN 4 or PSN 5 for web logins.
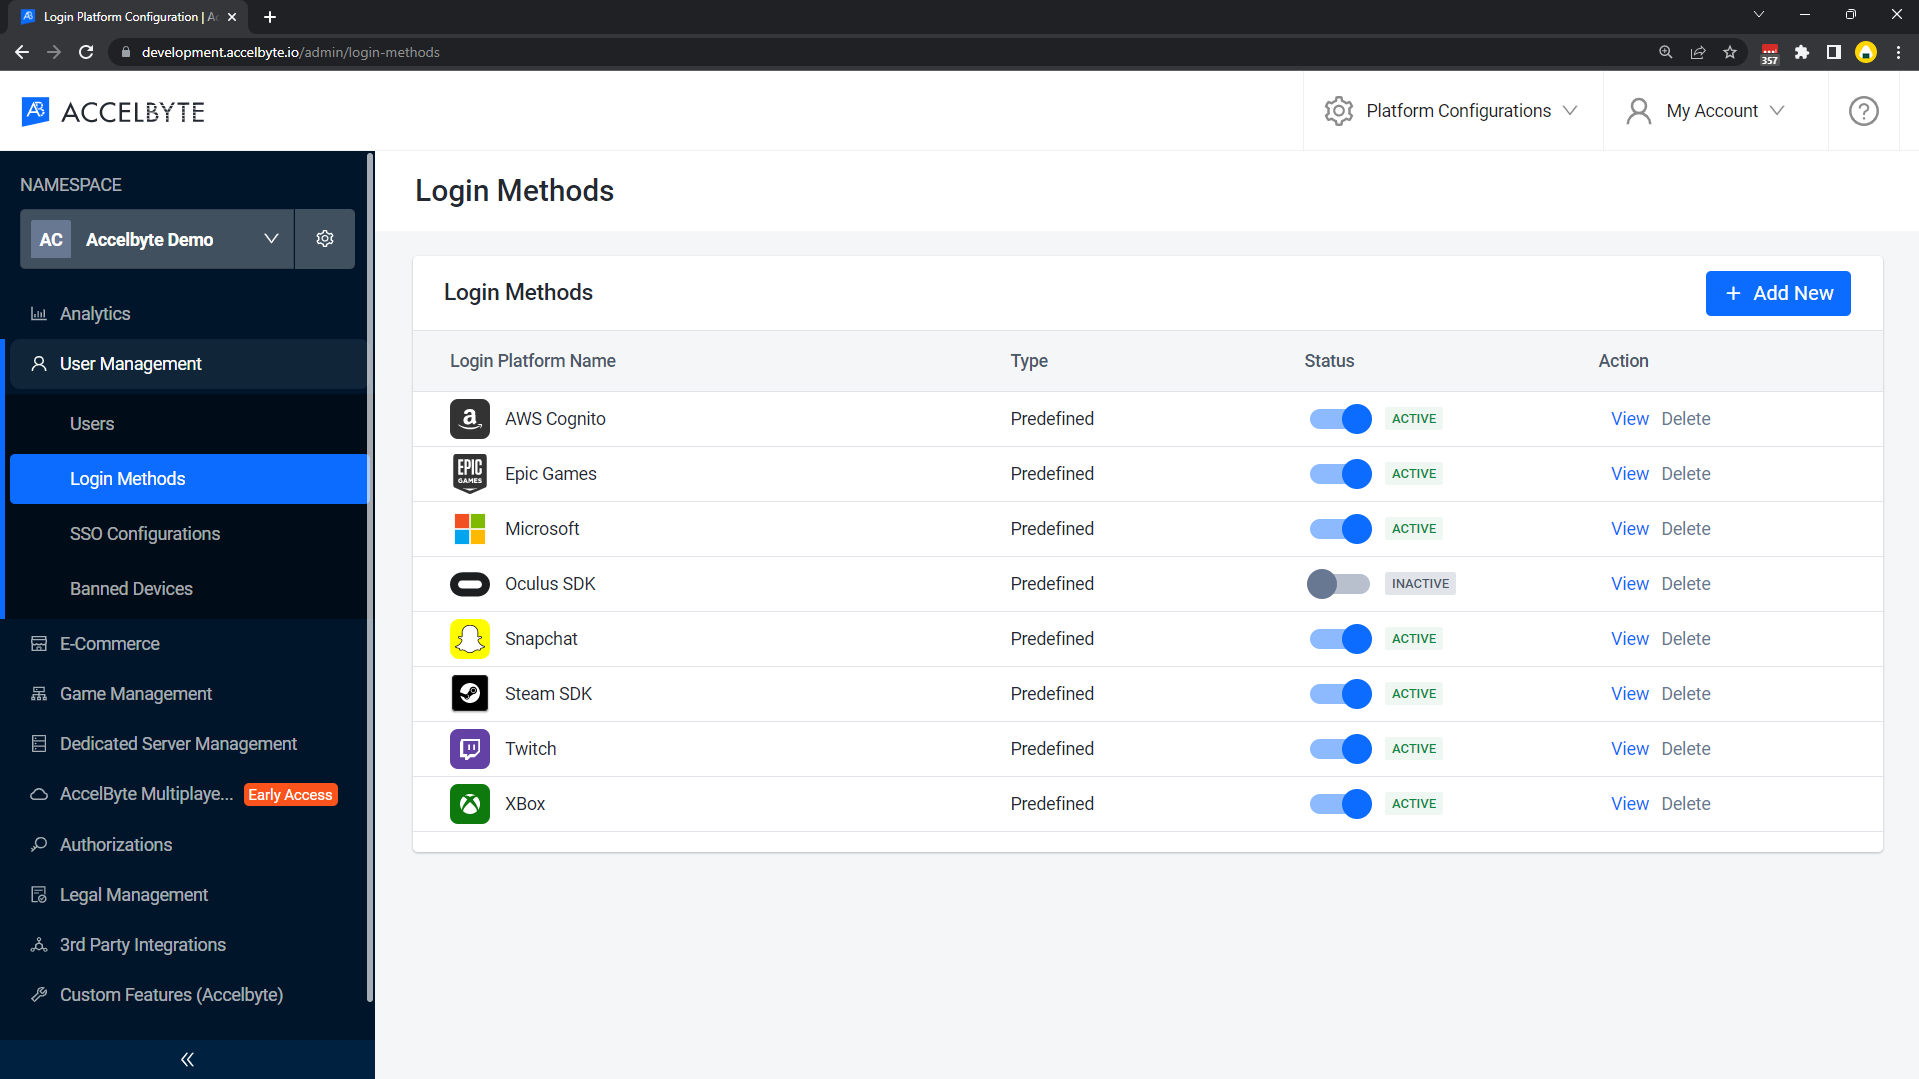
Log in to the AGS Admin Portal, choose your Publisher Namespace, and click Login Method below the User Management sidebar, and click the + Add New button on the right side.
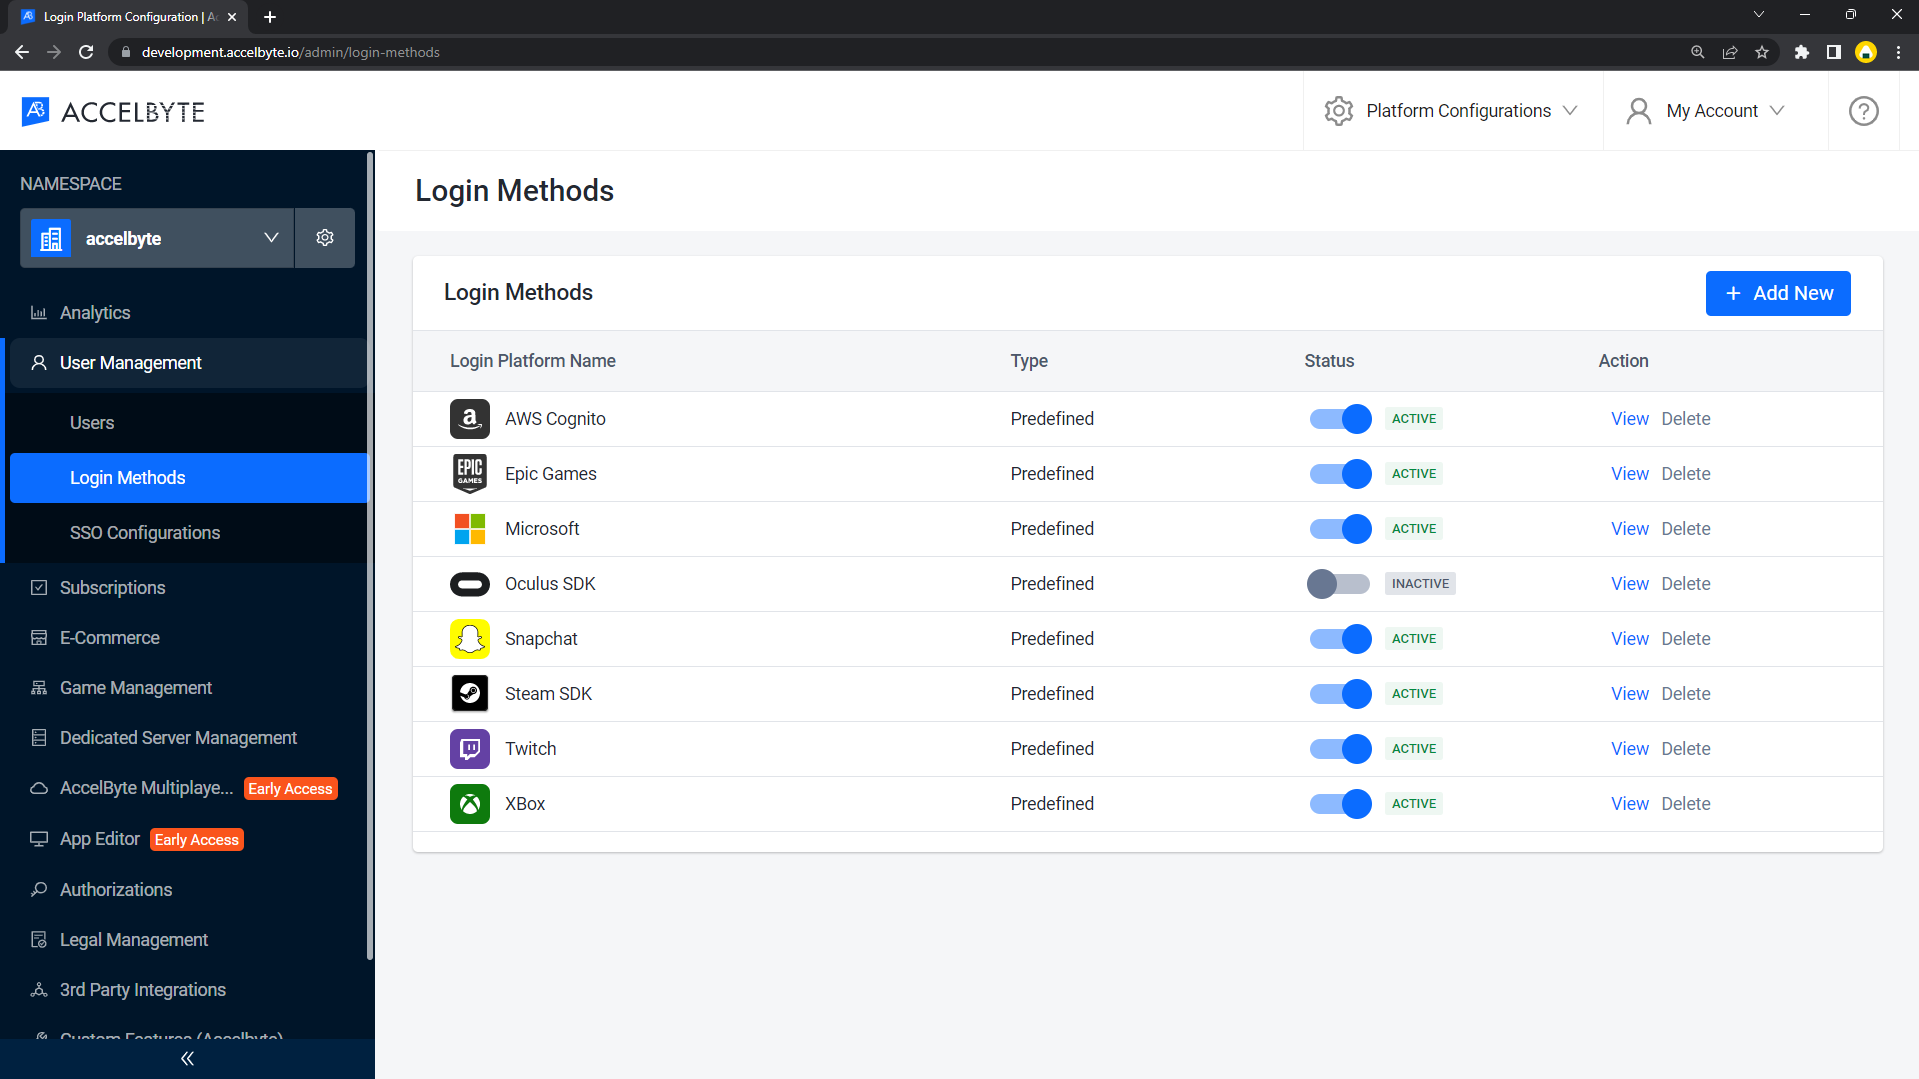
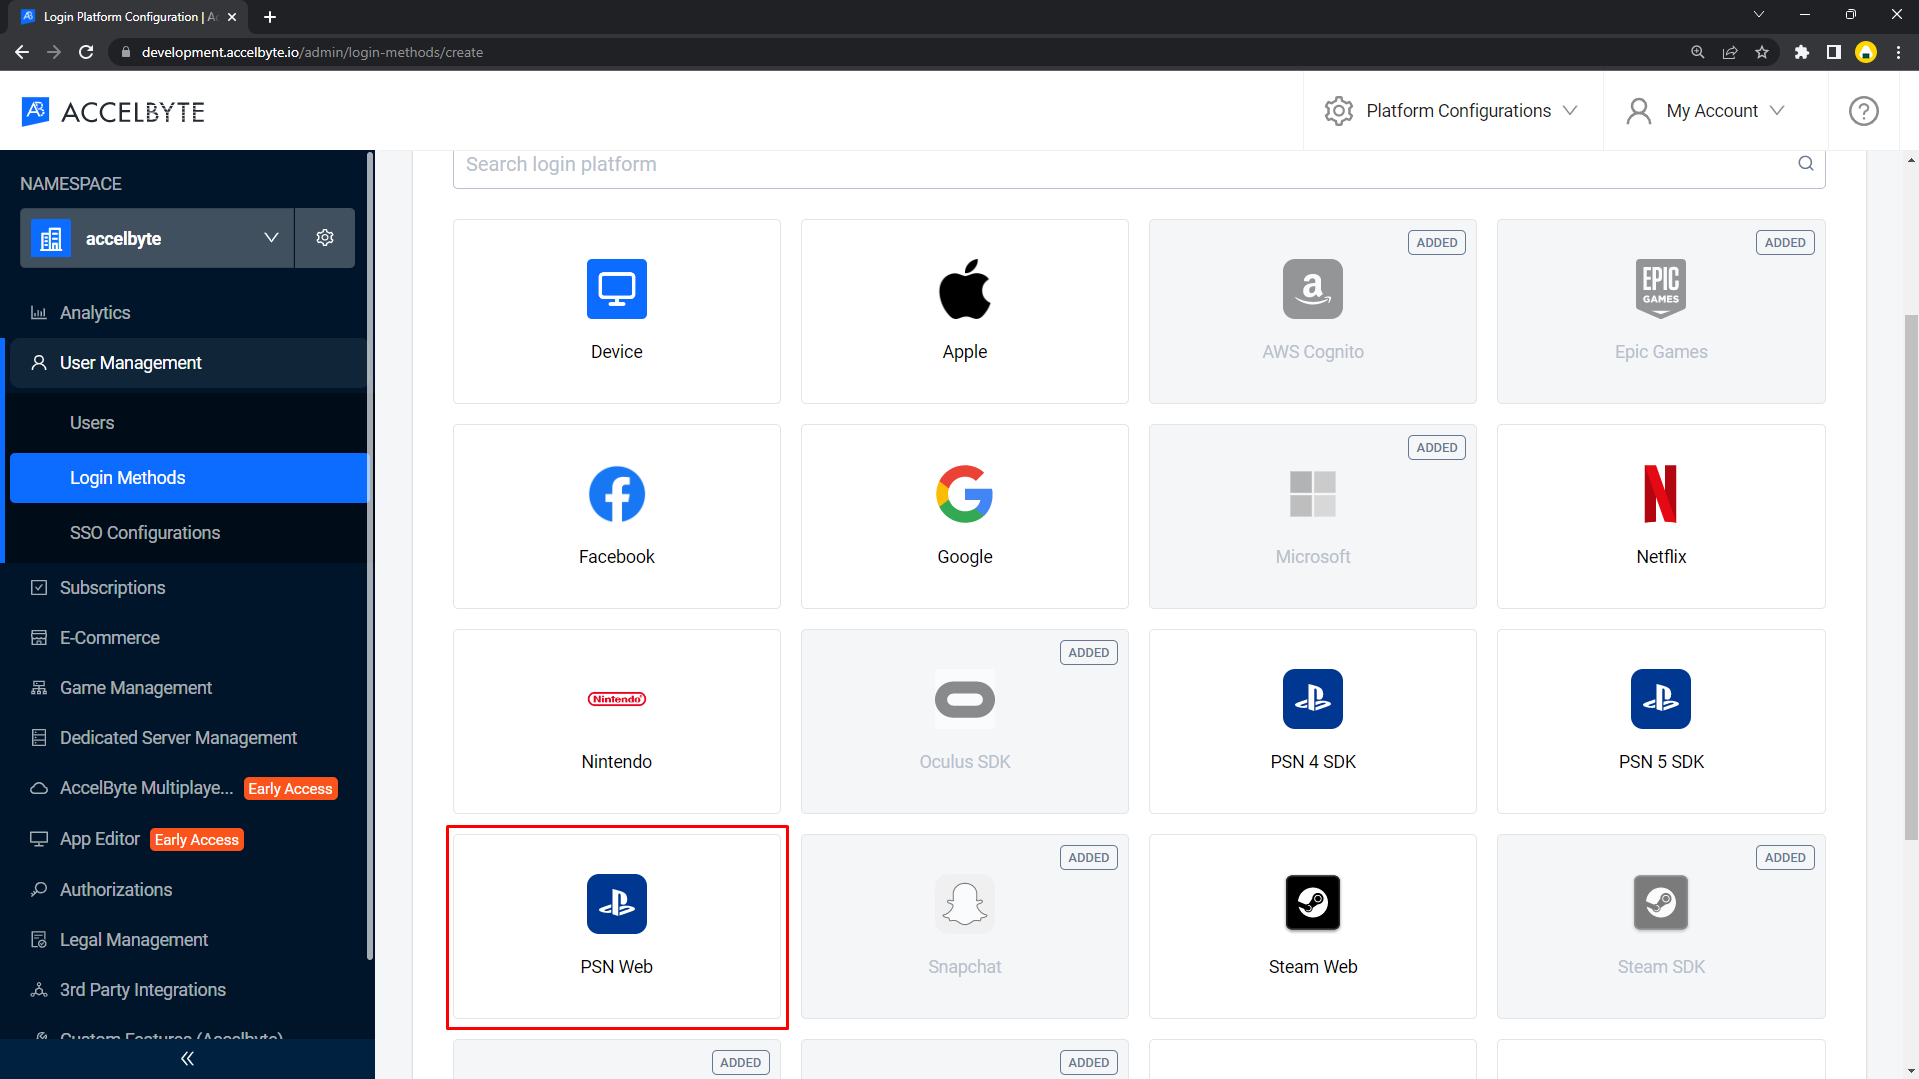
Click PSN Web.
Fill out the popup menu with the credentials you created on the PSN Partner Center.
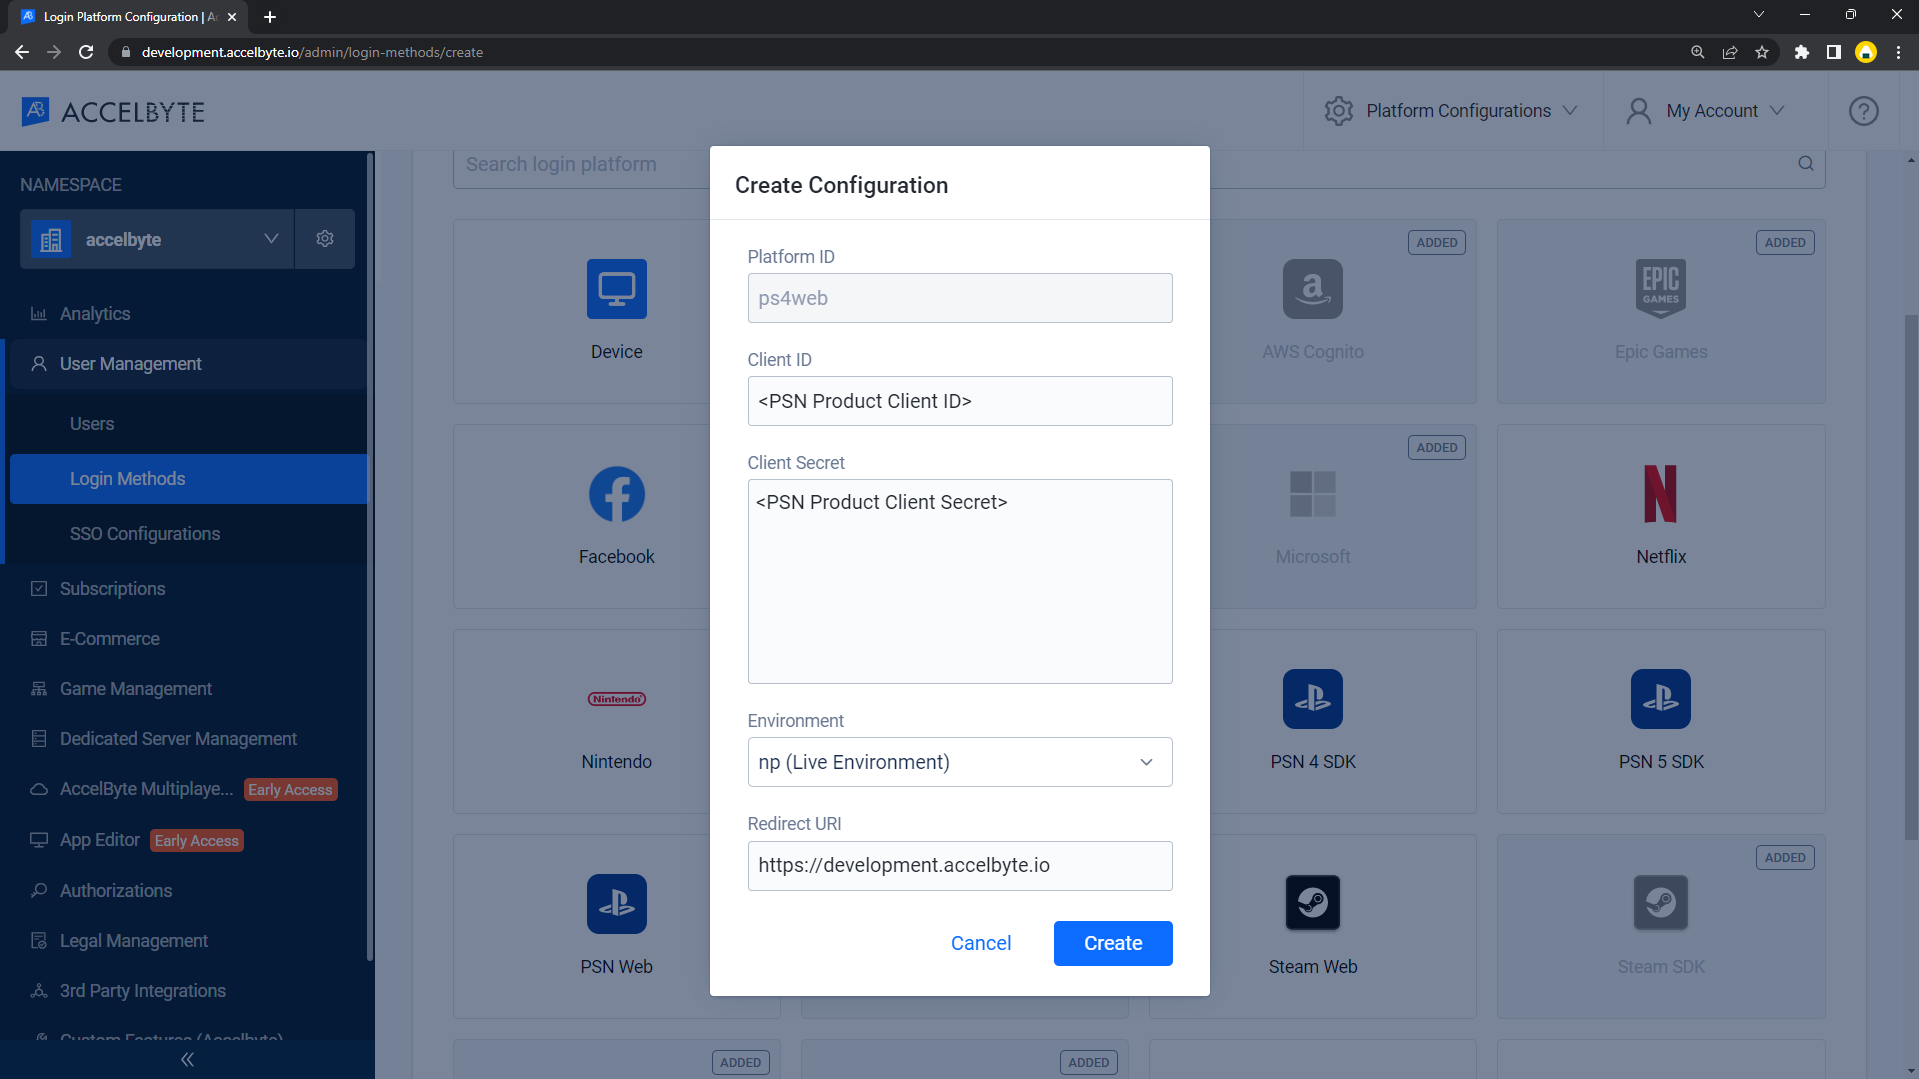
For PSN 4 credentials:
- Client ID is your PS4 DevNet App Server/Website product Client ID.
- Client Secret is your PS4 DevNet App Server/Website product Client Secret.
For PSN 5 credentials:
- Client ID is your PS5 DevNet App Server product Client ID.
- Client Secret is your PS5 DevNet App Server product Client Secret.
Environment is the current environment of your PSN product. There are three types of environments: sp-int (development), prod-qa (QA) and np (live environment). To activate the PSN web login, you need to choose np (live environment) because the PSN App Server/Website product is directly going to live/production once you create it on PSN DevNet. The two other environments (sp-int and prod-qa) are primarily used for the testing/QA process on DevKit/Testing Console. For further details about the PSN environment, please refer to this link https://learn.playstation.net/bundle/playstation-partners-getting-started/page/PSP_EnvironmentsOverview.html.
Fill Redirect URI in with your
<BaseURL>(BaseURL is your domain address, e.g: https://development.accelbyte.io) that is registered on your PS4/PS5 DevNet App Server/Website product configuration.
The system redirects you to the Details page. Click Activate next to Integration, and click Activate again on the popup that appears to confirm.

Player Portal login using a PSN account
After setting up on PSN Developer Partner and AGS Admin Portal (using either PSN 4 or PSN 5 login integration), you can directly test user logins to AGS Player Portal.
Go to your Player Portal and click Login.
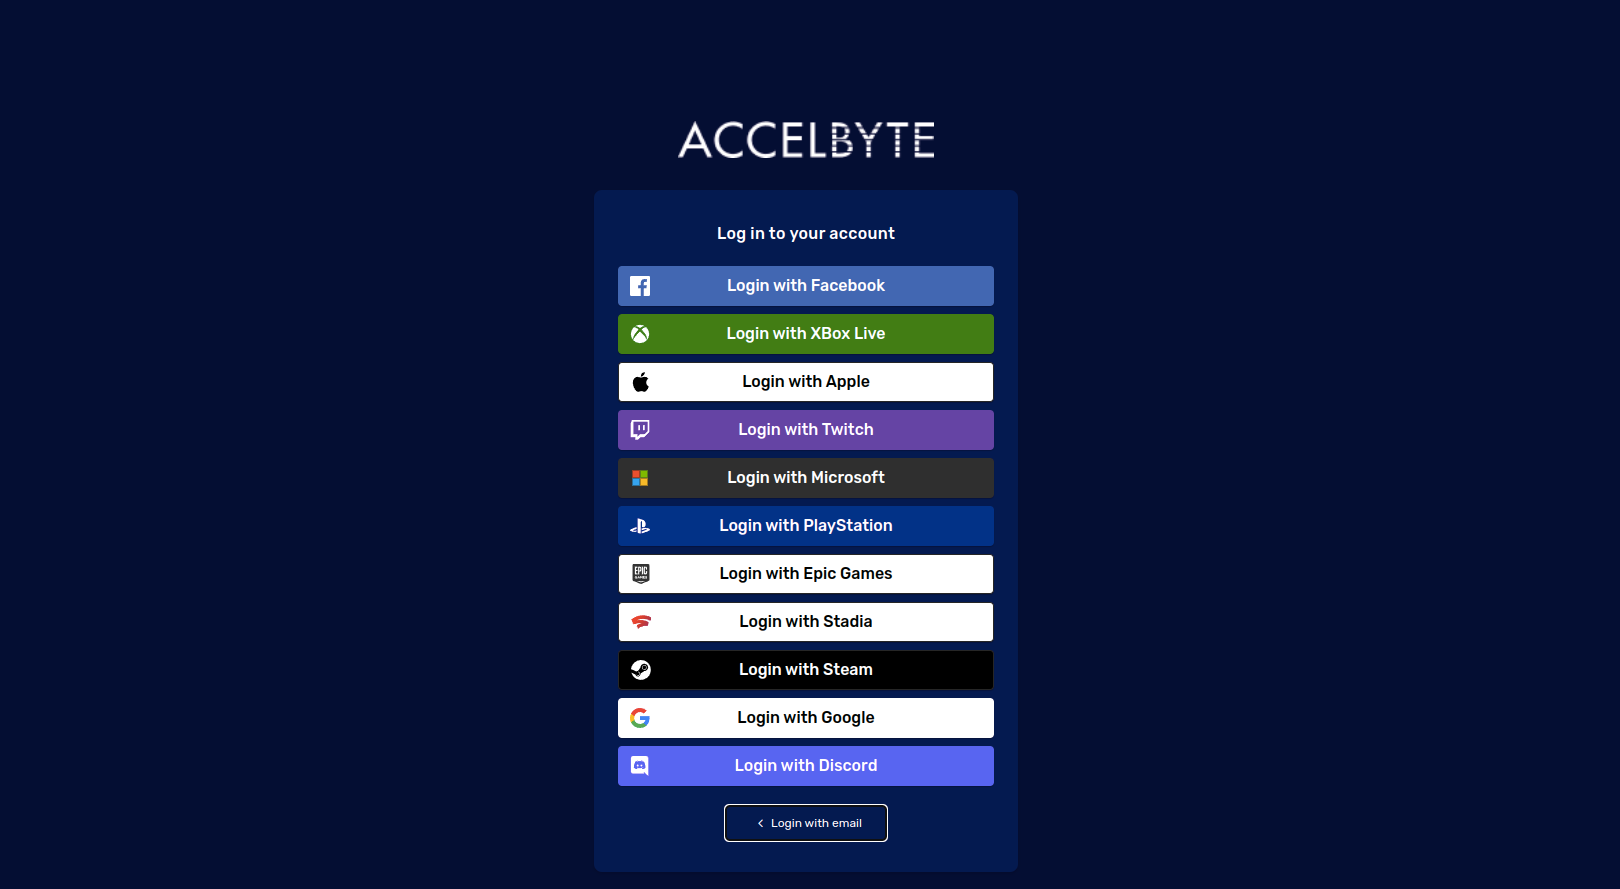
Click the PlayStation Logo. If you can’t find the icon, click More login options, then Login with PlayStation.
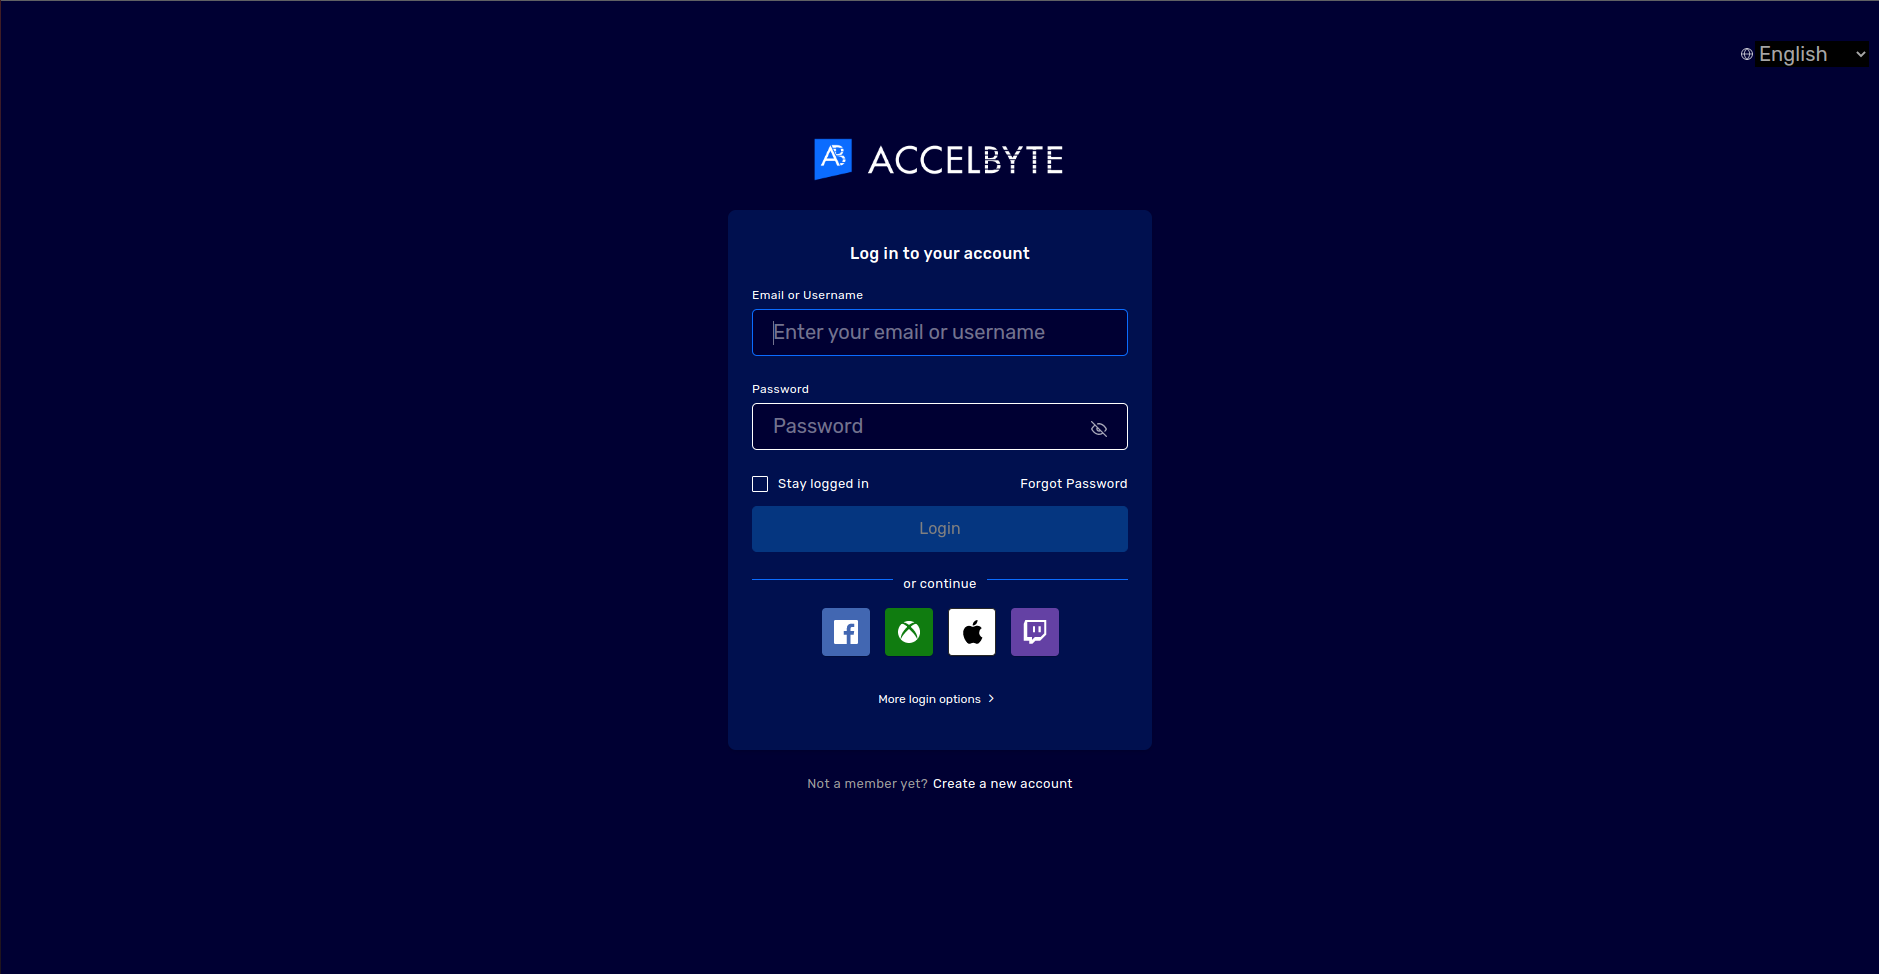
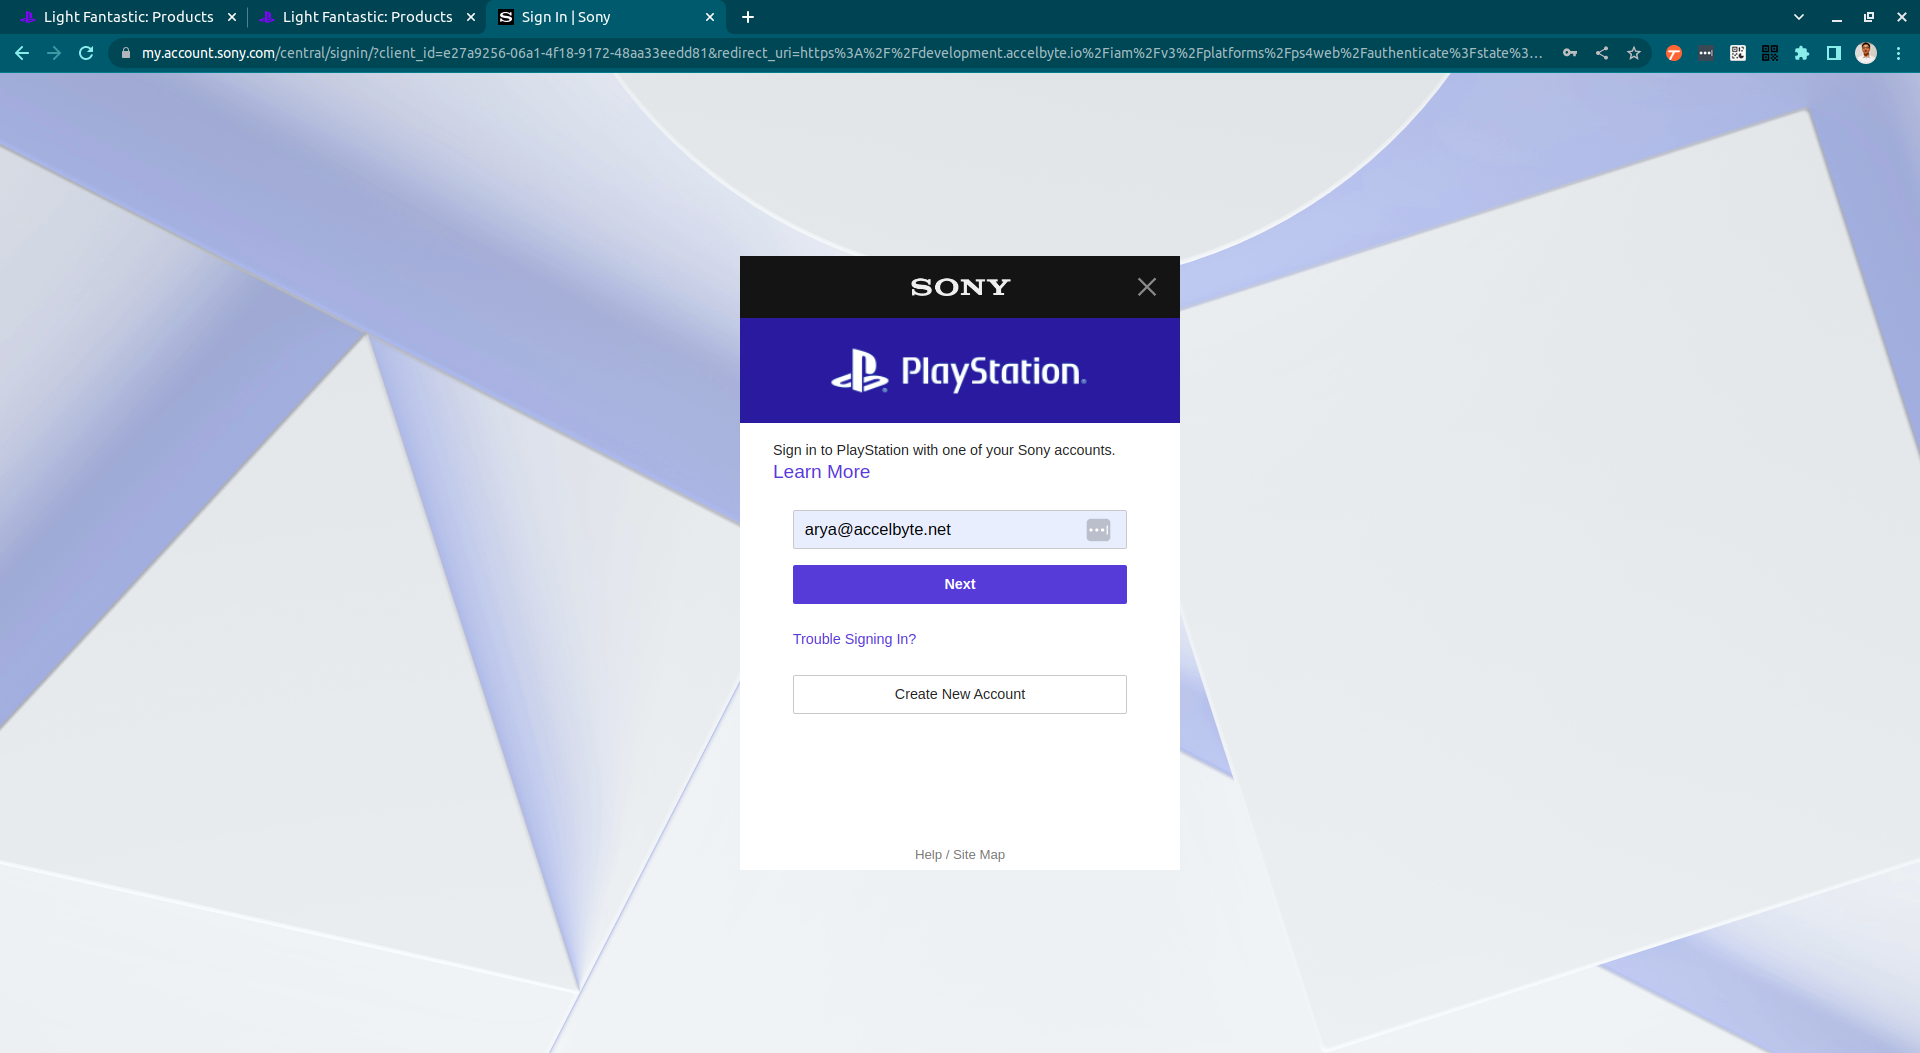
Log in with your PSN account credentials.
The system asks players to link their PSN account with an existing or new AGS account. AccelByte is working on making this configurable to enable players to log in to the Player Portal with a headless account.
In-game login (PS4)
Use the following steps to set up PSN 4 logins for your game. This will allow your players to sign in to your game using their PSN accounts from the game.
Log in to the AGS Admin Portal and select your publisher namespace in the top of the left sidebar. Click Login Methods under the User Management menu on the left-hand side. Click the + Add New button on the right-hand side.
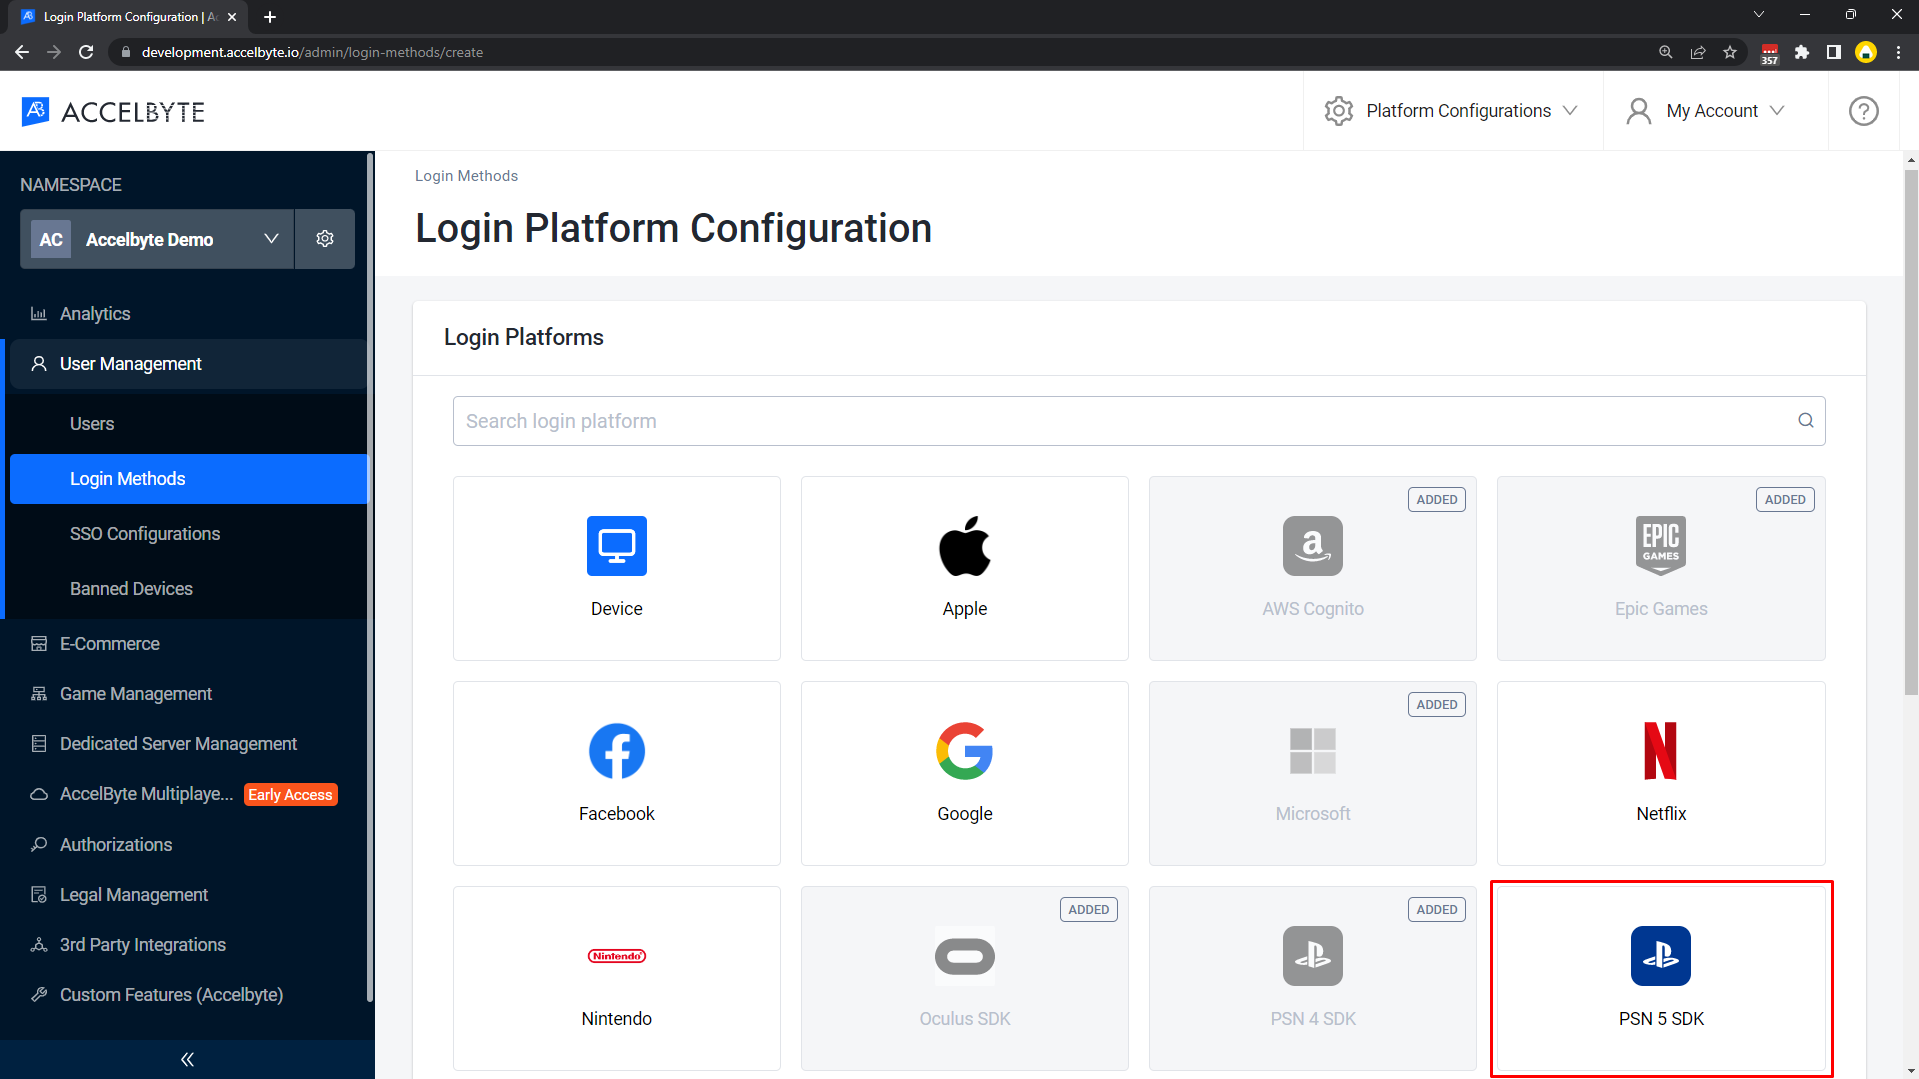
Click PSN 4 SDK.
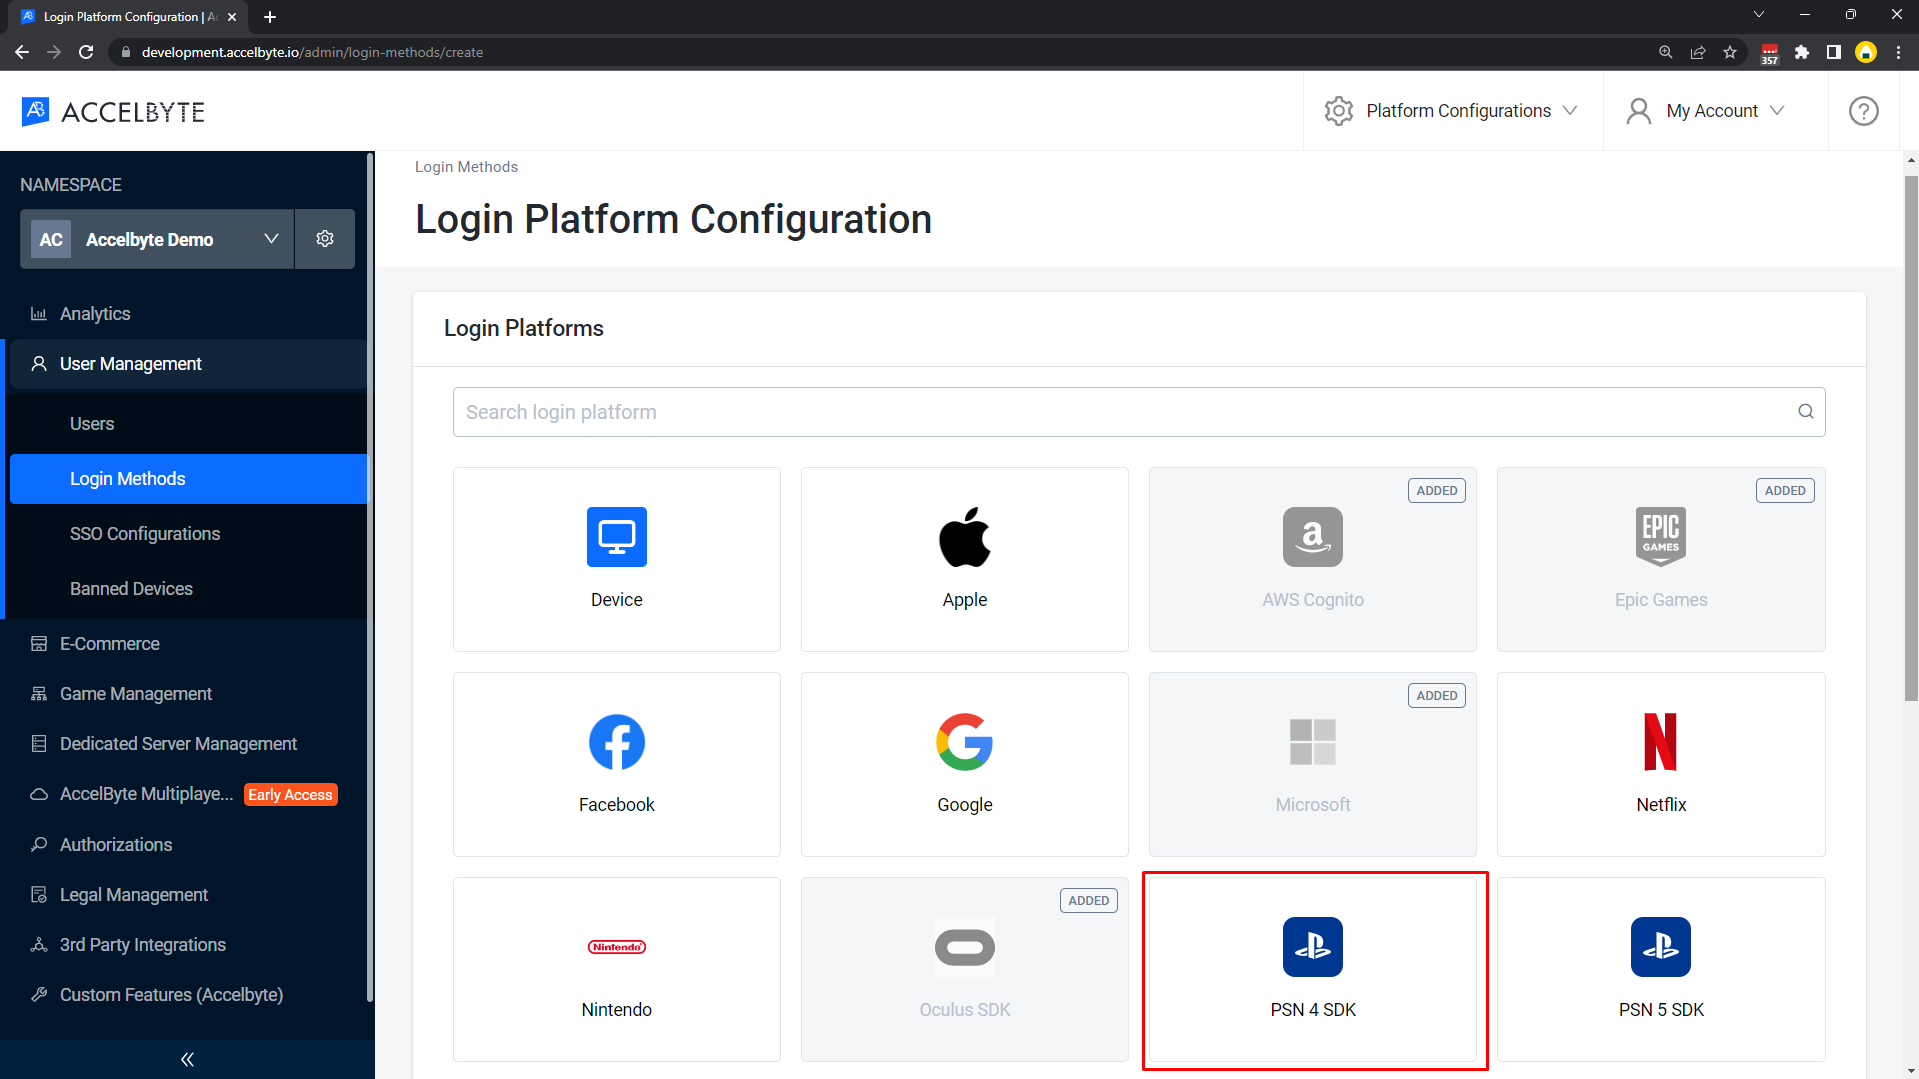
Fill out the following popup form with your PSN App Server/Website product credentials. If you forget the credentials, please download them again by navigating to the App Server/Website product in the Credential files section.
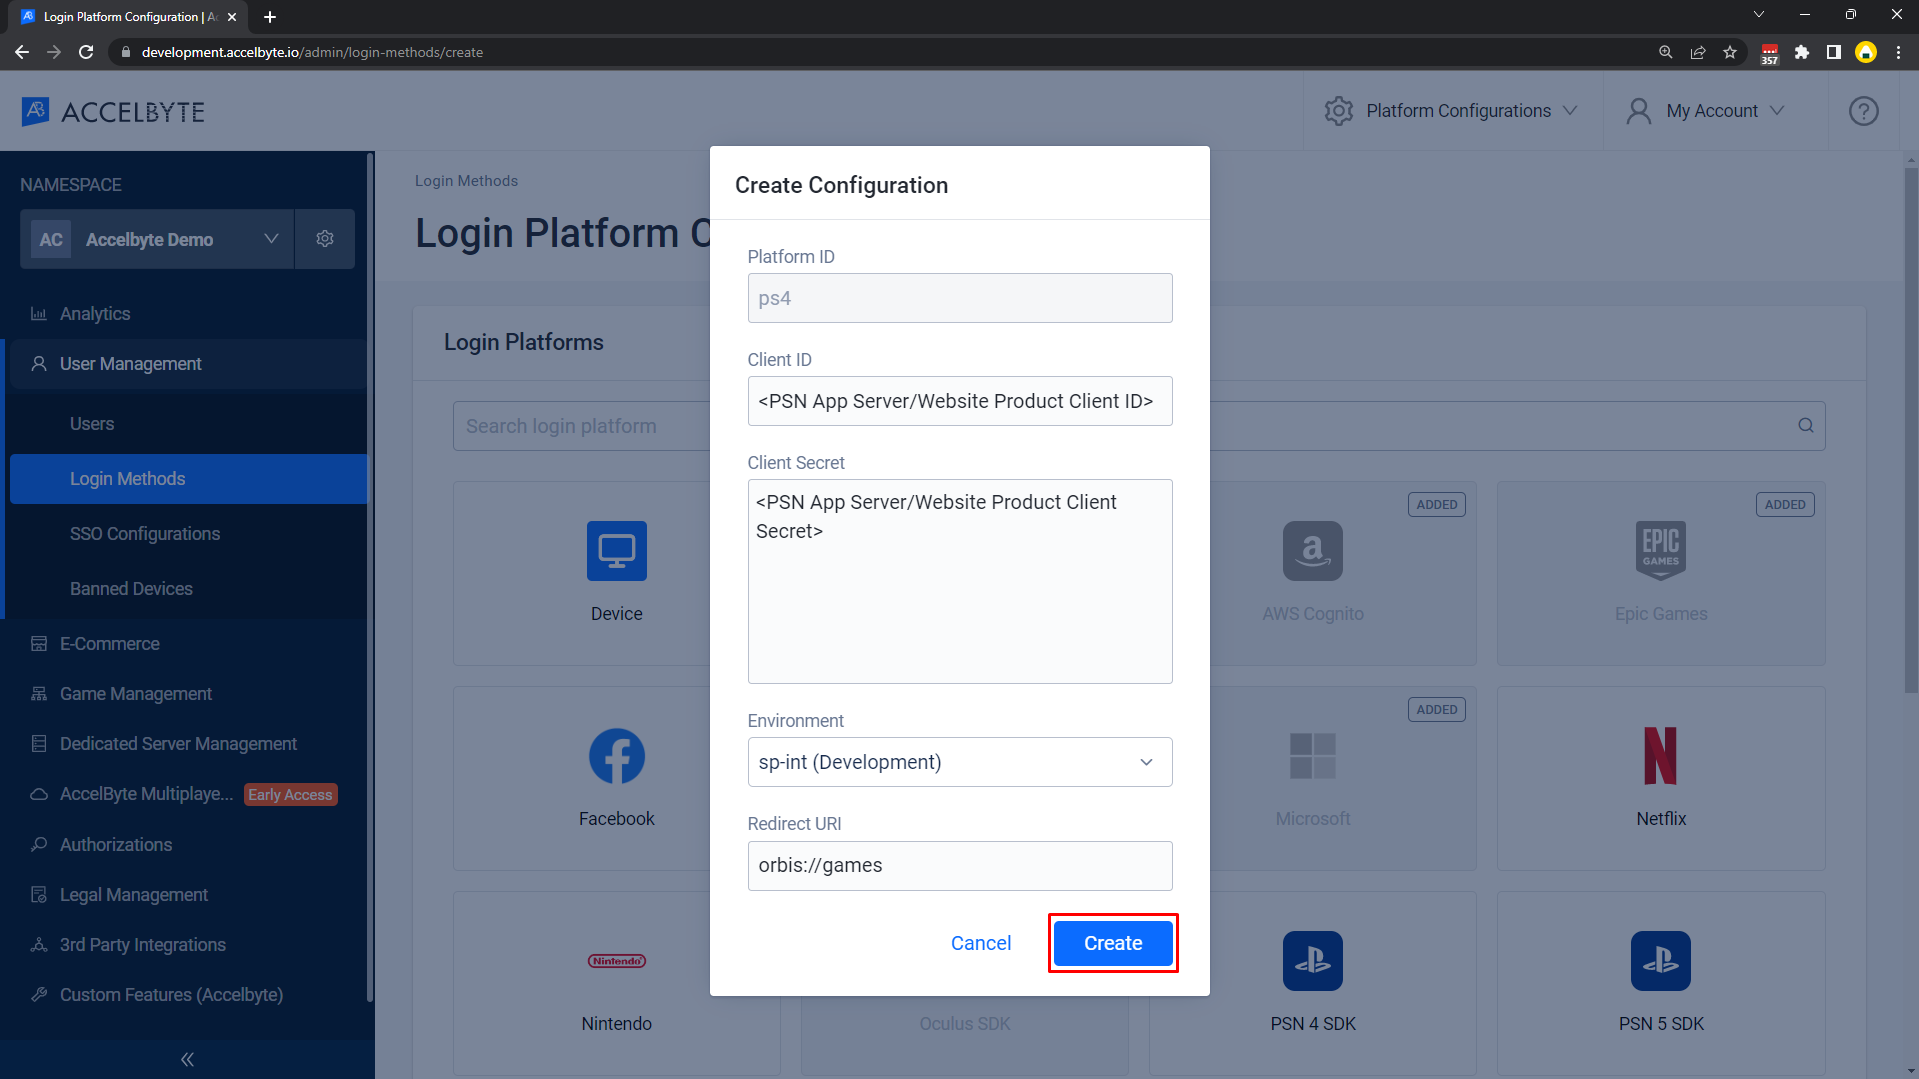
- Client ID is your PS4 DevNet App Server/Website product Client ID.
- Client Secret is your PS4 DevNet App Server/Website product Client Secret.
- Environment is the current status of your game in the Concept and Content Pipeline. There are three types of environments: sp-int (development), prod-qa (QA), and np (live environment). To activate PSN 4 in-game login, you need to choose the correct environment of your game status. You can check your game status under the Concepts Section.
- If the status is "In Development", please use "sp-int (development)".
- When your game is "In Development" status, it may build on DevKit console directly, and you need to create a request for IAM service static IPs and your network static IPs used by PSN DevKit (e.g your office network/VPN) to get whitelisted by PSN to be able to test in-game login against the sp-int (development) environment. To create the request, you can refer to this section "Request IP whitelisting to PlayStation".
- Also, you need to add Test Users to your App product.
- If the status is "Published", please use "np (live environment)".
- Only use "prod-qa (QA)" once your game is in the certification phase. For further details about the PSN environment, please refer to Environments Overview.
- If the status is "In Development", please use "sp-int (development)".
- Fill Redirect URI with
orbis://gamessince it's the default Redirect URI used for PS4 DevNet App Server/Website products to enable in-game login.
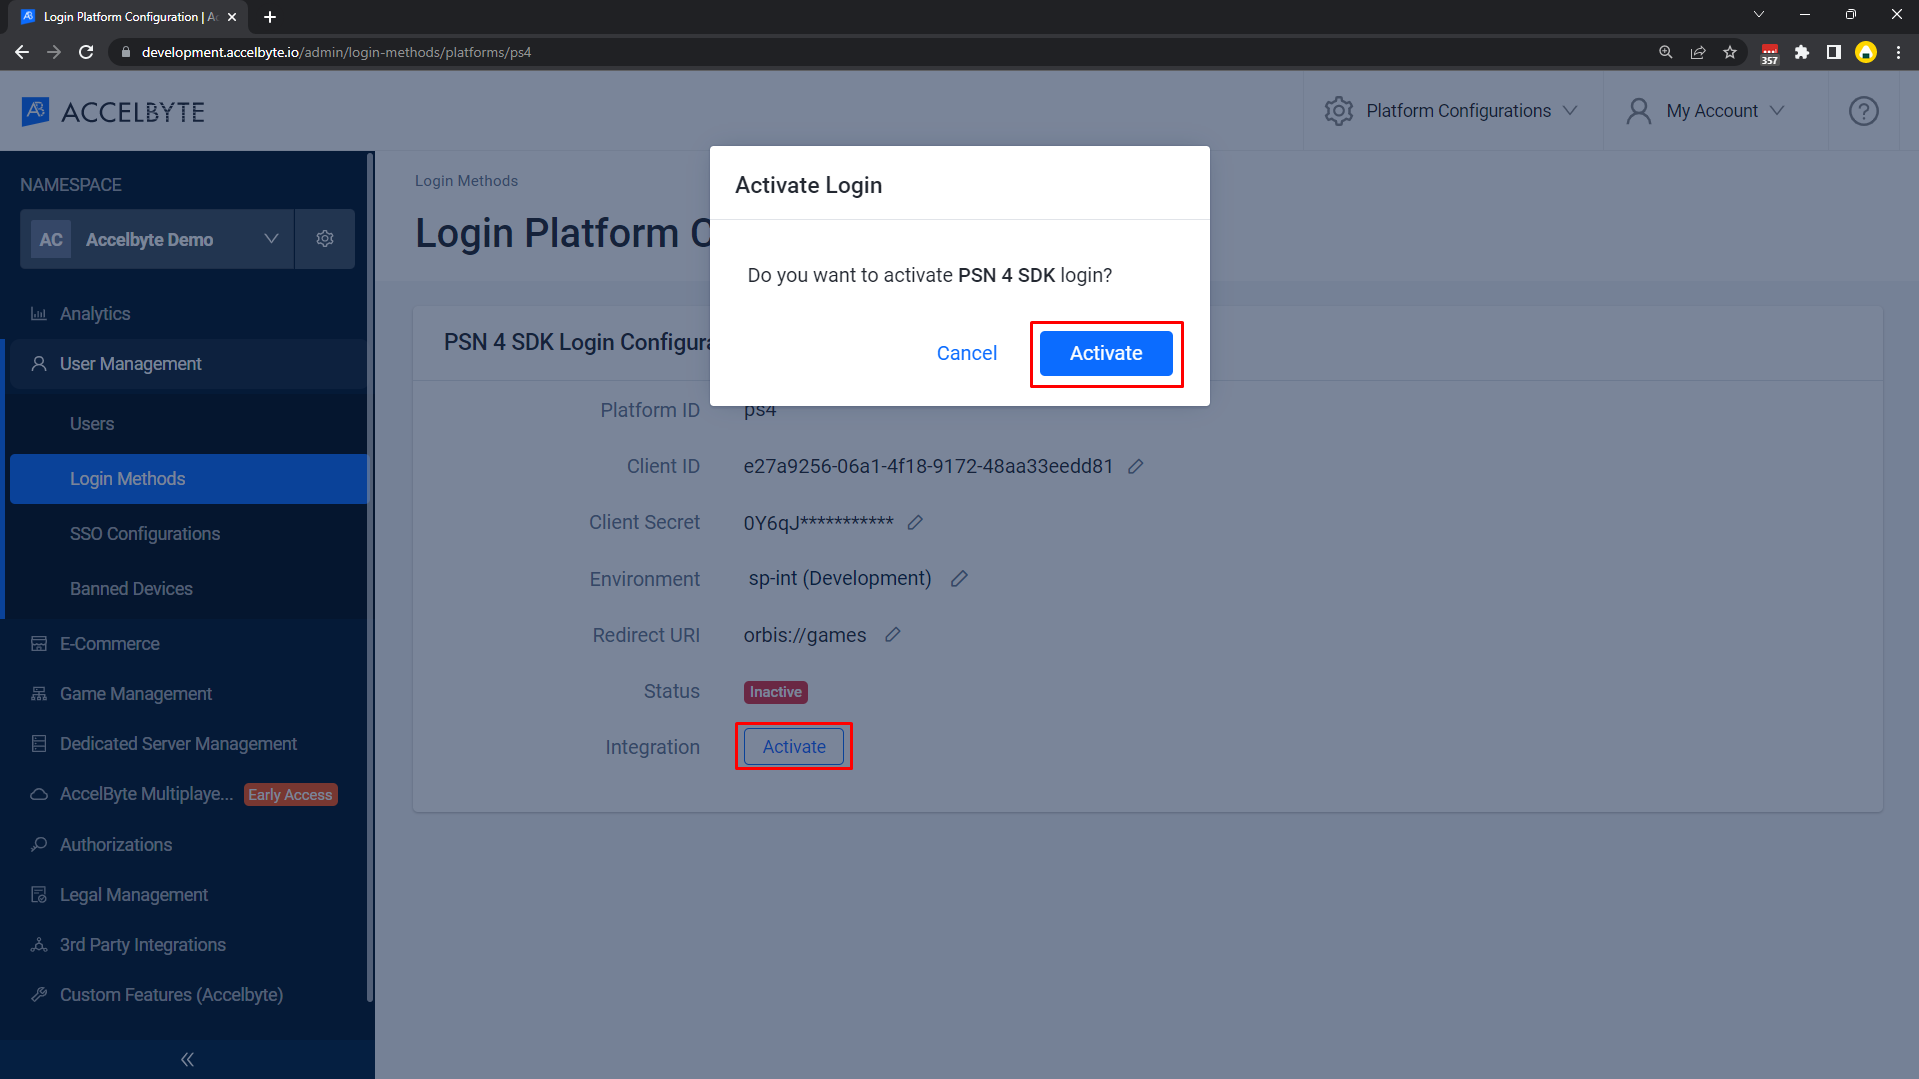
The system redirects you to the Details page. Click Activate next to Integration, and click Activate again on the popup that appears to confirm.
In-game login (PS5)
Use the following steps to set up PSN 5 logins for your game. This will allow your players to sign in to your game using their PSN accounts from the game.
Log into the AGS Admin Portal and select your publisher namespace in the top of the left sidebar. Click Login Methods under the User Management menu on the left-hand side. Click the + Add New button on the right-hand side.
Select PSN 5 SDK.
Fill out the following popup form with your PSN App Server product credentials. If you forget the credentials, please download them again by navigating to the App Server product in the "Credential files" section.
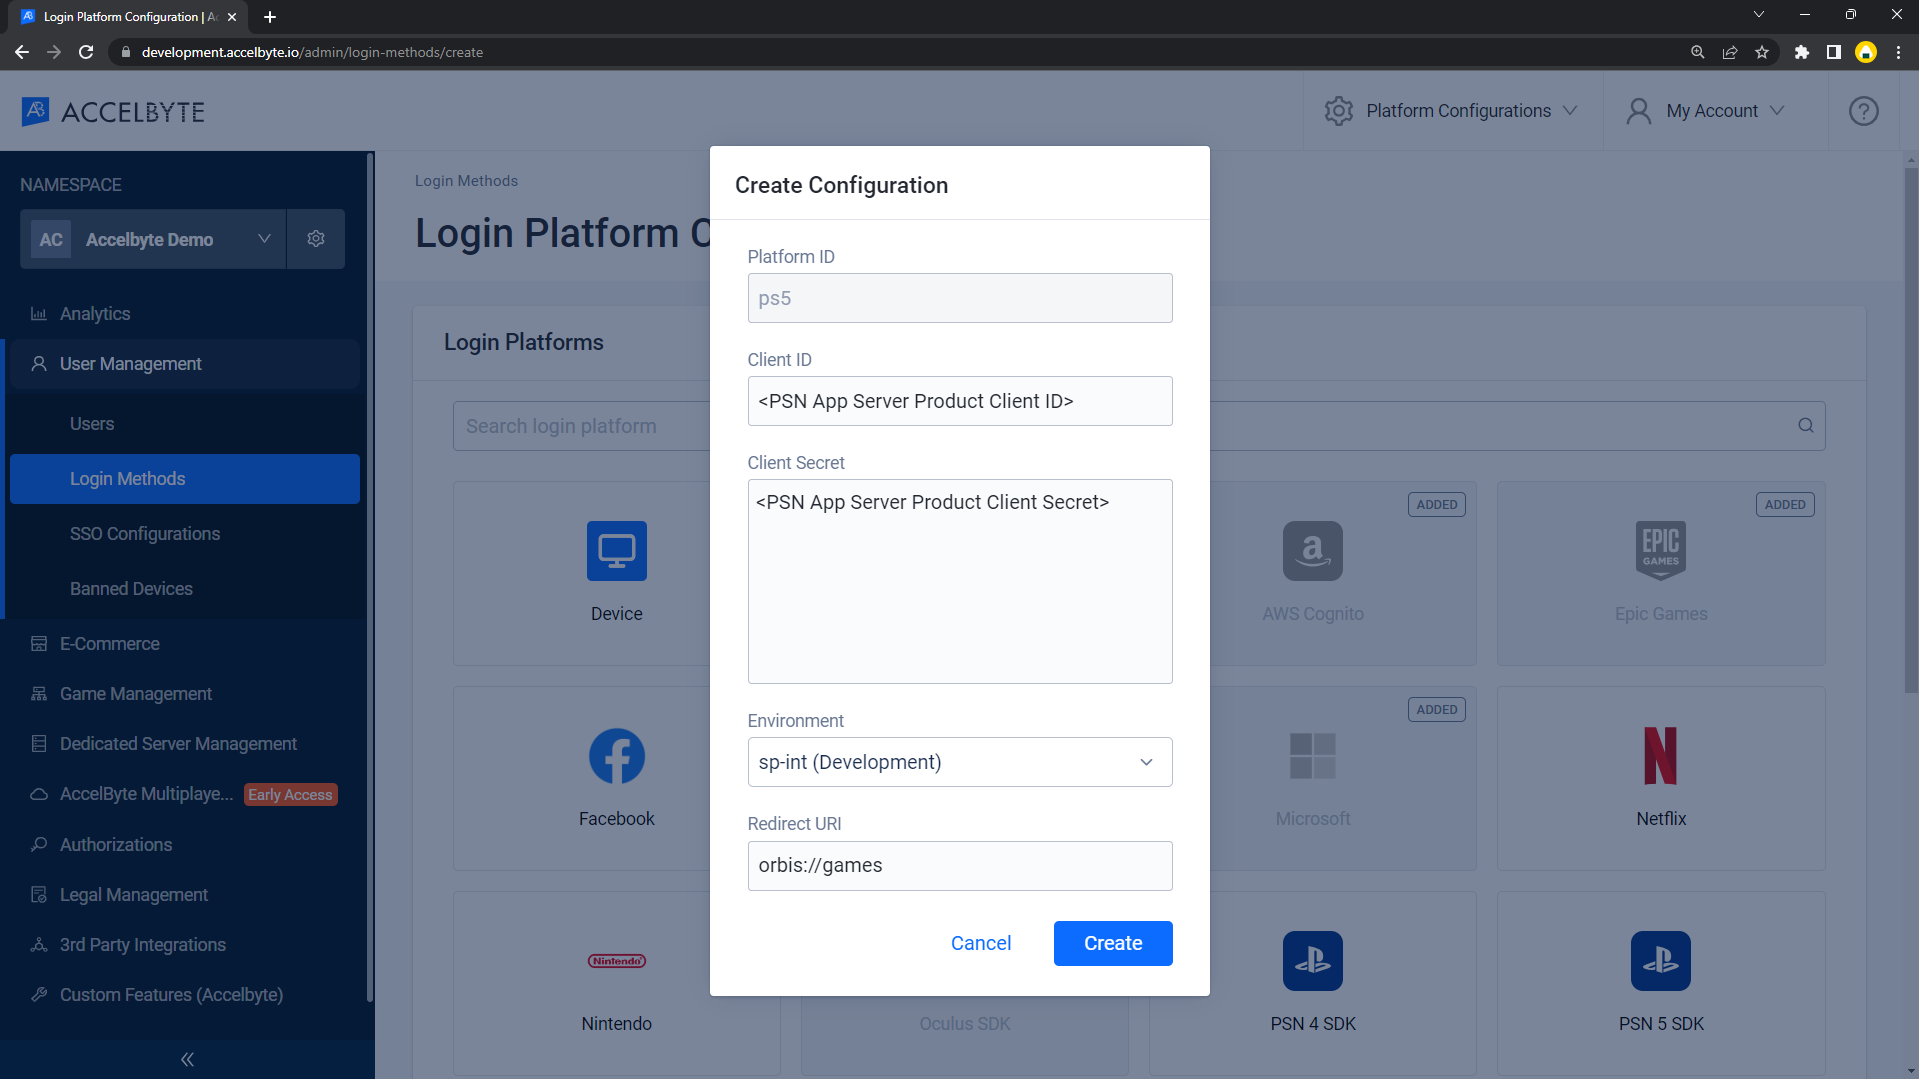
- Client ID is your PS5 DevNet App Server product Client ID.
- Client Secret is your PS5 DevNet App Server product Client Secret.
- Environment is the current status of your game in the Concept and Content Pipeline. There are three types of environments: sp-int (development), prod-qa (QA), and np (live environment). To activate PSN in-game login, you need to choose the correct environment of your game status. You can check your game status under the Concepts Section.
- If the status is "In Development" please use "sp-int (development)".
- When your game is "In Development" status, it may build on DevKit console directly, and you need to create a request for IAM service static IPs and your network static IPs used by PSN DevKit (e.g your office network/VPN) to get whitelisted by PSN to be able to test in-game login against the sp-int (development) environment. To create the request, you can refer to this section "Request IP whitelisting to PlayStation".
- If the status is "Published", please use "np (live environment)".
- Only use "prod-qa (QA)" once your game is in the certification phase. For further details about the PSN environment, please refer to Environments Overview.
- If the status is "In Development" please use "sp-int (development)".
- Fill Redirect URI with
orbis://gamessince it's the default Redirect URI used for PS5 DevNet App Server products to enable in-game login.
The system redirects you to the Details page. Click Activate next to Integration, and click Activate again on the popup that appears to confirm.

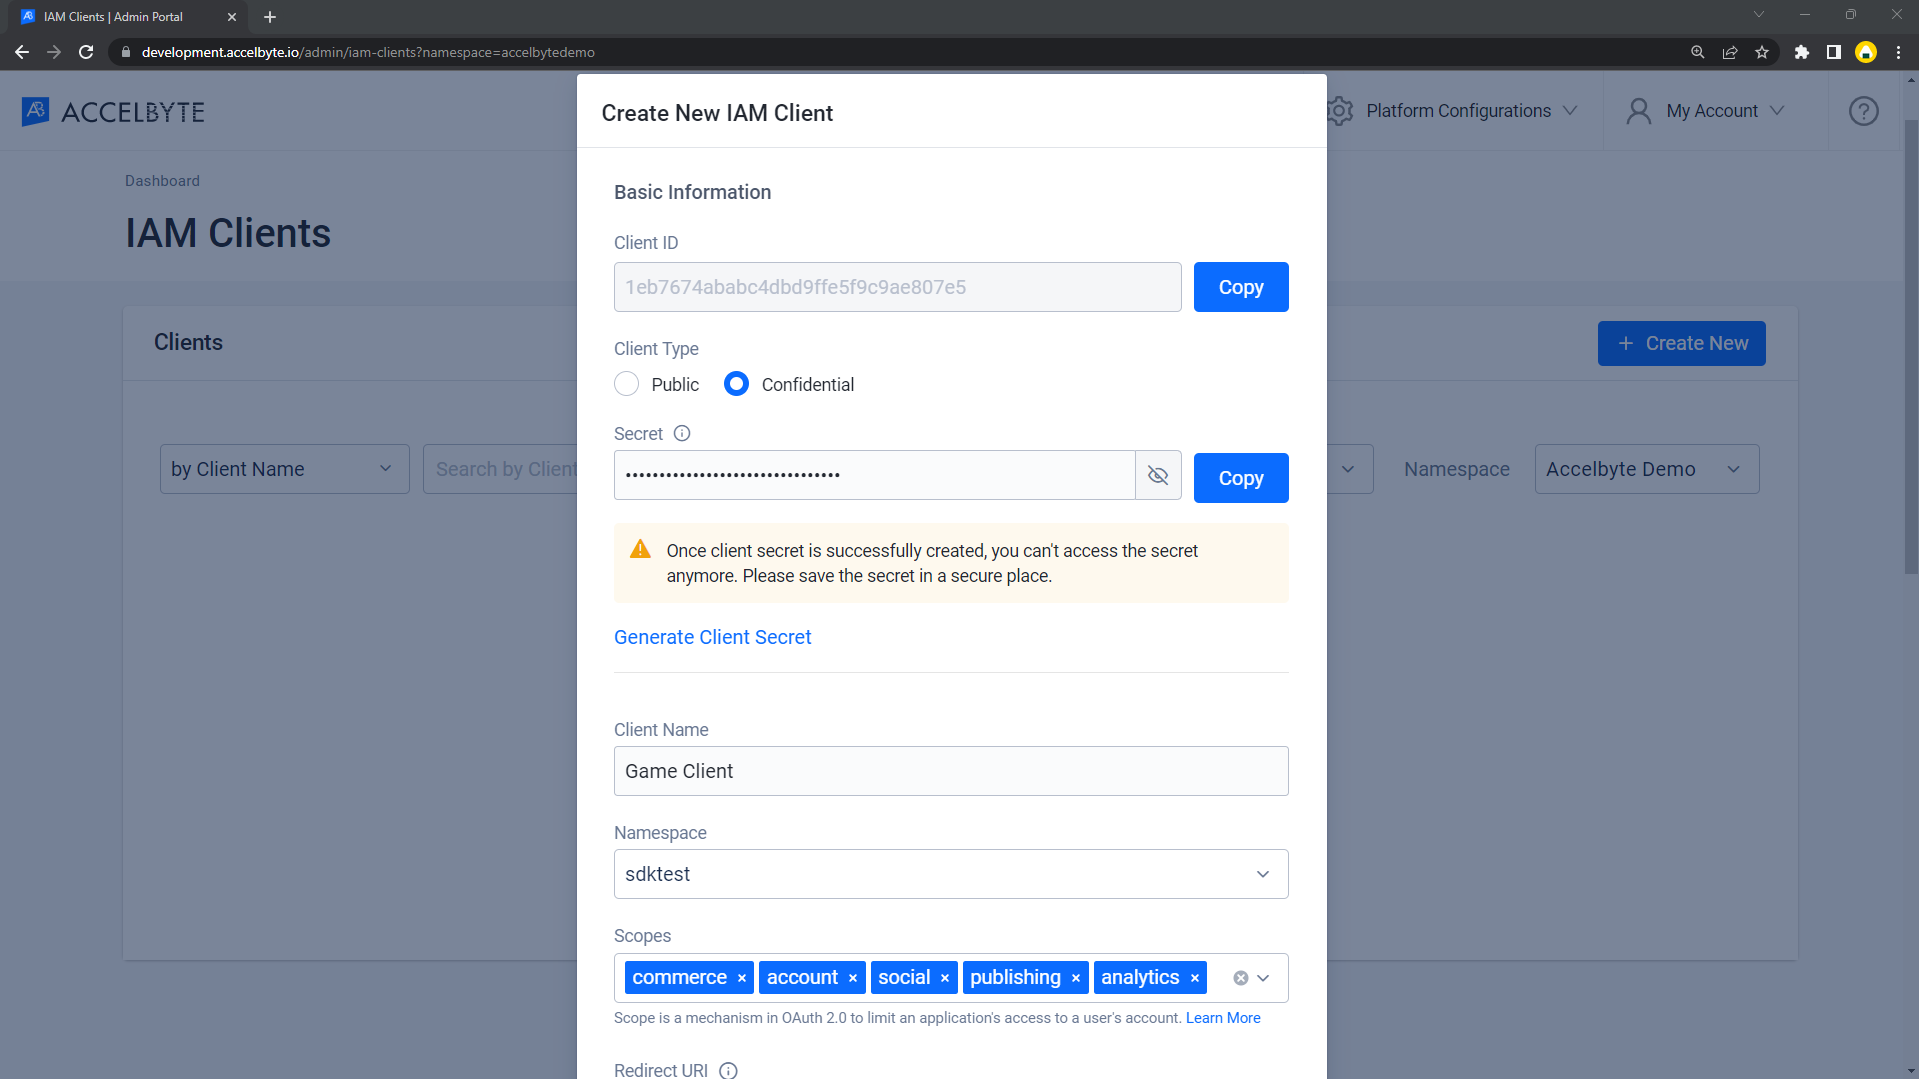
Create an IAM client
An IAM client is a representation of the game client that you want to release on your target platform. With an IAM Client, your game client can request access to protected AGS resources with the appropriate permissions.
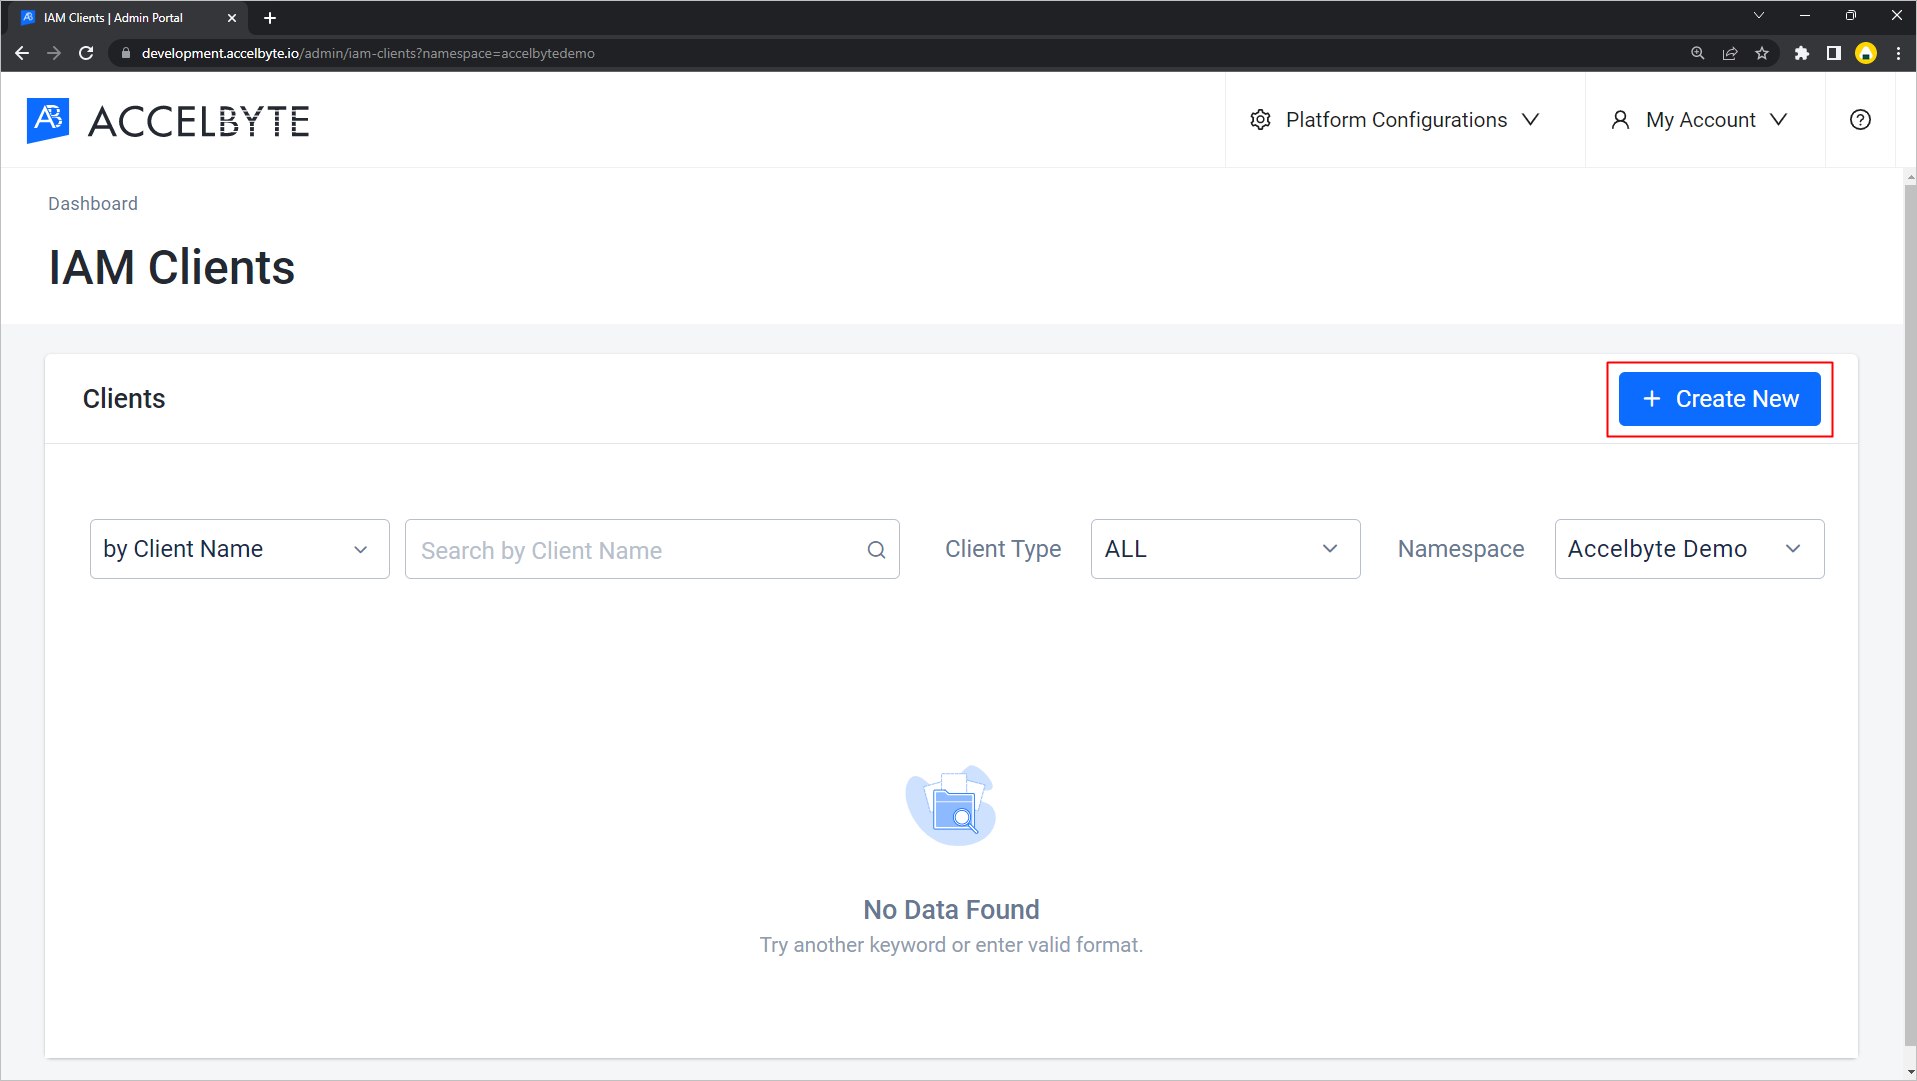
In the AGS Admin Portal, go to Platform Configurations and then IAM Clients.
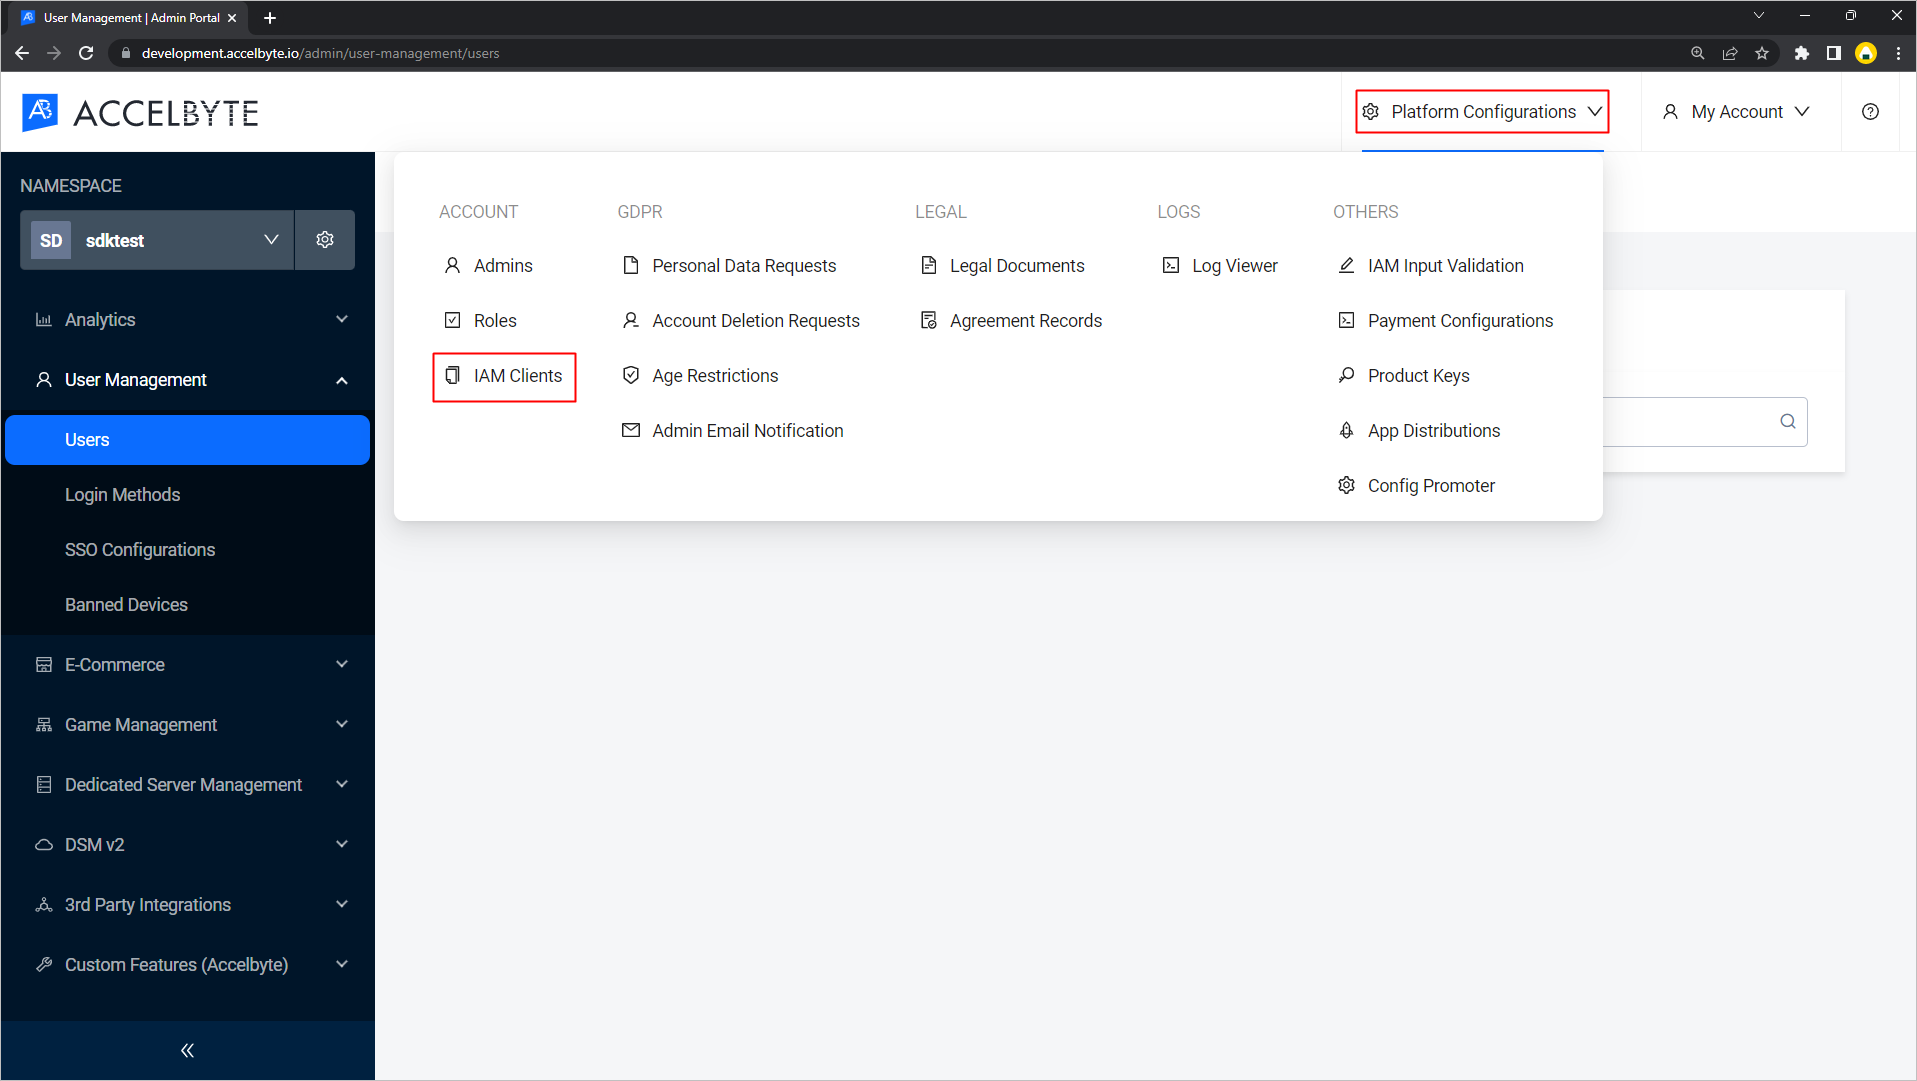
Create a new IAM client by clicking the + Create New button.
a. Enter the Client Type. :::note We recommend you use the Confidential type since you might need to add some permissions to this IAM client later for accessing AGS resources. Adequate security is not available if you use the Public client type. ::: b. In the Secret field, type the secret yourself or click Generate Client Secret to generate a secret key.
危険The client secret isn't visible after this creation step. It is vital that you copy and save the value, as you'll need it when you set up your game configuration.
c. Fill in the Client Name with something like
<game name> <target platform>.d. Choose your game Namespace.
e. For Scopes, you can leave the default value.
f. For Redirect URI, enter
http://127.0.0.1as it's for the Game Client Build.g. You can leave Target Audience blank.
h. You can also leave Base URI blank.
i. You can describe the IAM Client in the Description field.
j. Platform Input in the SDK Configuration means the Target Platform for your game. In this case, set it to PlayStation.
k. Advanced Configuration consists of additional features, such as two-factor authentication (2FA) and override expiration time. Since this is for a Game Client build, you can leave these as default/disabled.
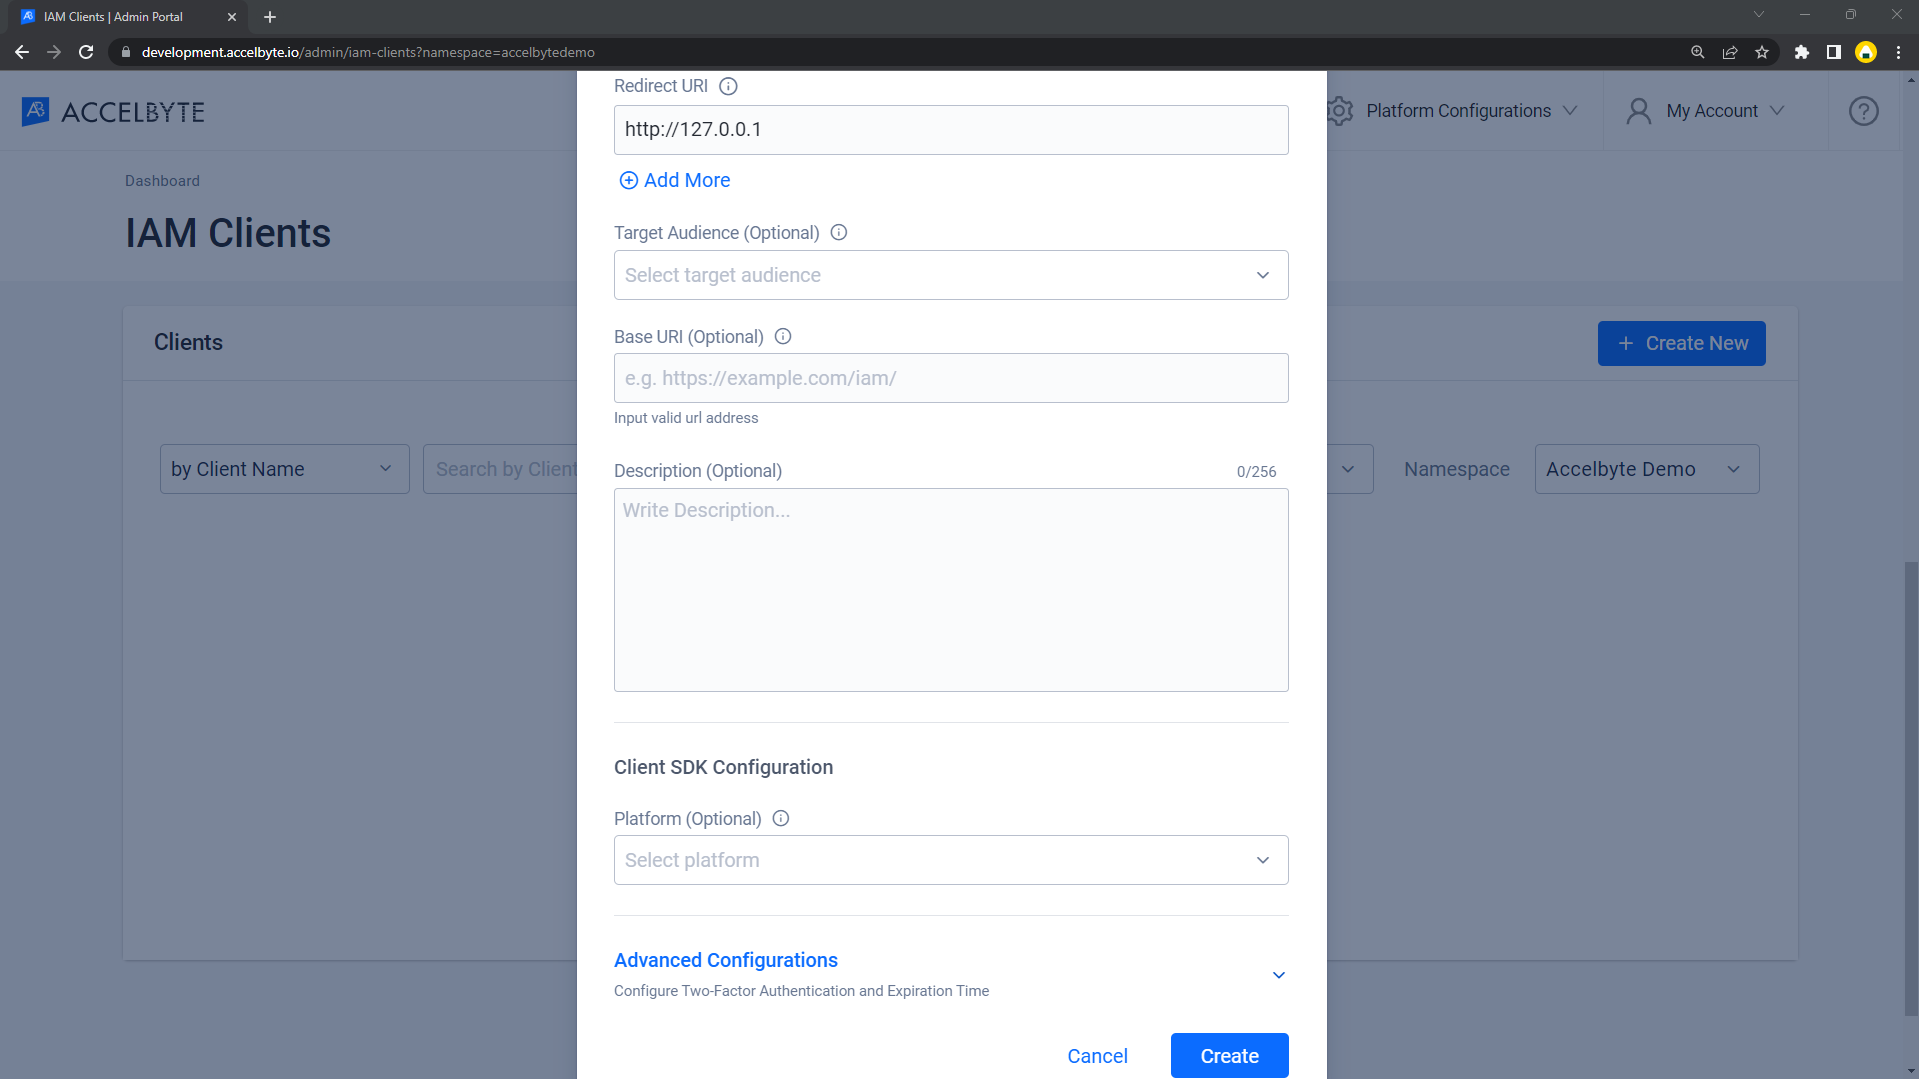 注記
注記The system automatically generates the client ID, so you can copy and use it in your SDK Configuration for your game build later on.
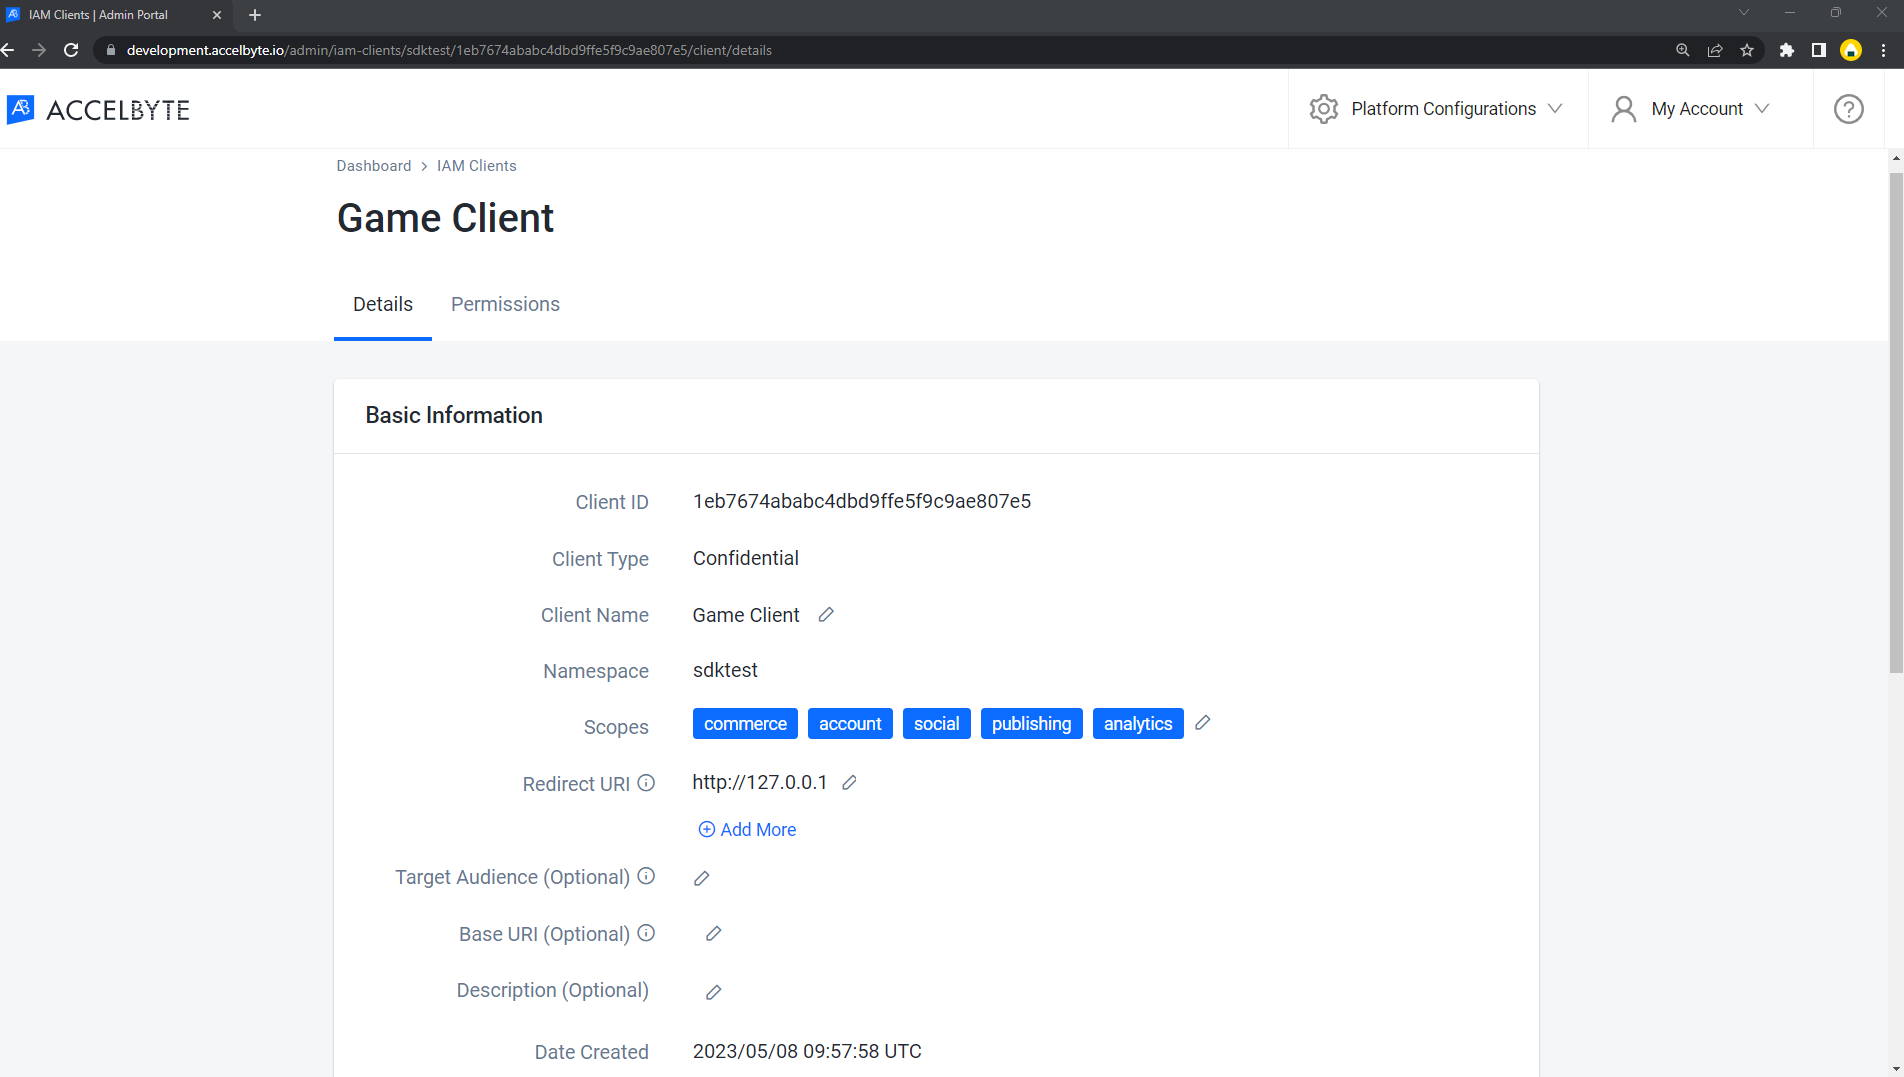
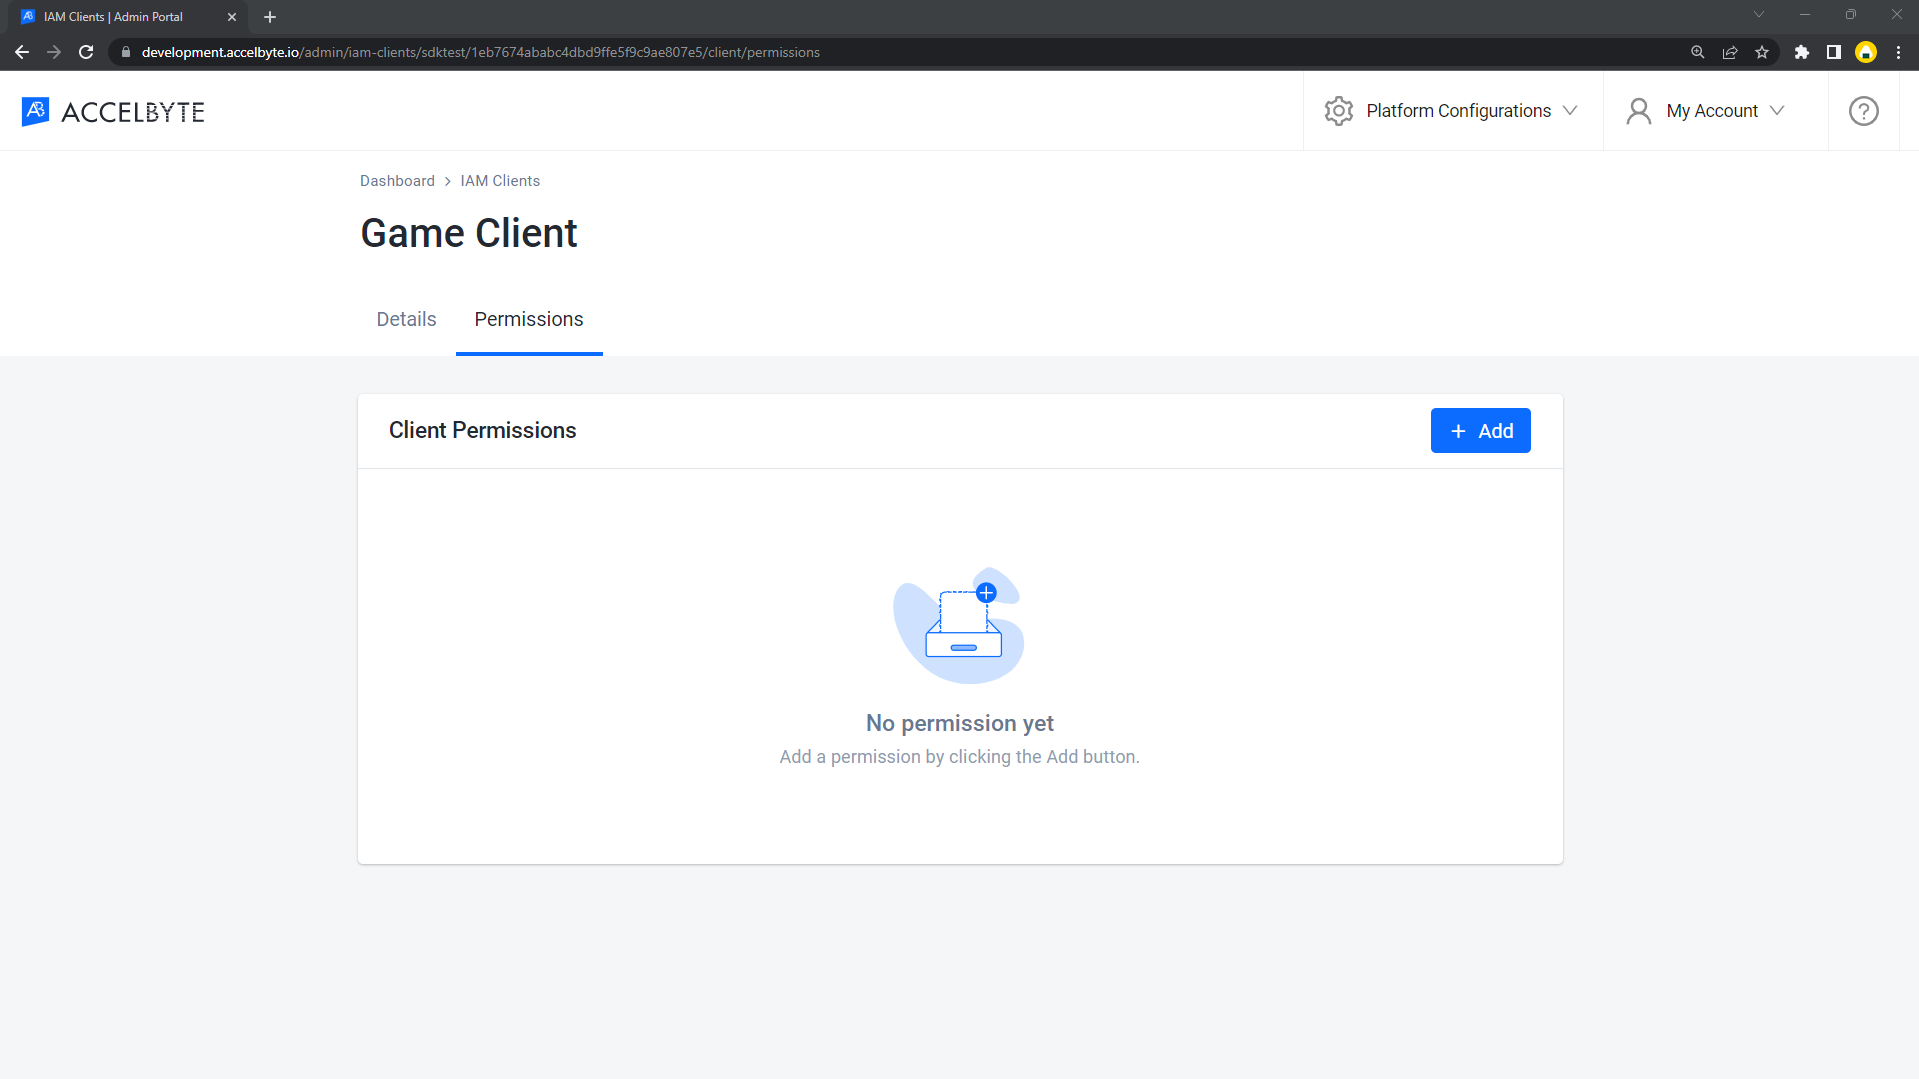
The system redirects you to the Client Details page. Set up the permissions you need. For more details about permissions, refer to the IAM Client permission docs.
In-game login instructions
The setup for each game engine is different. Choose your game engine from the available tabs.
- Unreal Engine Instructions
- Unity Instructions
In-game login integration (Unreal)
PS4 (Unreal)
Preparing Unreal Engine source code (PS4)
Some processes will be missing due to the Epic Games Private Platform Restrictions. If you need assistance, please contact AccelByte support.
Adding dependencies (Unreal PS4)
First, you need to add the public dependency modules called OnlineSubsystem and OnlineSubsystemPS4 to the <YourProject>.Build.cs file. These dependencies are needed to integrate your project to use the online subsystems from Unreal Engine.
public AccelbyteSdkTestDemo(ReadOnlyTargetRules Target) : base(Target)
{
  PCHUsage = PCHUsageMode.UseExplicitOrSharedPCHs;

  PublicDependencyModuleNames.AddRange(new string[] { "Core",    "CoreUObject", "Engine", "InputCore", "OnlineSubsystem", "OnlineSubsystemUtils","Sockets", "Networking", "InputCore", "AccelByteUe4Sdk", "Json", "JsonUtilities", "Http", "WebSockets"});

if (Target.Platform.Equals(UnrealTargetPlatform.PS4))
{
    DynamicallyLoadedModuleNames.AddRange(new string[] { "OnlineSubsystemPS4" } );
}

PrivateDependencyModuleNames.Add("OnlineSubsystem");
Add OnlineSubsystemPS4 inside <YourProject>.Target.cs:
public AccelbyteSdkTestDemoTarget( TargetInfo Target) : base(Target)
{
 Type = TargetType.Game;
  DefaultBuildSettings = BuildSettingsVersion.V2;
  ExtraModuleNames.AddRange( new string[] { "ABThirdPartyLogin", "OnlineSubsystem", "AccelByteUe4Sdk", "OnlineSubsystemPS4" } );
}
And add this to <YourProjectEditor>.Target.cs:
public AccelbyteSdkTestDemoEditorTarget( TargetInfo Target) : base(Target)
{
 Type = TargetType.Editor;
  DefaultBuildSettings = BuildSettingsVersion.V2;
  ExtraModuleNames.AddRange( new string[] { "ABThirdPartyLogin", "OnlineSubsystem", "AccelByteUe4Sdk", "OnlineSubsystemPS4" } );
}
Project settings for PS4 (Unreal)
Create a file called PS4Engine.ini in the [ProjectPath]/Platforms/PS4/Config directory. Inside this file, you need to add several variables of PS4 configuration. You need this configuration to make sure PS4 will initiate automatically by default when opening the project.
To tell Unreal Engine to use Online Subsystem PS4, add the following setting:
[OnlineSubsystem]
DefaultPlatformService=PS4
Then, you'll need to configure the OnlineSubsystemPS4 module by adding the following settings:
[OnlineSubsystemPS4]
bEnabled=True
WebApiTimeoutInSeconds=15
Add the application server TitleID and TitlePasscode values as shown below:
[/Script/PS4PlatformEditor.PS4TargetSettings]
TitleID=<Your PS4 Title ID>
TitlePasscode=<Your PS4 Title Passcode>
Project settings for AGS (Unreal PS4)
Add AccelByte credentials inside the DefaultEngine.ini file:
[/Script/AccelByteUe4Sdk.AccelByteSettings]
ClientId=<Your IAM_Client_Id>
ClientSecret=<Your IAM_Client_Secret>
Namespace=<Your Namespace>
PublisherNamespace=<Your Publisher Namespace>
RedirectURI=
BaseUrl="https://demo.accelbyte.io"
IamServerUrl="https://demo.accelbyte.io/iam"
PlatformServerUrl="https://demo.accelbyte.io/platform"
Sample code implementation (Unreal PS4)
We will now show you how to implement the PS4 authentication method for your game with sample code.
The IOnlineSubsystem reads the DefaultPlatformService value defined in PS4Engine.ini. The IdentityInterface manages interactions with these services related to user accounts, enabling user authentication and access token retrieval. Once the operation is successful, the LoginWithOtherPlatform function of the AccelByte SDK handles third-party platform login using the authentication token obtained from the Identity Interface.
UE_LOG(LogTemp, Warning, TEXT("%s"), TEXT("Begin Login"));
const IOnlineSubsystem* OnlineSubsystem = IOnlineSubsystem::Get();
if (OnlineSubsystem == nullptr)//will get active OSS Platform Service
{
  FString Message = TEXT("Cannot login with no online subsystem set!");
  UE_LOG(LogTemp, Warning, TEXT("%s"), *Message);
  OnActionInfoUpdated.Broadcast(Message);
  return;
}

const IOnlineIdentityPtr OnlineIdentity = OnlineSubsystem->GetIdentityInterface();
if (!OnlineIdentity.IsValid())
{
  FString Message = TEXT("Could not retrieve identity interface from native subsystem.");
  UE_LOG(LogTemp, Warning, TEXT("%s"), *Message);
  return;
}
APlayerController* MyPlayerController = UGameplayStatics::GetPlayerController(GetWorld(), 0);;

const ULocalPlayer* LocalPlayer = Cast<ULocalPlayer>(MyPlayerController->Player);
if (LocalPlayer == nullptr)
{
  FString Message = TEXT("Can only login with native platform for local players");
  UE_LOG(LogTemp, Warning, TEXT("%s"), *Message);
  return;
}
const FVoidHandler OnLoginSuccessDelegate = FVoidHandler::CreateLambda([=]() {
  FAccountUserData AccountUserData = FRegistry::Credentials.GetAccountUserData();

  FString AccountUserDataString;
  FJsonObjectConverter::UStructToJsonObjectString(AccountUserData, AccountUserDataString);

  FString Message = FString::Printf(TEXT("Login to AB Service Success : %s"), *AccountUserDataString);
});
const FCustomErrorHandler OnLoginErrorDelegate = FCustomErrorHandler::CreateLambda([=](int32 ErrorCode, const FString& ErrorMessage, const FJsonObject& ErrorObject) {
     FString Message = FString::Printf(TEXT("Error Login to AB Service : %s"), *ErrorMessage);//Failed Login to AB Service
});
const FOnLoginCompleteDelegate NativeLoginComplete = FOnLoginCompleteDelegate::CreateLambda([=]
(int32 LocalUserNum, bool bWasSuccessful, const FUniqueNetId& UserId, const FString& Error) {
  UE_LOG(LogTemp, Warning, TEXT("OnLoginComplete %s : %s"), bWasSuccessful ? TEXT("Success") : TEXT("Fail"), *Error);
  FString Message = FString::Printf(TEXT("OnLoginComplete %s : %s"), bWasSuccessful ? TEXT("Success") : TEXT("Fail"), *Error);
  OnActionInfoUpdated.Broadcast(Message);

  if (bWasSuccessful)
  {
     FString PS4Token= OSS->GetIdentityInterface()->GetAuthToken(0);
     UE_LOG(LogTemp, Warning, TEXT("PlatformToken : %s"), *PlatformToken);
     OnActionInfoUpdated.Broadcast(FString::Printf(TEXT("PlatformToken : %s"), *PlatformToken));//Will Obtained Auth Ticket from OnlineIdentity

     FRegistry::User.LoginWithOtherPlatform(EAccelBytePlatformType::PS4, PS4Token, OnLoginSuccessDelegate, OnLoginErrorDelegate);
     UE_LOG(LogTemp, Warning, TEXT("Request LoginWithOtherPlatform"));
     OnActionInfoUpdated.Broadcast(TEXT("Request LoginWithOtherPlatform"));
  }//this method will hitting the Accelbyte endpoint and will return value after success
});
OnlineIdentity->AddOnLoginCompleteDelegate_Handle(LocalPlayer->GetControllerId(), NativeLoginComplete);
const bool bWaitForDelegate = OnlineIdentity->Login(LocalPlayer->GetControllerId(), FOnlineAccountCredentials());
if (!bWaitForDelegate)
{
  FString Message = TEXT("The online subsystem couldn't login");
  UE_LOG(LogTemp, Warning, TEXT("%s"), *Message);
  OnActionInfoUpdated.Broadcast(Message);
}

FString Message = TEXT("Sending login request to native subsystem!");
UE_LOG(LogTemp, Warning, TEXT("%s"), *Message);
OnActionInfoUpdated.Broadcast(Message);
Project settings (Unreal PS4)
- For working with websocket, please copy the certificate from your Unreal File in the
Engine/Content/Certificates/ThirdPartydirectory. - Create a
Content/Certificatesfolder in the project directory. - In your project settings, under Packaging, add an array item to “Additional Non-Asset Directories to Package”, with the value Certificates.
Project-packaging (Unreal PS4)
Compile the editor and run it. Click on File > Package Project. You will find Game Console Target on the list. Select PlayStation 4.
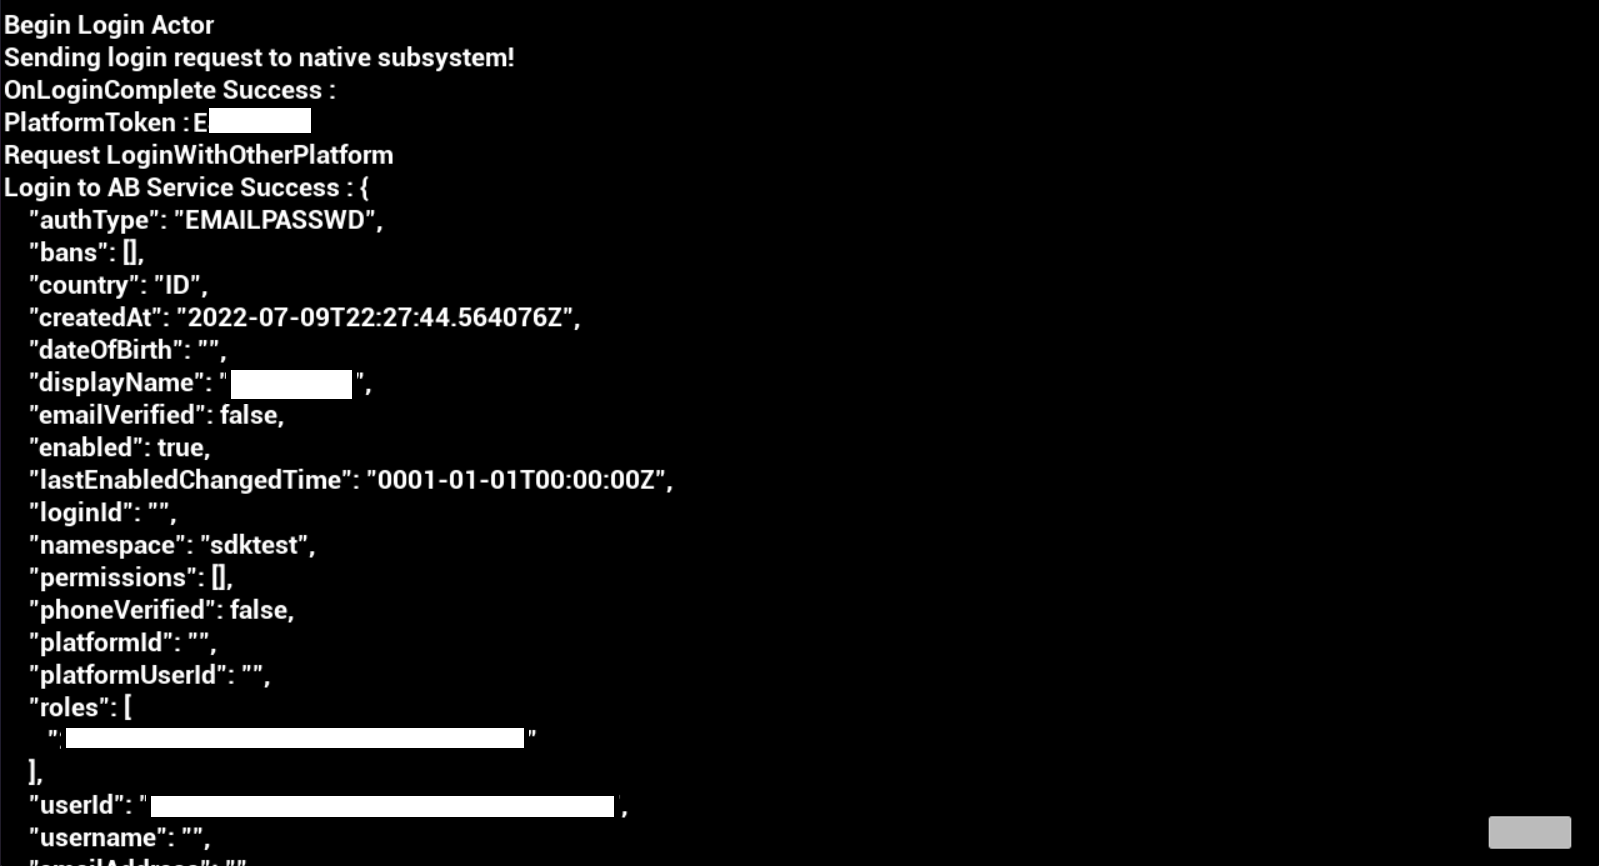
Sample code testing (Unreal PS4)
Below is a screenshot demonstrating that the code works and we are able to log in using a PSN account with the sample code.
PS5 (Unreal)
You can integrate AccelByte SDK into your PS5 game with so that your players can log in using their PSN credentials.
Preparation and configuration (Unreal PS5)
Some processes will be missing due to the Epic Games Private Platform Restrictions. If you need assistance, please contact AccelByte support.
Adding dependency (Unreal PS5)
First, you need to add public dependency modules called OnlineSubsystem and OnlineSubsystemPS5 to the <YourProject>.Build.cs file. These dependencies are needed to integrate your project to use the online subsystems from Unreal Engine.
public AccelbyteSdkTestDemo(ReadOnlyTargetRules Target) : base(Target)
{
  PCHUsage = PCHUsageMode.UseExplicitOrSharedPCHs;

  PublicDependencyModuleNames.AddRange(new string[] { "Core",    "CoreUObject", "Engine", "InputCore", "OnlineSubsystem", "OnlineSubsystemUtils",
"OnlineSubsystemPS5",
"Sockets", "Networking", "InputCore", "AccelByteUe4Sdk", "Json", "JsonUtilities", "Http", "WebSockets"
     });

if (Target.Platform.Equals(UnrealTargetPlatform.PS5))
{
    DynamicallyLoadedModuleNames.AddRange(new string[] { "OnlineSubsystemPS5" } );
}

PrivateDependencyModuleNames.Add("OnlineSubsystem");
Add OnlineSubsystemPS5 inside <YourProject>.Target.cs:
public AccelbyteSdkTestDemoTarget( TargetInfo Target) : base(Target)
{
 Type = TargetType.Game;
  DefaultBuildSettings = BuildSettingsVersion.V2;
  ExtraModuleNames.AddRange( new string[] { "ABThirdPartyLogin", "OnlineSubsystem", "AccelByteUe4Sdk", "OnlineSubsystemPS5" } );
}
And add this to <YourProjectEditor>.Target.cs:
public AccelbyteSdkTestDemoEditorTarget( TargetInfo Target) : base(Target)
{Type = TargetType.Editor;
  DefaultBuildSettings = BuildSettingsVersion.V2;
  ExtraModuleNames.AddRange( new string[] { "ABThirdPartyLogin", "OnlineSubsystem", "AccelByteUe4Sdk", "OnlineSubsystemPS5" } );
}
Project settings for PS5 (Unreal)
Inside your PS5Engine.ini, file you need to add several variables for PS5 configuration. You need this configuration to make sure PS5 will initiate automatically by default when opening the project.
To tell Unreal Engine to use Online Subsystem PS5, add the following setting:
[OnlineSubsystem]
DefaultPlatformService=PS5
Then, you'll need to configure the OnlineSubsystemPS5 module by adding the following settings:
[OnlineSubsystemPS5]
bEnabled=True
Add the application server ClientId and AuthCode entitlement scope values in the following format:
[OnlineSubsystemSony.OnlineIdentity]
ApplicationServerClientId=<<app server client_id>>
AuthCodeEntitlementScopes=psn:s2s openid id_token:psn.basic_claims
Project settings for AGS (Unreal PS5)
Add AccelByte credentials inside the DefaultEngine.ini file:
[/Script/AccelByteUe4Sdk.AccelByteSettings]
ClientId=<Your IAM_Client_Id>
ClientSecret=<Your IAM_Client_Secret>
Namespace=<Your Namespace>
PublisherNamespace=<Your Publisher Namespace>
RedirectURI=
BaseUrl="https://demo.accelbyte.io"
IamServerUrl="https://demo.accelbyte.io/iam"
PlatformServerUrl="https://demo.accelbyte.io/platform"
Sample code implementation (Unreal PS5)
We will now show you how to implement the PS5 authentication method for your game with sample code.
The IOnlineSubsystem reads the DefaultPlatformService value defined in PS5Engine.ini. The IdentityInterface manages interactions with these services related to user accounts, enabling user authentication and access token retrieval. Once the operation is successful, the LoginWithOtherPlatform function of the AccelByte SDK handles third-party platform login using the authentication token obtained from the Identity Interface.
UE_LOG(LogTemp, Warning, TEXT("%s"), TEXT("Begin Login"));
const IOnlineSubsystem* OnlineSubsystem = IOnlineSubsystem::Get();
if (OnlineSubsystem == nullptr)
{
  FString Message = TEXT("Cannot login with no online subsystem set!");
  UE_LOG(LogTemp, Warning, TEXT("%s"), *Message);
  OnActionInfoUpdated.Broadcast(Message);
  return;
}

const IOnlineIdentityPtr OnlineIdentity = OnlineSubsystem->GetIdentityInterface();
if (!OnlineIdentity.IsValid())
{
  FString Message = TEXT("Could not retrieve identity interface from native subsystem.");
  UE_LOG(LogTemp, Warning, TEXT("%s"), *Message);
  return;
}
APlayerController* MyPlayerController = UGameplayStatics::GetPlayerController(GetWorld(), 0);;

const ULocalPlayer* LocalPlayer = Cast<ULocalPlayer>(MyPlayerController->Player);
if (LocalPlayer == nullptr)
{
  FString Message = TEXT("Can only login with native platform for local players");
  UE_LOG(LogTemp, Warning, TEXT("%s"), *Message);
  return;
}
const FVoidHandler OnLoginSuccessDelegate = FVoidHandler::CreateLambda([=]() {
  FAccountUserData AccountUserData = FRegistry::Credentials.GetAccountUserData();

  FString AccountUserDataString;
  FJsonObjectConverter::UStructToJsonObjectString(AccountUserData, AccountUserDataString);

  FString Message = FString::Printf(TEXT("Login to AB Service Success : %s"), *AccountUserDataString);
});
const FCustomErrorHandler OnLoginErrorDelegate = FCustomErrorHandler::CreateLambda([=](int32 ErrorCode, const FString& ErrorMessage, const FJsonObject& ErrorObject) {
     FString Message = FString::Printf(TEXT("Error Login to AB Service : %s"), *ErrorMessage);
});

const FOnLoginCompleteDelegate NativeLoginComplete = FOnLoginCompleteDelegate::CreateLambda([=]
(int32 LocalUserNum, bool bWasSuccessful, const FUniqueNetId& UserId, const FString& Error) {
  UE_LOG(LogTemp, Warning, TEXT("OnLoginComplete %s : %s"), bWasSuccessful ? TEXT("Success") : TEXT("Fail"), *Error);
  FString Message = FString::Printf(TEXT("OnLoginComplete %s : %s"), bWasSuccessful ? TEXT("Success") : TEXT("Fail"), *Error);
  OnActionInfoUpdated.Broadcast(Message);

  if (bWasSuccessful)
  {
     FString PS5Token= OSS->GetIdentityInterface()->GetAuthToken(0);
     UE_LOG(LogTemp, Warning, TEXT("PlatformToken : %s"), *PlatformToken);
     OnActionInfoUpdated.Broadcast(FString::Printf(TEXT("PlatformToken : %s"), *PlatformToken));

     FRegistry::User.LoginWithOtherPlatform(EAccelBytePlatformType::PS5, PS5Token, OnLoginSuccessDelegate, OnLoginErrorDelegate);
     UE_LOG(LogTemp, Warning, TEXT("Request LoginWithOtherPlatform"));
     OnActionInfoUpdated.Broadcast(TEXT("Request LoginWithOtherPlatform"));
  }
});
OnlineIdentity->AddOnLoginCompleteDelegate_Handle(LocalPlayer->GetControllerId(), NativeLoginComplete);
const bool bWaitForDelegate = OnlineIdentity->Login(LocalPlayer->GetControllerId(), FOnlineAccountCredentials());
if (!bWaitForDelegate)
{
  FString Message = TEXT("The online subsystem couldn't login");
  UE_LOG(LogTemp, Warning, TEXT("%s"), *Message);
  OnActionInfoUpdated.Broadcast(Message);
}

FString Message = TEXT("Sending login request to native subsystem!");
UE_LOG(LogTemp, Warning, TEXT("%s"), *Message);
OnActionInfoUpdated.Broadcast(Message);
Project settings (Unreal PS5)
- For working with websocket, please copy the certificate from your Unreal File in the
Engine/Content/Certificates/ThirdPartydirectory. - Create a
Content/Certificatesfolder in the project directory. - In your project settings, under Packaging, add an array item to "Additional Non-Asset Directories to Package", with the value Certificates.
Project-packaging (Unreal PS5)
Compile the editor and run it. Click on File > Package Project. You will find Game Console Target on the list. Select PlayStation 5.
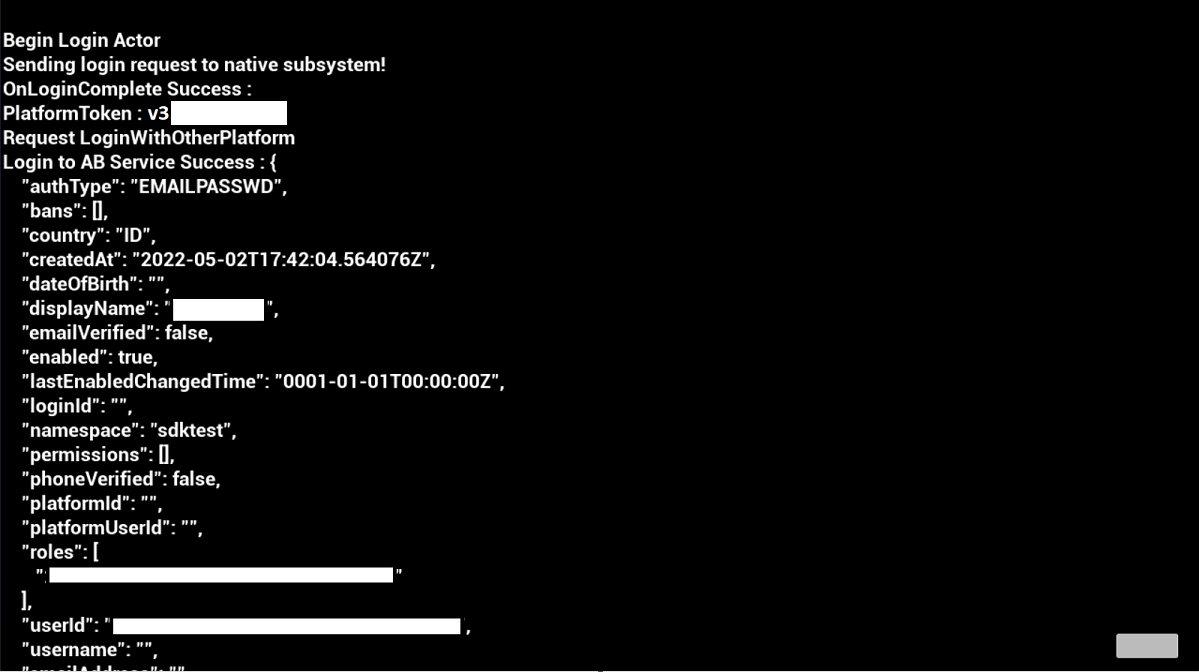
Sample code testing (Unreal PS5)
Below is a screenshot demonstrating that the code works and we are able to login using PSN account with the sample code.
Unity In-game login integration (Unity)
PS4 (Unity)
Preparation and configuration (Unity PS4)
Project settings for AGS (Unity PS4)
- Create a file for game client configuration named
AccelByteSDKConfig.json. - Copy the
AccelByteSDKConfig.jsonfile to theAssets/Resourcesdirectory. - Fill in the
AccelByteSDKConfig.jsonfile using the information based on your game. Here is an example of the JSON file:
{
 "Default": {
    "Namespace": "Game Namespace",
    "UsePlayerPrefs": true,
    "EnableDebugLog": true,
    "DebugLogFilter": "Log",
    "BaseUrl": "https://demo.accelbyte.io",
    "RedirectUri": "http://127.0.0.1",
    "AppId": "",
    "PublisherNamespace": "Publisher Namespace"
  }
}
- Create an OAuth Config file for PS4 named
AccelByteSDKOAuthConfigPS4.jsonin theAssets/Resourcesdirectory. - Fill in the
AccelByteSDKOAuthConfigPS4.jsonfile as follows:
{
  "Default": {
    "ClientId": "<OAuth Client ID>",
    "ClientSecret": "<OAuth Client Secret>"
  }
}
- Create a file called
AccelByteServerSDKConfig.jsonand add it to your project in theAssets/Resourcesdirectory. - Update the
AccelByteServerSDKConfig.jsonwith code below that will be used as the Game Server configuration. Here is an example of the JSON file:
{
  "Default": {
    "Namespace": "Default",
    "BaseUrl": "",
    "RedirectUri": "http://127.0.0.1"
  }
}
- Create two files, one named
AccelByteSDKOAuthConfig.jsonand the other namedAccelByteServerSDKOAuthConfig.json. Add both of these files to your project in theAssets/Resourcesdirectory. The contents of both these JSON files should be as follows:
{
  "Default": {
    "ClientId": "<OAuth Client ID>",
    "ClientSecret": "<OAuth Client Secret>"
  }
}
NPToolkit Unity package (PS4)
Import the NPToolkit Unity package from Asset > Import Package > Custom Package.
PlayStation SDK (Unity PS4)
Download and install the PlayStation SDK via SDK Manager. For this guide, we use version SDK7.000.
Game Integration (Unity PS4)
- Get the auth token:
Sony.NP.Auth.GetAuthCodeRequest request = new Sony.NP.Auth.GetAuthCodeRequest();

Sony.NP.Auth.NpClientId clientId = new Sony.NP.Auth.NpClientId();
clientId.Id = "e27a9256-06a1-4f18-9xxx-xxxxxxxxxxxx";
request.ClientId = clientId;
request.Scope = "psn:s2s";
request.UserId = GetLocalProfiles();

Sony.NP.Auth.AuthCodeResponse response = new Sony.NP.Auth.AuthCodeResponse();
int requestId = Sony.NP.Auth.GetAuthCode(request, response);
- Log in to AGS:
var user = AccelBytePlugin.GetUser();
User user.LoginWithOtherPlatform(AccelByte.Models.PlatformType.PS4, response.AuthCode, (Result<TokenData,OAuthError> result) =>
{
   if (!result.IsError)
   {
       PrintLog("\nLogin Success!");
   }
   else
   {
       PrintLog("\nLogin Fail!");
   }
});
Build configuration (Unity PS4)
- Change your build platform to PS4.
- Set your App Content ID in Player Settings > Publishing Settings > Content ID.
- Set your NP Title ID in Player Settings > Publishing Settings > Playstation(R)Network > NP Title ID.
- Allocate memory for persistent data. Set a value on Project Settings > Publishing Settings > Persistence Data Size.
Sample code testing (Unity PS4)
Below we post a screenshot demonstrating that the code works and we are able to login using PSN account with the sample code.
PS5 (Unity)
Preparation and configuration (Unity PS5)
Project settings for AGS (Unity PS5)
- Create a new folder named
Resourcesinside theAssetsfolder. Place all the AccelByte config files in this folder. - Create a file for Game Client configuration named
AccelByteSDKConfig.json. - Fill in the
AccelByteSDKConfig.jsonfile using the information based on your game. Here is an example of the JSON file:
{
 "Default": {
    "Namespace": "Game Namespace",
    "UsePlayerPrefs": true,
    "EnableDebugLog": true,
    "DebugLogFilter": "Log",
    "BaseUrl": "https://demo.accelbyte.io",
    "RedirectUri": "http://127.0.0.1",
    "AppId": "",
    "PublisherNamespace": "Publisher Namespace"
  }
}
- Create a file called
AccelByteServerSDKConfig.json. - Update the
AccelByteServerSDKConfig.jsonwith code below that will be used as the Game Server configuration:
{
  "Default": {
    "Namespace": "Default",
    "BaseUrl": "",
    "RedirectUri": "http://127.0.0.1"
  }
}
- Create two files, one named
AccelByteSDKOAuthConfig.jsonand one namedAccelByteServerSDKOAuthConfig.json. Add both of these files to your project in theAssets/Resourcesdirectory. The contents of both these JSON files should be as follows:
{
  "Default": {
    "ClientId": "<OAuth Client ID>",
    "ClientSecret": "<OAuth Client Secret>"
  }
}
- Create a file called
AccelByteSDKOAuthConfigPS5.json. - Update the
AccelByteSDKOAuthConfigPS5.jsonwith code below that will be used as the Game Server configuration. Here is an example of the JSON file:
{
  "Default": {
    "ClientId": "<OAuth Client ID>",
    "ClientSecret": "<OAuth Client Secret>"
  }
}
Build configuration (Unity PS5)
Change your build platform to PS5.
PlayStation Network Unity plugin/package (PS5)
Add the PlayStation Network Package through Package Manager.
PlayStation SDK (Unity PS5)
Download and install PlayStation SDK via SDK Manager. For this guide, we use version SDK6.000.
Game integration (Unity PS5)
- Initialize the PSN Plugin:
var initResult = Main.Initialize();

if (initResult.Initialized == true)
{
    Console.WriteLine("PSN Initialized ");
    Console.WriteLine("Plugin SDK Version : " + initResult.SceSDKVersion.ToString());
}
else
{
    Console.WriteLine("PSN not initialized ");
}
- Get the platform/auth token:
int initialUserID = UnityEngine.PS5.Utility.initialUserId;
int slot = UnityEngine.PS5.PS5Input.GetSlotFromUserId((uint)initialUserID);
var loggedinUserId = UnityEngine.PS5.PS5Input.GetUsersDetails(slot).userId;

Authentication.GetAuthorizationCodeRequest request = new Authentication.GetAuthorizationCodeRequest()
{
    UserId = loggedinUserId,
    ClientId = "560b99c7-2e7e-4e4e-a284-5e0851625dfb",
    Scope = "psn:s2s openid id_token:psn.basic_claims"
};

var requestOp = new AsyncRequest<Authentication.GetAuthorizationCodeRequest>(request).ContinueWith((antecedent) =>
{
    if (CheckAysncRequestOK(antecedent))
    {
        Console.WriteLine("GetAuthorizationCodeRequest:");
        Console.WriteLine("  ClientId = " + antecedent.Request.ClientId);
        Console.WriteLine("  Scope = " + antecedent.Request.Scope);
        Console.WriteLine("  AuthCode = " + antecedent.Request.AuthCode);
        Console.WriteLine("  IssuerId = " + antecedent.Request.IssuerId);

        psToken = antecedent.Request.AuthCode;

    }
    else
    {
        Console.WriteLine("Error acquiring authorization code from PSN  ");
    }
});
Authentication.Schedule(requestOp);
- Log in to AGS:
var user = AccelBytePlugin.GetUser();
Result<TokenData, OAuthError> callback = null;

user.LoginWithOtherPlatform(PlatformType.PS5, token, (Result<TokenData, OAuthError> result) =>
{
    if (result.IsError)
    {
        Console.WriteLine("Login Error : " + result.Error.error + " " +result.Error.error_description);
    }
    else
    {
        Console.WriteLine("Login to AccelByte Success");
        Console.WriteLine(result.Value.ToString());
    }
    callback = result;
});
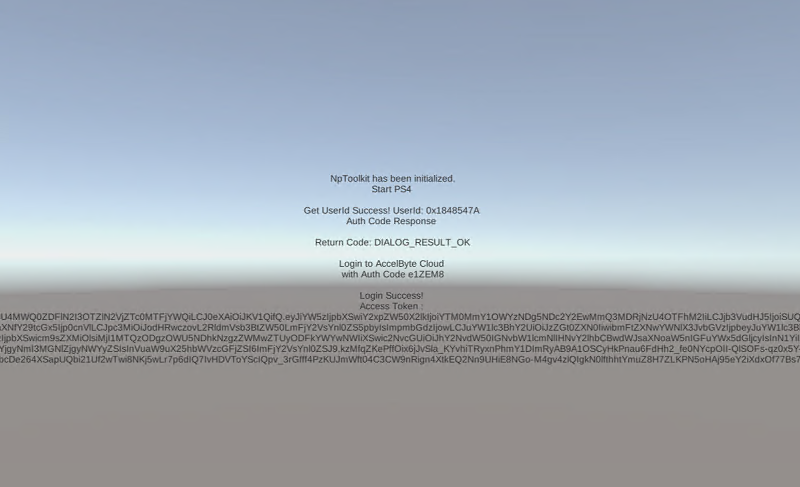
Sample code testing (Unity PS5)
Below is an example log demonstrating that the code works and we are able to log in using a PSN account with the sample code.
PSN Initialized
Plugin SDK Version : 06.000.038
GetAuthorizationCodeRequest:
  ClientId = 560b99c7-2e7e-4e4e-a284-5e0851625dfb
  Scope = psn:s2s openid id_token:psn.basic_claims
  AuthCode = v3.jbrXLG
  IssuerId = 1
Login with other platform to AccelByte Attemp
[Verbose][<b>AccelByteSDK</b>][2023-05-15T02:44:06Z]Loading OAuth file in "" directory with "PS5" platform[/Verbose]
AccelByte.Core.AccelByteLogHandler:PrintLog(AccelByteLogType, Object, Object)
AccelByte.Api.AccelByteSettingsV2:LoadOAuthFile(String, Boolean)
AccelByte.Api.AccelByteSettingsV2:.ctor(String, SettingsEnvironment, Boolean)
AccelByte.Api.AccelBytePlugin:Initialize(Config, OAuthConfig)
AccelByte.Api.AccelBytePlugin:CheckPlugin()
AccelByte.Api.AccelBytePlugin:GetUser()
<LoginWithAB>d__5:MoveNext()
UnityEngine.SetupCoroutine:InvokeMoveNext(IEnumerator, IntPtr)

[Verbose][<b>AccelByteSDK</b>][2023-05-15T02:44:06Z]Loading AccelByte OAuth file from AccelByteSDKOAuthConfigPS5[/Verbose]
AccelByte.Core.AccelByteLogHandler:PrintLog(AccelByteLogType, Object, Object)
AccelByte.Api.AccelByteSettingsV2:LoadOAuthFile(String, Boolean)
AccelByte.Api.AccelByteSettingsV2:.ctor(String, SettingsEnvironment, Boolean)
AccelByte.Api.AccelBytePlugin:Initialize(Config, OAuthConfig)
AccelByte.Api.AccelBytePlugin:CheckPlugin()
AccelByte.Api.AccelBytePlugin:GetUser()
<LoginWithAB>d__5:MoveNext()
UnityEngine.SetupCoroutine:InvokeMoveNext(IEnumerator, IntPtr)

[Verbose][<b>AccelByteSDK</b>][2023-05-15T02:44:06Z]Current Function Called:
---
Date : 2023-05-15T03:44:06Z
Class : User
File: , Line: 0
Function : LoginWithOtherPlatform
---
[/Verbose]
AccelByte.Core.AccelByteLogHandler:PrintLog(AccelByteLogType, Object, Object)
AccelByte.Core.Report:GetFunctionLog(String, String)
AccelByte.Api.User:LoginWithOtherPlatform(PlatformType, String, ResultCallback`2, Boolean)
<LoginWithAB>d__5:MoveNext()
UnityEngine.SetupCoroutine:InvokeMoveNext(IEnumerator, IntPtr)

[Verbose][<b>AccelByteSDK</b>][2023-05-15T02:44:06Z]Current Function Called:
---
Date : 2023-05-15T03:44:06Z
Class : OAuth2
File: , Line: 0
Function : LoginWithOtherPlatform
---
[/Verbose]
AccelByte.Core.AccelByteLogHandler:PrintLog(AccelByteLogType, Object, Object)
AccelByte.Core.Report:GetFunctionLog(String, String)
OAuth2:LoginWithOtherPlatform(PlatformType, String, ResultCallback`2, Boolean)
System.Action`1:Invoke(T)
<LoginWithAB>d__5:MoveNext()
UnityEngine.SetupCoroutine:InvokeMoveNext(IEnumerator, IntPtr)

[Verbose][<b>AccelByteSDK</b>][2023-05-15T02:44:07Z]HTTP Request:
---
POST https://development.accelbyte.io/iam/v3/oauth/platforms/ps5/token
X-Amzn-TraceId : 1-64619C76-56cd121ad16545afbcb52474
cookie : device-token=unity_Console_PS5_37b4f89ef040955b245b6ff4f3ef22715420eea6
Content-Type : application/x-www-form-urlencoded; charset=utf-8
Accept : application/json; charset=utf-8
Namespace : sdktest
Game-Client-Version : 0.1
AccelByte-SDK-Version : 15.8.0
Authorization : Basic YTM0MmY1OWYzNDg5NDc2Y2EwMmQ3MDRjNzU4OTFhM2I6a0AjaCxHXVJeQzYxIzJkITUuWXVPIXdsV0R0Wz1JVEU=
Content-Length : 62

platform_token=v3.jbrXLG&namespace=sdktest&createHeadless=true
---
[/Verbose]
AccelByte.Core.AccelByteLogHandler:PrintLog(AccelByteLogType, Object, Object)
AccelByte.Core.Report:GetHttpRequest(IHttpRequest, UnityWebRequest)
AccelByte.Core.<Update>d__4:MoveNext()
System.Threading.ContextCallback:Invoke(Object)
System.Threading.ExecutionContext:RunInternal(ExecutionContext, ContextCallback, Object, Boolean)
System.Runtime.CompilerServices.MoveNextRunner:Run()
System.Action:Invoke()
System.Threading.SendOrPostCallback:Invoke(Object)
UnityEngine.WorkRequest:Invoke()
UnityEngine.UnitySynchronizationContext:Exec()

HTTP create context
HTTP URL:          https://development.accelbyte.io/iam/v3/oauth/platforms/ps5/token
HTTP URI path:     /iam/v3/oauth/platforms/ps5/token
HTTP URI scheme:   https, hostname: development.accelbyte.io, port: 443
HTTP URI username: , password:
HTTP start transfer of unknown size
HTTP release context
[Verbose][<b>AccelByteSDK</b>][2023-05-15T02:44:09Z]HTTP Response:
---
HTTP/1.1 200
Date : 2023-05-15T03:44:09Z
Content-Length : 2382

{"access_token":"eyJhbGciOiJSUzI1NiIsImtpZCI6IjE1YjVlZGM4NjAzNjE5ODU4MWQ0ZDFlN2I3OTZlN2VjZTc0MTFjYWQiLCJ0eXAiOiJKV1QifQ.eyJiYW5zIjpbXSwiY2xpZW50X2lkIjoiYTM0MmY1OWYzNDg5NDc2Y2EwMmQ3MDRjNzU4OTFhM2IiLCJjb3VudHJ5IjoiSUQiLCJkaXNwbGF5X
25hbWUiOiJBQl9fREVNTyIsImV4cCI6MTY4NDEyMjI1MCwiaWF0IjoxNjg0MTE4NjUwLCJpc19jb21wbHkiOnRydWUsImlzcyI6Imh0dHBzOi8vZGV2ZWxvcG1lbnQuYWNjZWxieXRlLmlvIiwiamZsZ3MiOjAsIm5hbWVzcGFjZSI6InNka3Rlc3QiLCJuYW1lc3BhY2Vfcm9sZXMiOlt7Im5hbWVzcGFjZS
I6IioiLCJyb2xlSWQiOiIyMjUxNDM4ODM5ZTk0OGQ3ODNlYzBlNTI4MWRhZjA1YiJ9XSwicGVybWlzc2lvbnMiOltdLCJyb2xlcyI6WyIyMjUxNDM4ODM5ZTk0OGQ3ODNlYzBlNTI4MWRhZjA1YiJdLCJzY29wZSI6ImFjY291bnQgY29tbWVyY2Ugc29jaWFsIHB1Ymxpc2hpbmcgYW5hbHl0aWNzIiwic3V
iIjoiNWQ3ZGI0ZGIwODMwNGJmN2E0MzY1NzIzNmFiZjdiOGYiLCJ1bmlvbl9pZCI6ImQ5YzZlNWY1YzExOTQ0YmRhYzNlOWNkYzEyNmYxNTNkIiwidW5pb25fbmFtZXNwYWNlIjoiYWNjZWxieXRlIn0.2Qmu80Mk8-PZ5PGVHvAEfNGo_6fmr6FymTIgYCMNSoqPPGpghkYl1zG5JIYq4jHFNjUEGyC41ruQ
yU3iHpktGA3Z0pY4aqbQby3gpHyhwVym16VUmlDDITKKkls8rNwoZH9IgBRJ1bM4jHNv1FEZAm_wPQD7jiDP2udQgjW1DnWNQI3F-GRtRZcLeoOOvWTsgg3vn4RHo6bHRa2BJ-xKW6xPlHGwmCDuqOyV-ywxcyo3rnDKI9V0G8kzOhAAjYi9WSDRcBFVvGzcqq9BRnucKtzhxIznwirOs8LoPAlfZ4izjpKIz
L-ffBpVYbsNKmjp-cmmHY4noQ4RXXzkcp26-w","bans":[],"display_name":"AB__DEMO","expires_in":3600,"is_comply":true,"jflgs":0,"namespace":"sdktest","namespace_roles":[{"roleId":"2251438839e948d783ec0e5281daf05b","namespace":"*"}],"perm
issions":[],"platform_id":"ps5","platform_user_id":"7575546519636330573","refresh_expires_in":86400,"refresh_token":"eyJhbGciOiJSUzI1NiIsImtpZCI6IjE1YjVlZGM4NjAzNjE5ODU4MWQ0ZDFlN2I3OTZlN2VjZTc0MTFjYWQiLCJ0eXAiOiJKV1QifQ.eyJjbGllb
nRfaWQiOiJhMzQyZjU5ZjM0ODk0NzZjYTAyZDcwNGM3NTg5MWEzYiIsImV4cCI6MTY4NDIwNTA1MCwiaWF0IjoxNjg0MTE4NjUwLCJpc3MiOiJodHRwczovL2RldmVsb3BtZW50LmFjY2VsYnl0ZS5pbyIsIm5hbWVzcGFjZSI6InNka3Rlc3QiLCJwbGF0Zm9ybV9pZCI6InBzNSIsInN1YiI6IjVkN2RiNG
RiMDgzMDRiZjdhNDM2NTcyMzZhYmY3YjhmIn0.skmViGt-kaXKIXGUPJgfCfxmGjefZTP1Ue6CLlQA-00SEC0rc34I6Ma5GovROE0H2AmKJTLvCHTBNPKl0iJZXo6Bp9IZfMXpFjxCeh96yo3NfVJ62o8WXYzomtqTlFAT5TG0NFh6gfmCpnagRj3-A0TVfvTH09JdSRdHl588LOEQFVYstYwlPQa9ab00zJ8
-HehVoUAvPpkRrNSLbDfQkehnLff4NnWsDGBdZM5w7budwuHFjbkMhtUX0a_9g-CCHjE45ixEzgN5sfez1ZSO9ZbsrtTDgnU06fZRxBVKHVzVDAZbxyFxy_Ia0IAc7_ydwOiRUOsGAAx0Ec3jsjoP0w","roles":["2251438839e948d783ec0e5281daf05b"],"scope":"account commerce socia
l publishing analytics","token_type":"Bearer","user_id":"5d7db4db08304bf7a43657236abf7b8f"}

---
[/Verbose]
Troubleshooting
IP whitelisting
PlayStation DevKit can't access sp-int or development environment web pages because access is denied.
Suggestions
Request access to Sony Partner Manager or Sony Support to whitelist the device's public IP.