Integrate dedicated servers with the SDK
Overview
This section guides you through integration with the AccelByte Server SDK for dedicated servers in the AccelByte Multiplayer Service (AMS).
Goals
- Provide an understanding of the lifecycle of a dedicated server.
- Explain how to make the appropriate API call to register a dedicated server to AMS.
Prerequisites
Before you begin this guide, you should complete the following:
- Set up an IAM client for dedicated servers, preferably a confidential client. No additional permissions are required.
- Prepare a dedicated server executable, built using the Linux architecture.
- Install and configure the AccelByte Game SDK for your project. The AccelByte Game SDK is available on both Unreal Engine and Unity. Please visit the SDK setup tutorial to learn how to install the SDKs.
AMS only supports dedicated servers that are built with the Linux architecture.
The lifecycle of a dedicated server under AMS
The local watchdog uses states to keep track of the lifecycle of a dedicated server and the states are:
- Starting: The dedicated server is spun up by the watchdog. The watchdog is waiting for a websocket connection to be established with the dedicated server.
- Creating: The dedicated server has established a websocket connection with the watchdog, and is loading any necessary resources to serve a game session.
- Ready: the server is ready to serve a game session.
- In Session: the server is serving a game session.
- Unresponsive: the server has failed one or more health checks.
- Draining: the server is sent the drain command and will soon be terminated.
The change of states are best described by the following diagram:
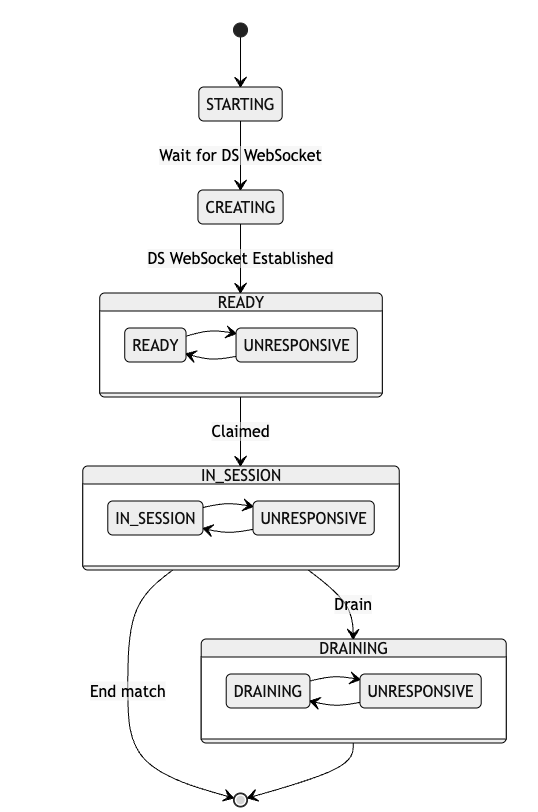
The dedicated server is required to tell when it will be ready by using the SendReadyMessage() API. This is because the dedicated server sometimes requires loading its own assets (such as meshes for a game level) in order to serve a game session. The time required to load such assets varies greatly. The SendReadyMessage() API is used so that the dedicated server has time to do this, and can then notify the watchdog, and in turn the fleet command that it is ready to serve a game session. The watchdog will then change the dedicated server state from Creating to Ready.
Designed to get out of your way
The APIs we created are only applicable when your dedicated server is hosted within an AMS environment (when it is uploaded to AMS or launched by the AMS Simulator).
We took extra care to ensure that the SDK you integrate will not block your dedicated server from running on its own, even if it fails to connect to a local watchdog or an AMS simulator. This is to ensure that you can continue working on your dedicated server locally without having to worry about the AMS requirements.
When you are ready to start testing your integration with AMS, you can do so locally by using the AMS Simulator, without the need to upload your dedicated server onto AMS. You can read more in the debugging dedicated servers guide.
Listening to the correct ports
AMS dedicated server images are containerized during delivery, but not during execution. This means that your dedicated server will be assigned arbitrary port numbers as determined by the local watchdog.
When your dedicated server starts, you can pass these port numbers into your server in the form of command line arguments, so that your dedicated server can be told which ports to listen to.
Read the article on managing dedicated server allocation for more information on how to configure your command line argument.
Set up your environment
Unreal OSS
Please add the following configuration into your DefaultEngine.ini file.
[OnlineSubsystemAccelByte]
bServerUseAMS=True
Register a dedicated server to AMS
When your dedicated server is created by a local watchdog, it will transition from the Starting state into the Creating state once a websocket connection is established between the dedicated server and the local watchdog. During the Creating state, the server will start to initialize and load all the necessary assets that it requires to serve a game session. During this time, the server is subjected to the Creation timeout, which will automatically remove the server when the timeout is exceeded.
Once your server has finished loading, and is ready to serve a game session, your server should notify AMS by calling the respective API:
- Unreal
- Unreal OSS
- Unity
FRegistry::ServerAMS.SendReadyMessage();
SessionInterface->SendReadyToAMS();
AccelByteServerPlugin.GetAMS().SendReadyMessage();
Listening to the Drain signal
The drain signal tells a dedicated server that it will soon be terminated. The dedicated server will be set to Draining state and is subjected to the drain timeout. Upon reaching the drain timeout, the watchdog will automatically terminate the dedicated server, this gives a configurable period of time for your dedicated server to do any last minute action and then terminate itself peacefully. There are a number of reasons why your dedicated servers are sent a drain signal:
- The fleet is deactivated, sending all dedicated servers in the Ready state into the drain state. (In Session dedicated servers will be allowed to run their course.)
- The nodes that host the dedicated servers need to be taken down for maintenance.
- The dedicated servers are sent the drain signal explicitly by an operator from your organization.
To register a handler to listen to the drain signal:
- Unreal
- Unreal OSS
- Unity
AccelByte::GameServerApi::ServerAMS::FOnAMSDrainReceived OnAMSDrainReceivedDelegate = AccelByte::GameServerApi::ServerAMS::FOnAMSDrainReceived::CreateThreadSafeSP(SharedThis(this), &ClassName::OnAMSDrain);
FRegistry::ServerAMS.SetOnAMSDrainReceivedDelegate(OnAMSDrainReceivedDelegate);
FOnAMSDrainReceivedDelegate OnAMSDrainReceivedDelegate = FOnAMSDrainReceivedDelegate::CreateUObject(this, &ClassName::OnAMSDrain);
OnAMSDrainReceivedHandle = SessionInterface->AddOnAMSDrainReceivedDelegate_Handle(OnAMSDrainReceivedDelegate);
AccelByteServerPlugin.GetAMS().OnDrainReceived += () =>
{
    //Drain callback
};