Configure season passes
Overview
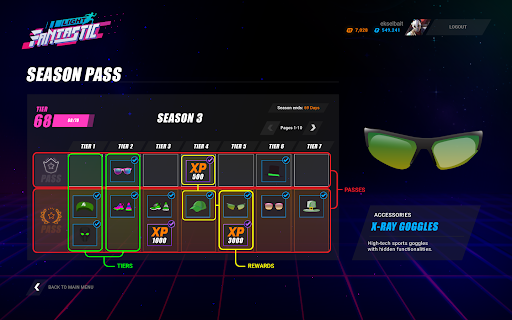
The season pass service offered by AccelByte Gaming Services (AGS) enables you to have a seasonal progression system within your game. Players can progress through the season by earning experience points to level up the tiers and unlocking rewards at various tiers. Season passes not only add revenue streams, but they also foster player engagement by offering a sense of accomplishment as they progress to unlock the rewards throughout the season. This guide will show you how to configure a season pass.
Goals
- Provide an understanding and overview of season pass configurations.
Prerequisites
- Access to the AGS Admin Portal.
- Access to the AccelByte Season Pass API documentation.
- Access to the AccelByte ECommerce API to configure the required information.
Set up a season pass item
Before you can create a season pass, you need to define the pass item, tier item, and reward item in the store. Pass and tier items enable you to monetize the season pass. Purchasing a premium pass item grants players with a premium season pass with a more exclusive rewards, including unique in-game items, which will help the player fully immerse into the game. On the other hand, purchasing tier items helps players to advance through the season faster without the necessity of manually clearing the tier. The reward item is the in-game item/coin that a player can obtain upon clearing a tier.
You can follow the Store Item Setup Guide to configure the store item. After creating items in the draft store, you can skip publishing the store. Publish the store can be done right before publishing the season.
Create a pass item
If you are creating a pass item, go to the Create Item page inside the Store.
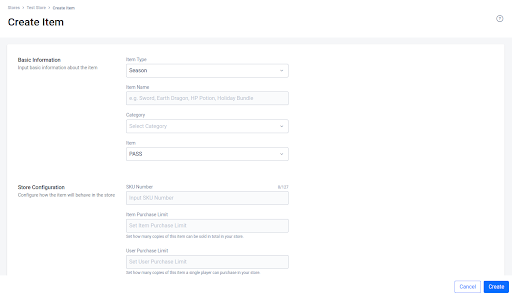
Choose item type Season, and select PASS under Item.
Fill in the Store Configuration section. You can refer to the Store Item Setup Guide to fill in this section.
Create a tier item
If you are creating a tier item, go to the Create Item page inside the Store.

Choose the item type Season, and select TIER under Item.
Fill in the Store Configuration section. You can refer to the Store Item Setup Guide to fill in this section.
Configure a season pass
Create a season
To configure a season in the Admin Portal, you can follow the steps below:
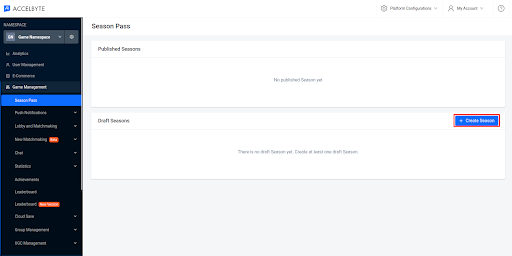
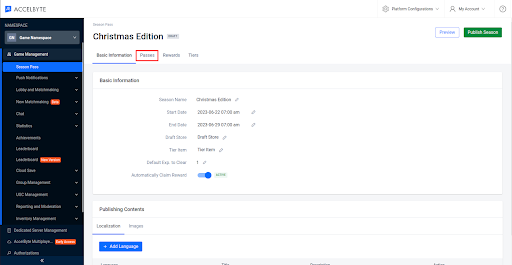
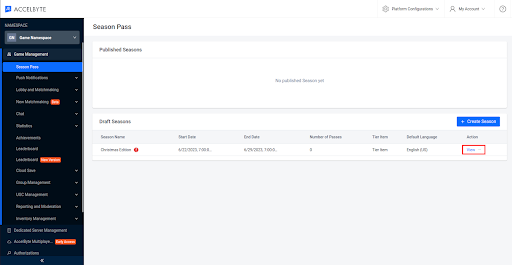
Go to the Game Management section in your game namespace and select Season Pass.

In the Season Pass tab, click the Create Season button.
The Create Season form will appear. Fill in the required fields.
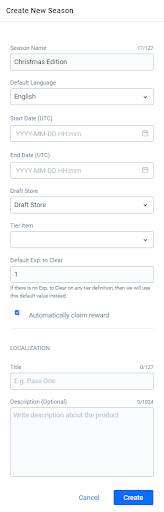
- Input the Season Name.
- Select the default language for localization in the Default Language field. After creating your season, you’ll be able to add additional languages for localization.
- Select the date and time when this season will start in the Start Date field.
- Select the date and time when this season will end in the End Date field.
- Select the Draft Store where the items related to the season are located.
- Select the tier item in the Tier Item field.
- Input the default experience (exp.) to clear each tier in the Default Exp. field.
- Select the Automatically claim reward option if you prefer to automatically grant rewards to the players. Otherwise, players will need to manually claim rewards from inside the game.
When you’re finished, click the Create button. The new season will be added to the list.
Create a pass
To configure a pass in the Admin Portal, you can follow these steps:
Go to the Game Management section in your game namespace and click Season Pass. Click the View action next to your target draft season.

On the Season Details page, go to the Passes tab.
To create a pass, click the Create Pass button.

The Create Pass form will appear. Fill in the required fields:
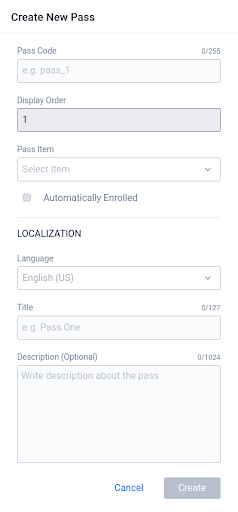
- Input the unique identifier in the Pass Code field.
- Input the position you want this pass to occupy in the game in the Display Order field. A pass with a Display Order of 1 will appear at the top of the list, 2 will appear under 1, and so on.
- Choose the item that you want to associate with this pass in the Pass Item dropdown menu.
- Select Automatically Enrolled if you want all players who participate in the season event to be automatically granted this pass without purchasing the pass item.
備考For a free pass, you can check Automatically Enrolled. Otherwise, for a premium pass, you should leave Automatically Enrolled unchecked.
- The Language selection is the same as the default language for the related season and cannot be changed.
- Input the default name for the pass in the Title field.
- Input the default description of the pass in the Description field.
When you’re finished, click the Create button. The new pass will be added to the list.
Once you’ve created a pass, you can still edit or delete it.
When you delete a pass, all the rewards tied to that pass will be removed.
Create a tier
To configure a tier in the Admin Portal, you can follow these steps:
Go to the Game Management section in your game namespace and click Season Pass. Click the View action next to your target draft season.

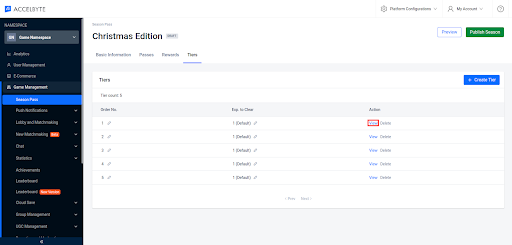
On the Season Details page, click the Tiers tab.
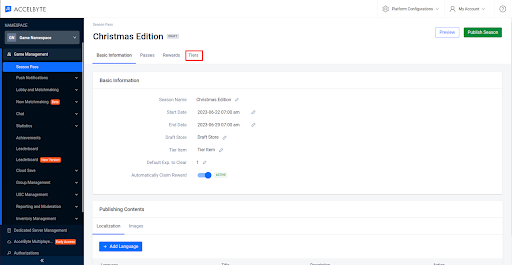
Click Create Tier on the right-hand side.

The Create New Tier form will appear. Fill in the required fields.
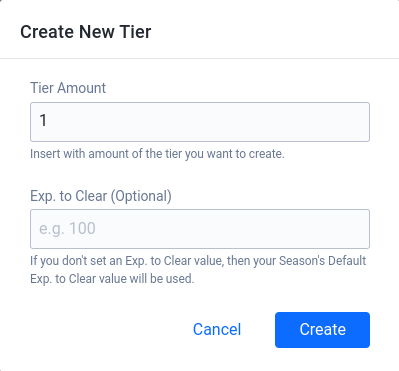
- Input the number of tiers you want this season to have in the Tier Amount field.
- Input the amount of experience (exp.) a player needs to clear each tier in the Exp. to Clear field.
Once completed, click the Create button.
Your new tier will appear in the associated Season Pass list.
Create a reward
To configure a reward in the Admin Portal, you can follow these steps:
Go to the Game Management section in your game namespace and click Season Pass. Click the View action next to your target draft season.
On the Season Details page, go to the Rewards tab.

On the Rewards page, click on the Create Reward button.

The Create New Reward form will appear. Fill in the required fields.
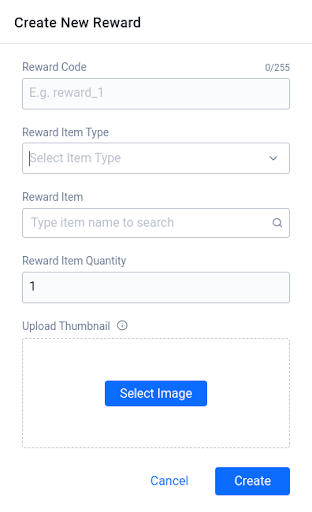
- Input a unique identifier for the code in the Reward Code field.
- Choose the Reward Item Type from the dropdown menu. The options are Items, Coins, and Bundles. For more information about item types, see our Item Store documentation.
- Choose the item that will be awarded to players from the Reward Item dropdown.
- Type the quantity of the item to be awarded to players in the Reward Item Quantity field.
- Use Upload Thumbnail to upload an image for the item.
When you’re finished, click the Create button. The new reward will be added to the list.
Once you’ve created a reward, you can edit or delete it when it is no longer needed.
While you can edit a reward, the reward’s Reward Code cannot be changed.
Associate rewards with passes and tiers
Once you’ve created the rewards, you’ll need to associate them with the corresponding passes and tiers. To do this, you can follow these steps:
Go to the Game Management section in your game namespace and click Season Pass. Click the View action next to your target draft season.

On the Season Details page, click the Tiers tab. Then, click the View button next to your desired tier’s Action column.
The Tier No. 1 Configuration form will appear. Fields will appear for each pass in this season. Fill in each field by choosing the rewards that you want to bind to that specific pass. You can select multiple rewards for a single pass.
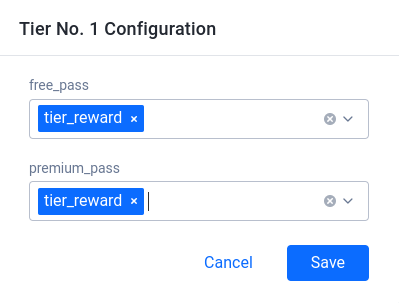
When you’re finished, click the Save button. The rewards will be tied to the pass in this tier.
Publish a season
In order for a season to start, it must be published before its start date.
You can only have one Published Season at a time.
You can publish a draft season by following the steps below:
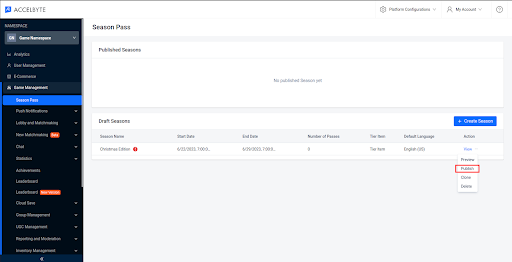
Go to the Game Management section in your game namespace and click Season Pass. Click the Publish action next to your target draft season.
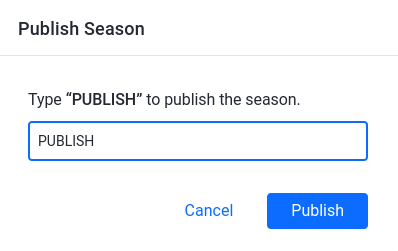
The Publish Season form will appear. To publish the season, type PUBLISH into the available field and click the Publish button.
The draft season will be published.