Get started with matchmaking customization
The Extend Override and Events handler is currently available for Closed Beta partners only. If you're interested, please submit a ticket to apply to become a Closed Beta partner.
Overview
AccelByte Gaming Services (AGS) has the capability to provide custom logic for matchmaking. In this guide, we will go through the workflow of creating and using a simple custom matchmaker for AGS.
If you wish to use an advanced matchmaker, or learn how to customize one, use the Advanced Sample App in the appropriate section below.
Prerequisites
- Go
- Python
- C#
Windows 10 WSL2 or Linux Ubuntu 20.04 with the following tools installed:
- Bash
- Make
- Docker v23.x
- docker-compose v2
- Go v1.19
- ngrok
Access to
AccelByte Gaming Servicesdemo environment.Base URL:
https://demo.accelbyte.io.Create a Game Namespace if you don't have one yet. Keep the
Namespace ID.Create an OAuth Client with
confidentialclient type. Keep theClient IDandClient Secret. You will need the following permissions to complete this guide.NAMESPACE:{namespace}:MMV2GRPCSERVICE - READ
ADMIN:NAMESPACE:{namespace}:USER:* - CREATE, READ, UPDATE, DELETE
ADMIN:NAMESPACE:{namespace}:CLIENT - READ
NAMESPACE:{namespace}:MATCHMAKING:TICKET - CREATE
ADMIN:NAMESPACE:{namespace}:DSNOTIFICATION - CREATE
NAMESPACE:{namespace}:SESSION:GAME - CREATE, READ, UPDATE, DELETE
ADMIN:NAMESPACE:{namespace}:USER:*:STATITEM - CREATE, READ, UPDATE, DELETE
NAMESPACE:{namespace}:SESSION:PARTY - READ
ADMIN:NAMESPACE:{namespace}:INFORMATION:USER:* - DELETE
NAMESPACE:{namespace}:USER:*:STATITEM - CREATE, READ, UPDATE, DELETE
NAMESPACE:{namespace}:UPLOADHELPER - READ
You have set up a network proxy for local testing. We recommend using NGROK.
- If you're using
NGROK, ensure that you follow the installation guide and set up the `NGROK authtoken``. - NGROK install guide
- If you're using
You have downloaded, installed, and set up the
extend-helper-cli. Download here.Access to the AGS Admin Portal.
Windows 10 WSL2 or Linux Ubuntu 20.04 with the following tools installed:
- Bash
- Make
- Docker v23.x
- docker-compose v2
- Python 3.9
- ngrok
Access to
AccelByte Gaming Servicesdemo environment.Base URL:
https://demo.accelbyte.io.Create a Game Namespace if you don't have one yet. Keep the
Namespace ID.Create an OAuth Client with
confidentialclient type. Keep theClient IDandClient Secret. You will need the following permissions to complete this guide.NAMESPACE:{namespace}:MMV2GRPCSERVICE - Read
ADMIN:NAMESPACE:{namespace}USER:* - Create, Read, Update, Delete
ADMIN:NAMESPACE:{namespace}CLIENT - Read
NAMESPACE:{namespace}MATCHMAKING:TICKET - Create
ADMIN:NAMESPACE:{namespace}DSNOTIFICATION - Create
NAMESPACE:{namespace}SESSION:GAME - Create, Read, Update, Delete
ADMIN:NAMESPACE:{namespace}USER:*:STATITEM - Create, Read, Update, Delete
NAMESPACE:{namespace}SESSION:PARTY - Read
ADMIN:NAMESPACE:{namespace}INFORMATION:USER:* - Delete
NAMESPACE:{namespace}USER:*:STATITEM - Create, Read, Update, Delete
NAMESPACE:{namespace}UPLOADHELPER - Read
You have set up a network proxy for local testing. We recommend using NGROK.
- If you're using
NGROK, ensure that you follow the installation guide and set up the `NGROK authtoken``. - NGROK install guide
- If you're using
You have downloaded, installed, and set up the
extend-helper-cli. Download here.Access to the AGS Admin Portal.
Windows 10 WSL2 or Linux Ubuntu 20.04 with the following tools installed:
- Bash
- Make
- Docker v23.x
- docker-compose v2
- .NET SDK 6.0
- ngrok
Access to
AccelByte Gaming Servicesdemo environment.Base URL:
https://demo.accelbyte.io.Create a Game Namespace if you don't have one yet. Keep the
Namespace ID.Create an OAuth Client with
confidentialclient type. Keep theClient IDandClient Secret. You will need the following permissions to complete this guide.NAMESPACE:{namespace}:MMV2GRPCSERVICE - Read
ADMIN:NAMESPACE:{namespace}USER:* - Create, Read, Update, Delete
ADMIN:NAMESPACE:{namespace}CLIENT - Read
NAMESPACE:{namespace}MATCHMAKING:TICKET - Create
ADMIN:NAMESPACE:{namespace}DSNOTIFICATION - Create
NAMESPACE:{namespace}SESSION:GAME - Create, Read, Update, Delete
ADMIN:NAMESPACE:{namespace}USER:*:STATITEM - Create, Read, Update, Delete
NAMESPACE:{namespace}SESSION:PARTY - Read
ADMIN:NAMESPACE:{namespace}INFORMATION:USER:* - Delete
NAMESPACE:{namespace}USER:*:STATITEM - Create, Read, Update, Delete
NAMESPACE:{namespace}UPLOADHELPER - Read
You have set up a network proxy for local testing. We recommend using NGROK.
- If you're using
NGROK, ensure that you follow the installation guide and set up the `NGROK authtoken``. - NGROK install guide
- If you're using
You have downloaded, installed, and set up the
extend-helper-cli. Download here.Access to the AGS Admin Portal.
Download the Simple or Advanced Sample App
- Go
- Python
- C#
First, we will need to clone a Sample App. Click here for the Simple MatchMaker Sample App repository.
git clone https://github.com/AccelByte/matchmaking-function-grpc-plugin-server-go.git
First, we will need to clone a Sample App. Click here for the Simple MatchMaker Sample App repository.
git clone https://github.com/AccelByte/matchmaking-function-grpc-plugin-server-python.git
First, we will need to clone a Sample App. Click here for the Simple MatchMaker Sample App repository.
git clone https://github.com/AccelByte/matchmaking-function-grpc-plugin-server-csharp.git
If you wish to modify the Simple Sample App, you can follow along in the Advanced Sample App guide to learn how, or you can download the Advanced Sample App.
git clone https://github.com/AccelByte/example-advanced-sample-app-grpc-golang.git
There is no advanced sample app for Python and C# yet. We're working on it!
- Go
- Python
- C#
Follow the Setup, Building, and Running sections of the repository README. Alternatively, you can use the following goLang command from the sample app root directory to run the server:
make proto
go run main.go
Follow the Setup, Building, and Running sections of the repository README. Alternatively, you can use the following python command from the sample app root directory to run the server:
make build
PYTHONPATH=src python -m src.app
Follow the Setup, Building, and Running sections of the repository README. Alternatively, you can use the following dotnet command from the sample app root directory to run the server:
make build
cd src/AccelByte.PluginArch.Demo.Server
dotnet run
Ensure that the server is running locally before moving onto the next section.
Start ngrok and expose the port specified within the Sample App. The following command assumes you have not changed the port in the Simple or Advanced Sample App:
ngrok tcp localhost:6565
Example rules and Session Template for Simple MatchMaker
The following can be used when creating a Ruleset and Session Template for the MatchPool that the Simple MatchMaker will be set in.
More detailed instructions on this process can be found here.
Ruleset
{
    "alliance": {
        "min_number": 2,
        "max_number": 2,
        "player_min_number": 1,
        "player_max_number": 1
    },
    "matching_rule": []
}
Session Template
Session Type: DS - Armada
Requested Regions: <choose one, or any>
Min Players: 2
Max Players: 2
Invite Timeout: 60
Inactive Timeout: 60
Joinability: Open
Test your local gRPC plugin server
Next, we will test the Sample App locally before creating a service. To do so, we'll use NGROK to expose our port locally and use that address for the Match Function URL. Lastly, we'll use the mmtool-cli to mimic a client (or clients) creating matchmaking requests.
Register a local custom function
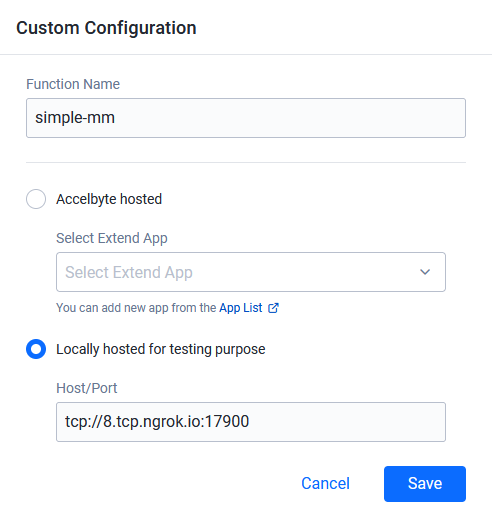
Copy the forwarding address from ngrok. An example of this will look like:
<number>.tcp.ngrok.io:<port>
Go to your AGS Admin Portal and use the namespace you wish to use when creating your custom function. On the left pane, click on Game Management, then New Matchmaking, and then Custom Function. Next, click the Register Function button and select the Locally hosted for testing purpose. Use the ngrok forwarding address for the URL. Once both fields are filled in, click Create.
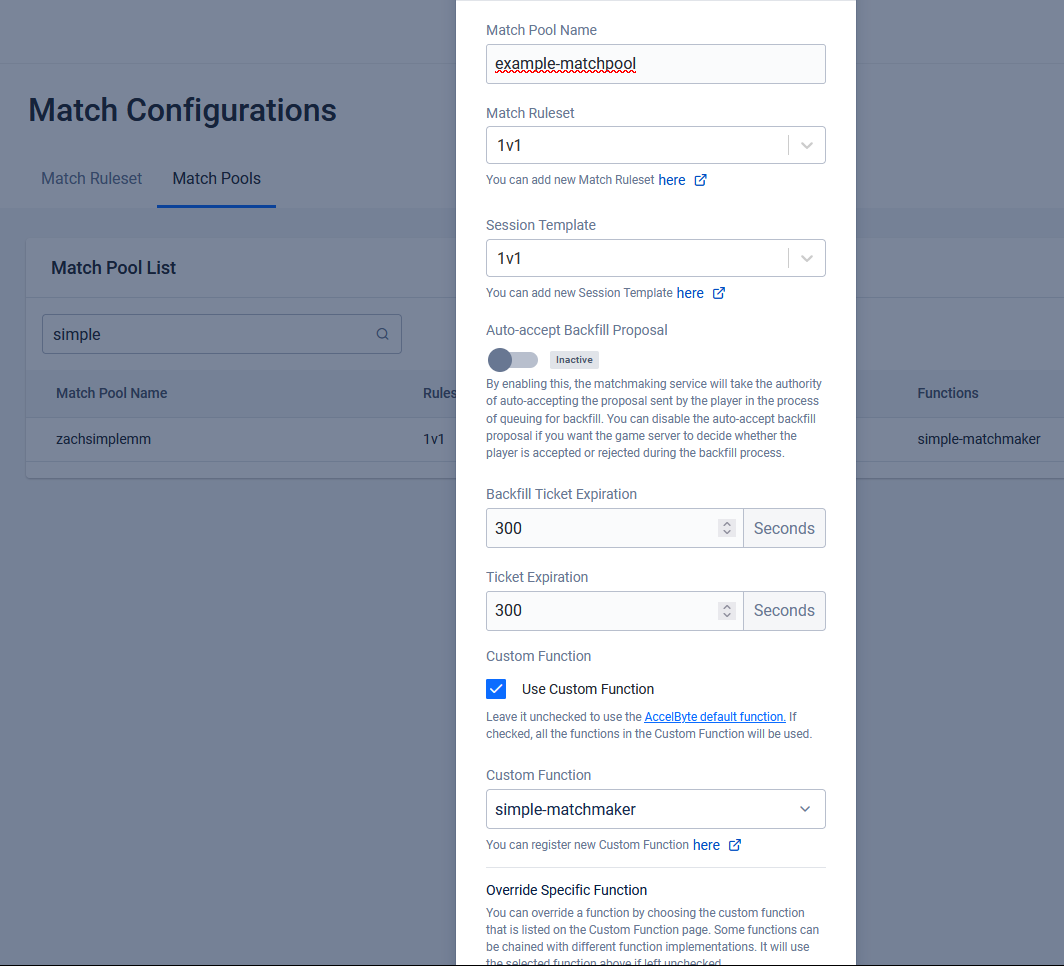
Next, set the match function to the match pool configuration you want to use. To do this, click on Game Management, then New Matchmaking, and then Match Configurations. Click the Match Pools tab and either create a match pool or edit an existing one. Scroll near the bottom and choose your Custom Function from the drop-down menu.
Test using gRPCurl
Testing with gRPCurl is optional, but it will ensure that your proxy is working correctly.
Download and install grpcurl and run the command below.
The following will printout the list of gRPC services served by the forwarded local sample app. Use your ngrok TCP forwarding address below.
grpcurl -plaintext <number>.tcp.ngrok.io:<port> list
Test using MMTool CLI (local)
mmtool-cli repo mmtool-cli releases
The mmtool-cli simulates game client behaviors and will be used to fully test your Sample App. If you have not done so, please follow the Setup portion of the README before continuing and ensure you're using the latest release for the platform of your choice. After your setup is complete, if you are using the the Simple Sample App (and have not changed any configurations), run the following command (replacing namespace and matchpool with your targeted namespace and matchpool, respectively).
mmtool-cli tickets create solo -n <namespace> -m <matchpool> -u 2
Create an Extend App
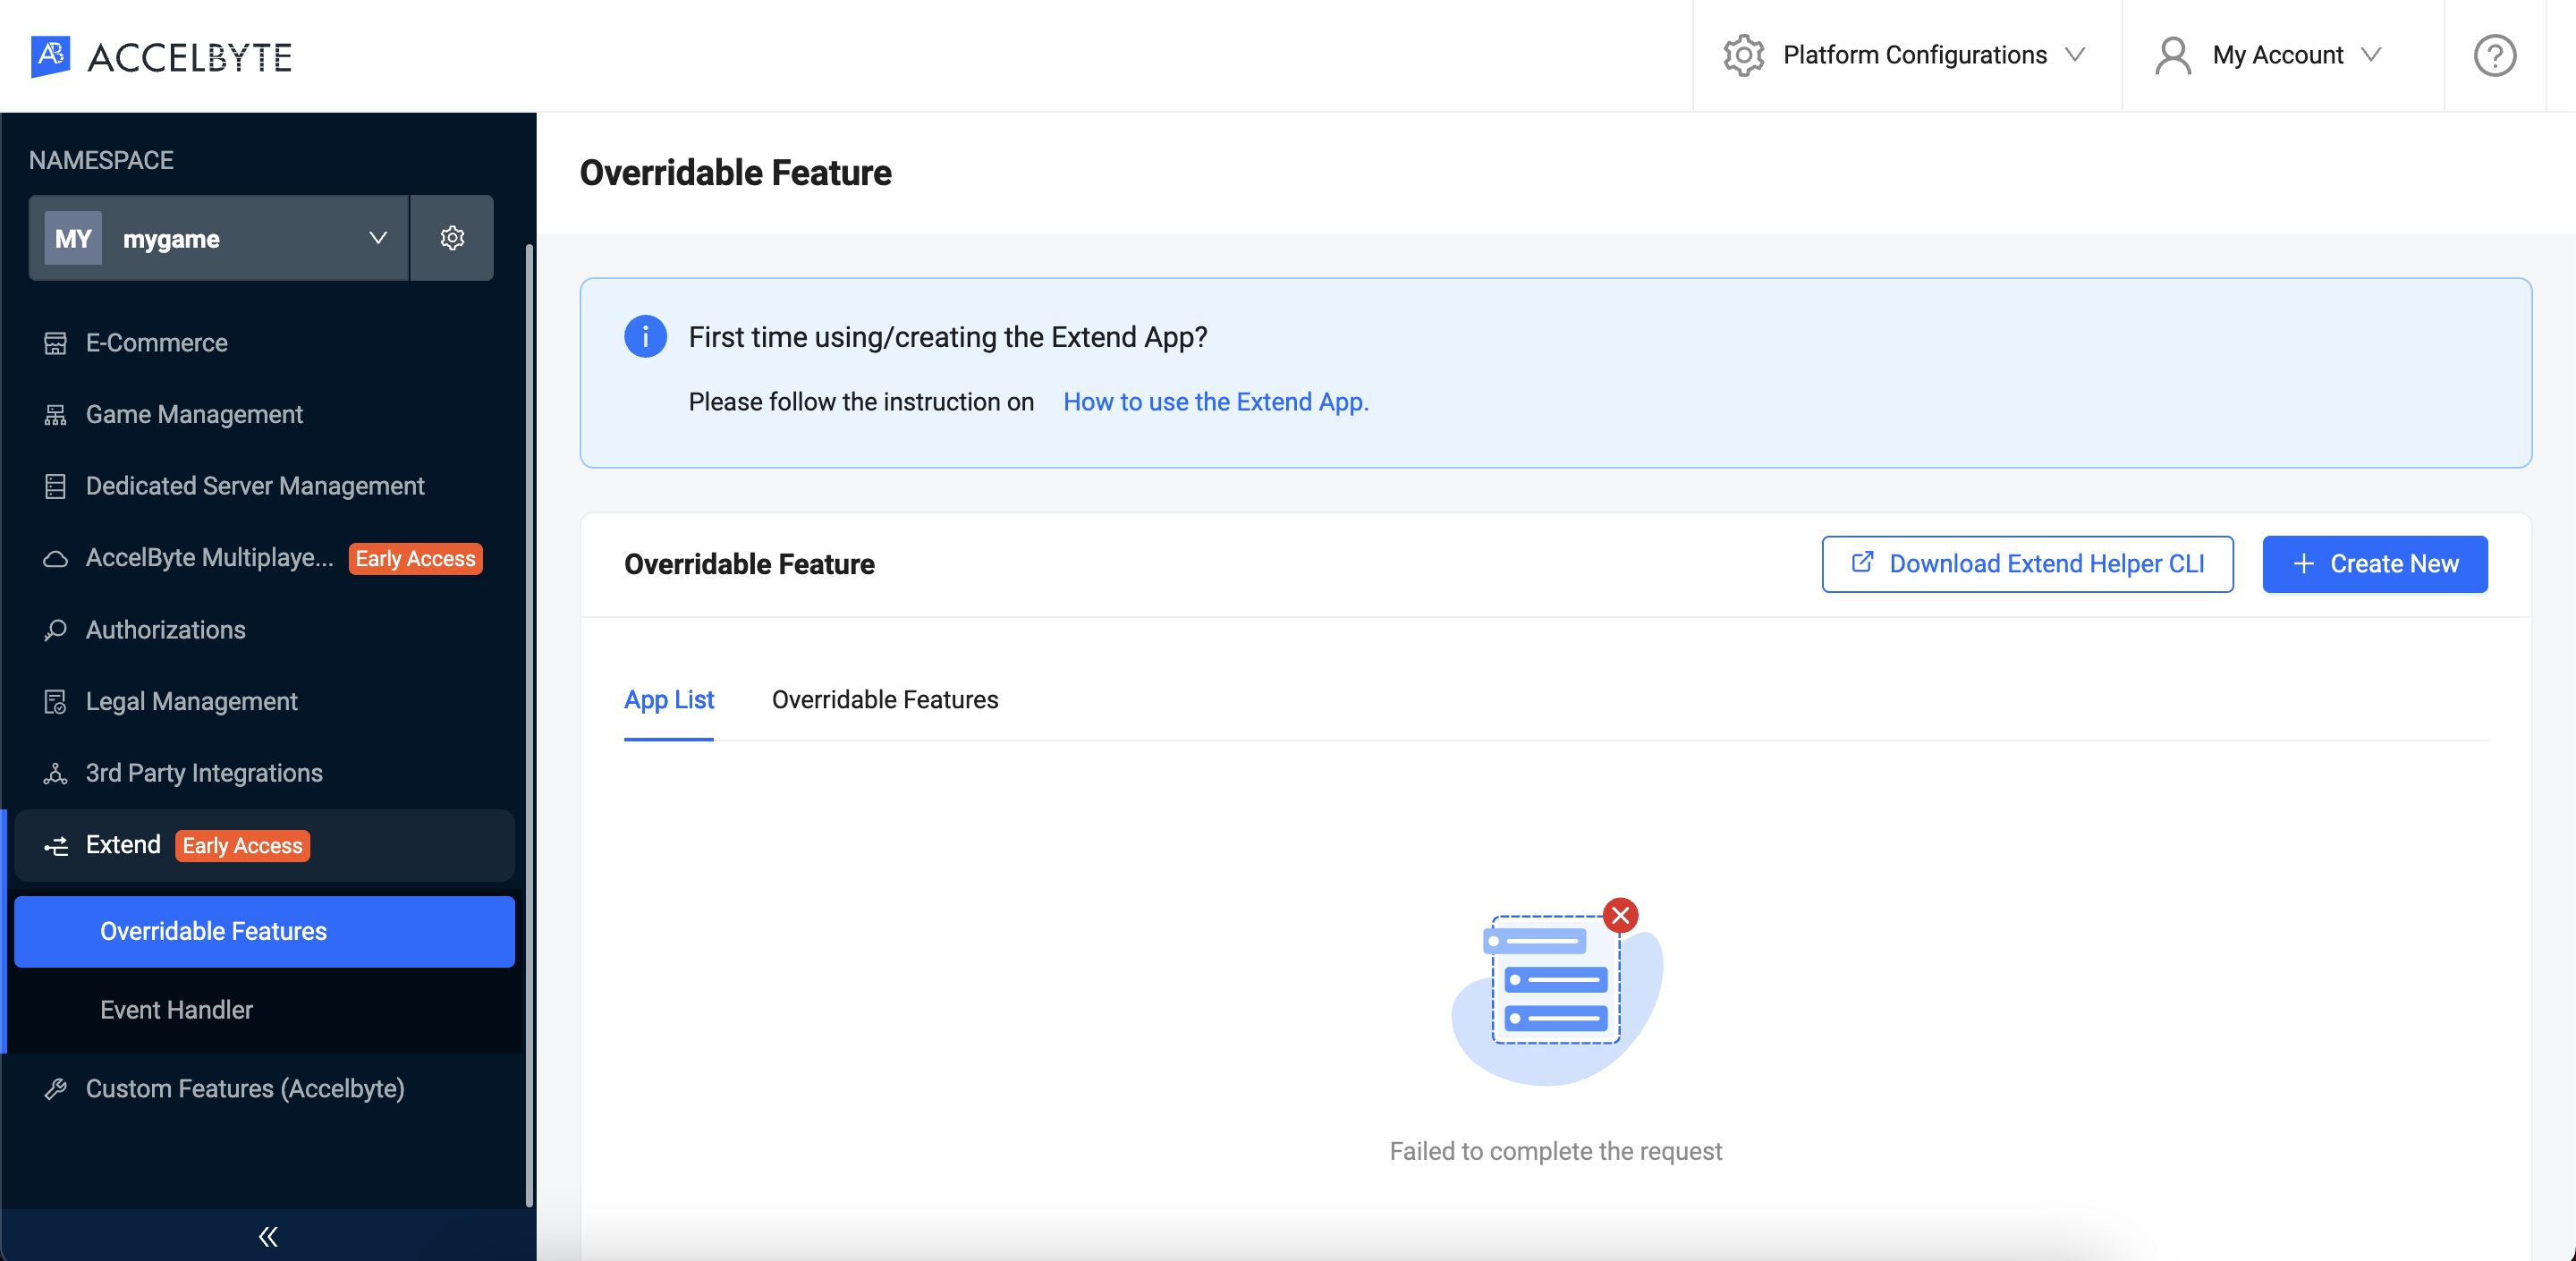
Go to the Admin Portal and use the namespace in which you wish to create your gRPC plugin. On the left pane, hover over Extend and click Overridable Features. Click Create New to create a new Extend App.
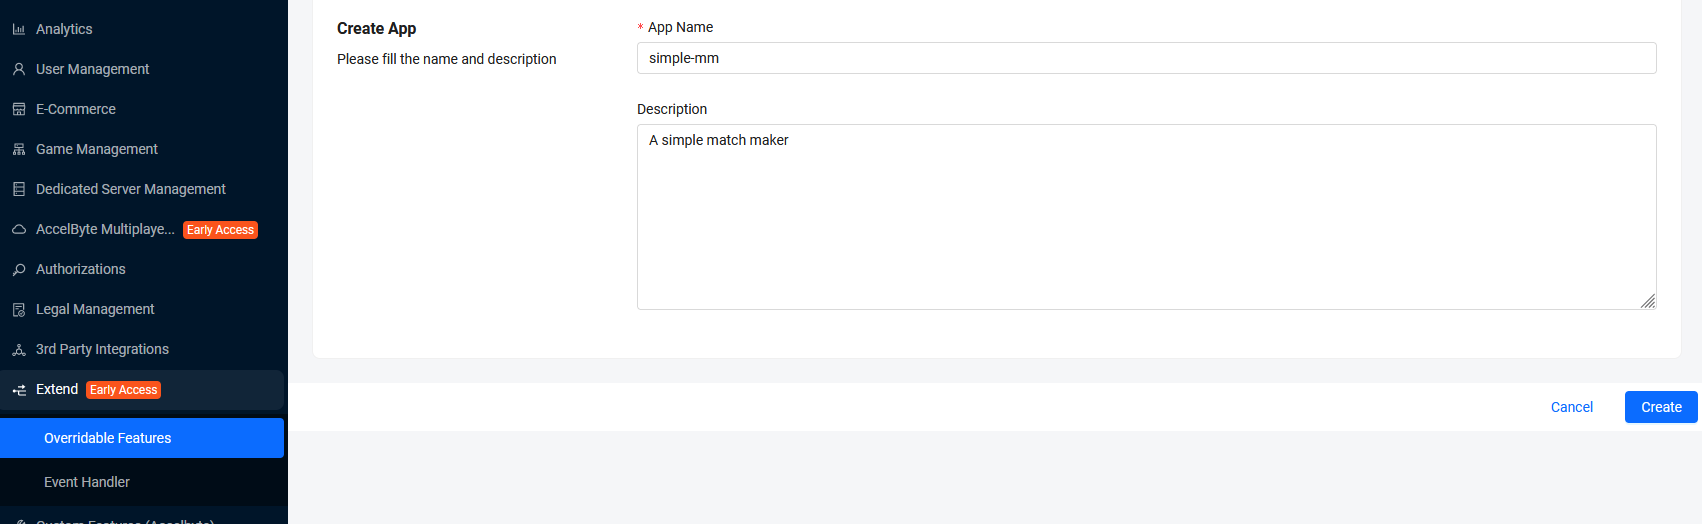
Type in the App Name and the Description. Then, click Create.
You will be redirected back to Overridable Features app list page with the newly created app with a status of Pending.

Wait until the status says Completed and click the app name in the list to see the details page.
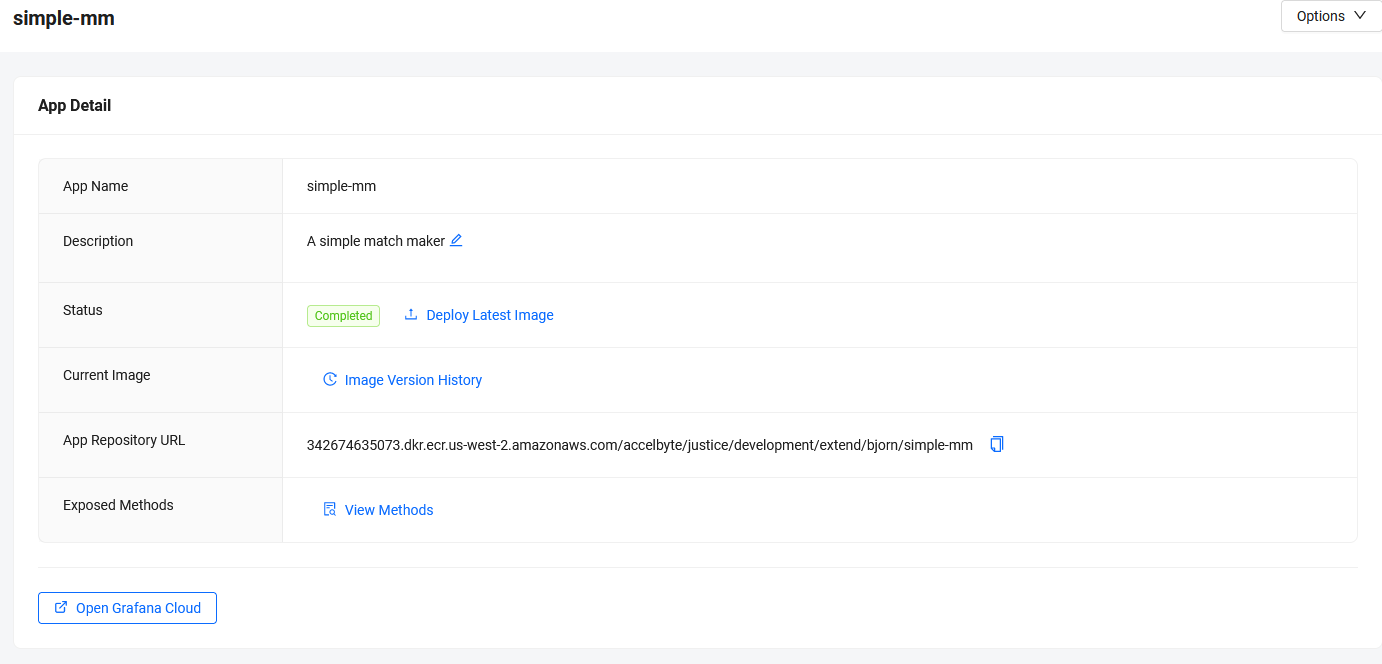
Please take note of the Namespace, App Name, and the App Repository URL since we're going to use it in the next section.
Package and push the Extend App image
The extend-helper-cli is required to get temporary Docker credentials for uploading your Docker image.
Use the Namespace and App Name used to create your Extend App for the following extend-helper-cli command.
extend-helper-cli dockerlogin --namespace <game namespace> --app <app name> -p | docker login -u AWS --password-stdin http://342674635073.dkr.ecr.us-west-2.amazonaws.com
Create an OAuth Client with confidential client type with the following permission. Keep the Client ID and Client Secret.
ADMIN:NAMESPACE:{namespace}:EXTEND:REPOCREDENTIALS[READ]
If you use extend-helper-cli v0.0.3 or lower, create a user if you don't have any with the following permission. Keep the Username and Password.
ADMIN:NAMESPACE:{namespace}:EXTEND:REPOCREDENTIALS[READ]
Go to the extend-helper-cli README for more details.
To directly build and push the sample app Docker image, you can use the provided make script. Inside the sample app directory, run the following:
make imagex_push IMAGE_TAG=v0.0.1 REPO_URL=<app-repo-url>
Note that the REPO_URL can be copied from the app detail page App Repository URL.
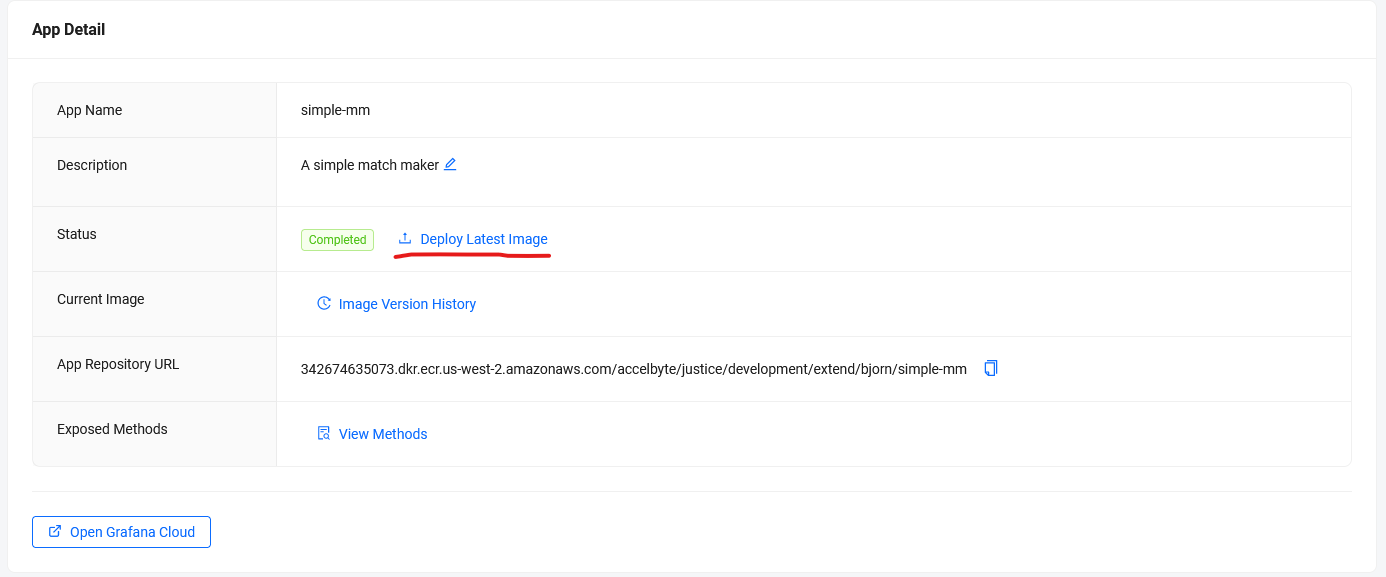
Deploy the Extend App
Return to the Admin Portal and, inside the Extend App Details page, click Deploy Latest Image. Wait until the deployment is successful.
Test the Extend App
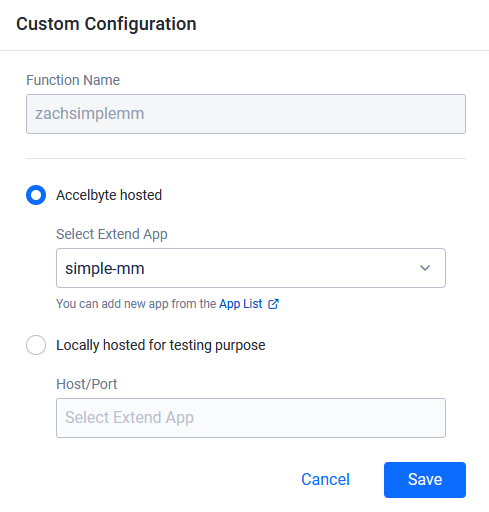
Update the custom function with the Extend App
Go back to the Admin Portal and update the Custom Function URL previously used by selecting the AccelByte Hosted option. Choose the Extend App name you created and click Save.
Test using MMTool CLI (Extend)
Reuse the command from the previous steps to test the Extend App.
mmtool-cli tickets create solo -n <namespace> -m <matchpool> -u 2
A note on Extend App behavior
In the deployment setup, there's a timeout mechanism for the gRPC Extend app managed by Envoy. This timeout occurs when there's no incoming/outgoing data or request, allowing the system to free up resources. By default, the timeout duration is 300s for streamIdleTimeout and 30s for routeTimeout.