Unreal Engine Module - Running DS on Armada - Upload a dedicated server to Armada
About
In this section, you will learn how to upload your dedicated server to Armada. The uploaded server will be considered a cloud-dedicated server that will be automatically spawned and managed by Armada.
Upload Linux dedicated server
Before uploading, you need to package your game as a Linux game server. To package a Linux game server using Unreal Engine, you need to install the Cross-Compile Toolchain in your computer. You can download it from the Unreal Engine website here. From that website, find the Version History section, then download and install the
-v20 clang-13.0.1-basedversion. Once installed, restart your computer.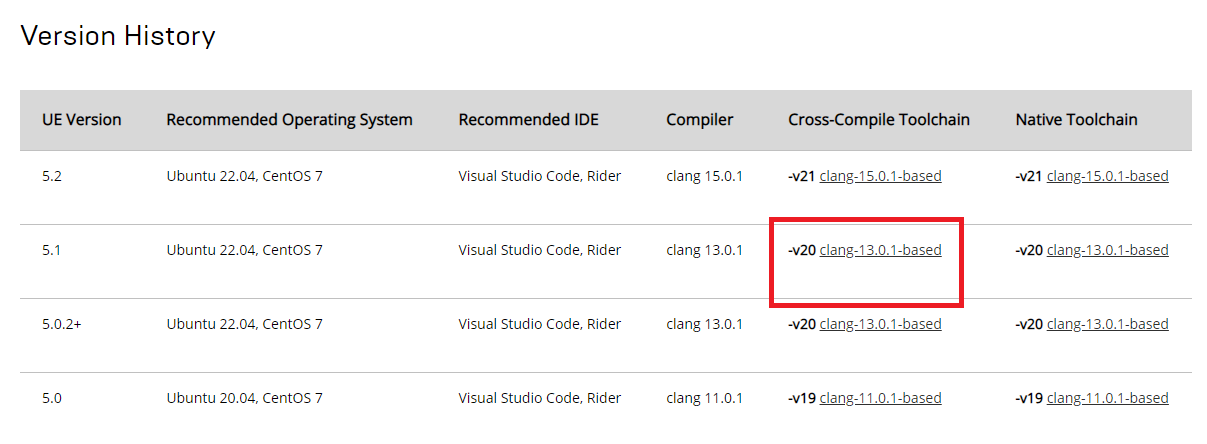
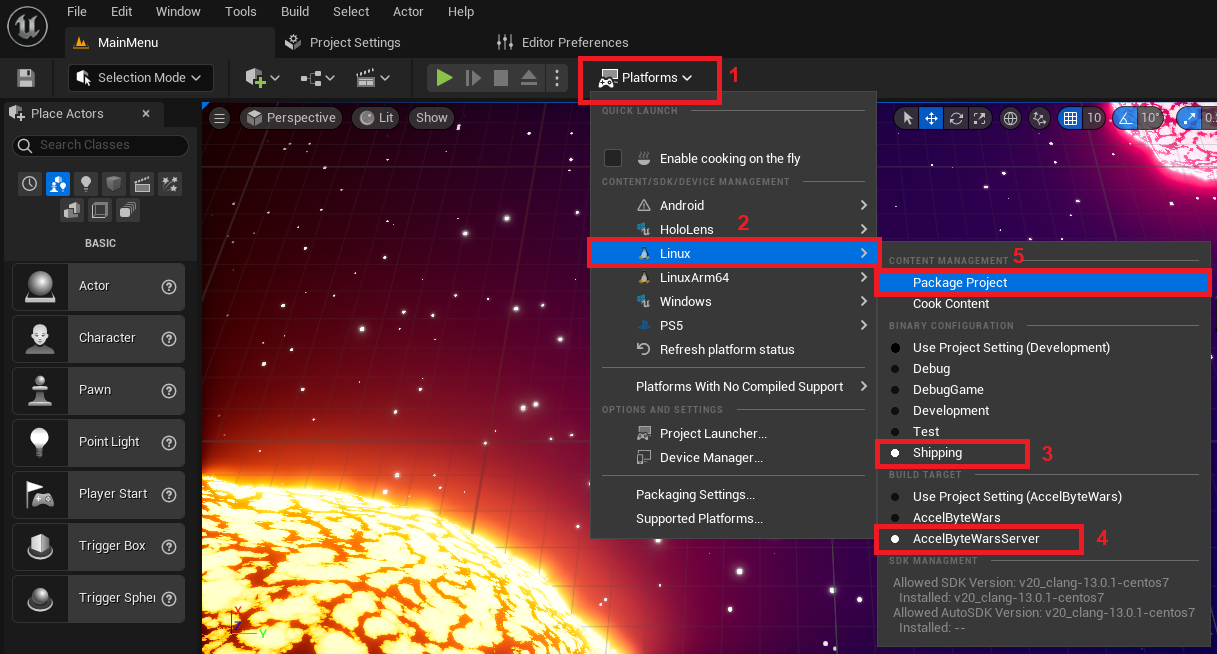
Now, open your Byte Wars project in the Unreal Engine Editor. Then, follow the step below to package your game server as a Linux game server.
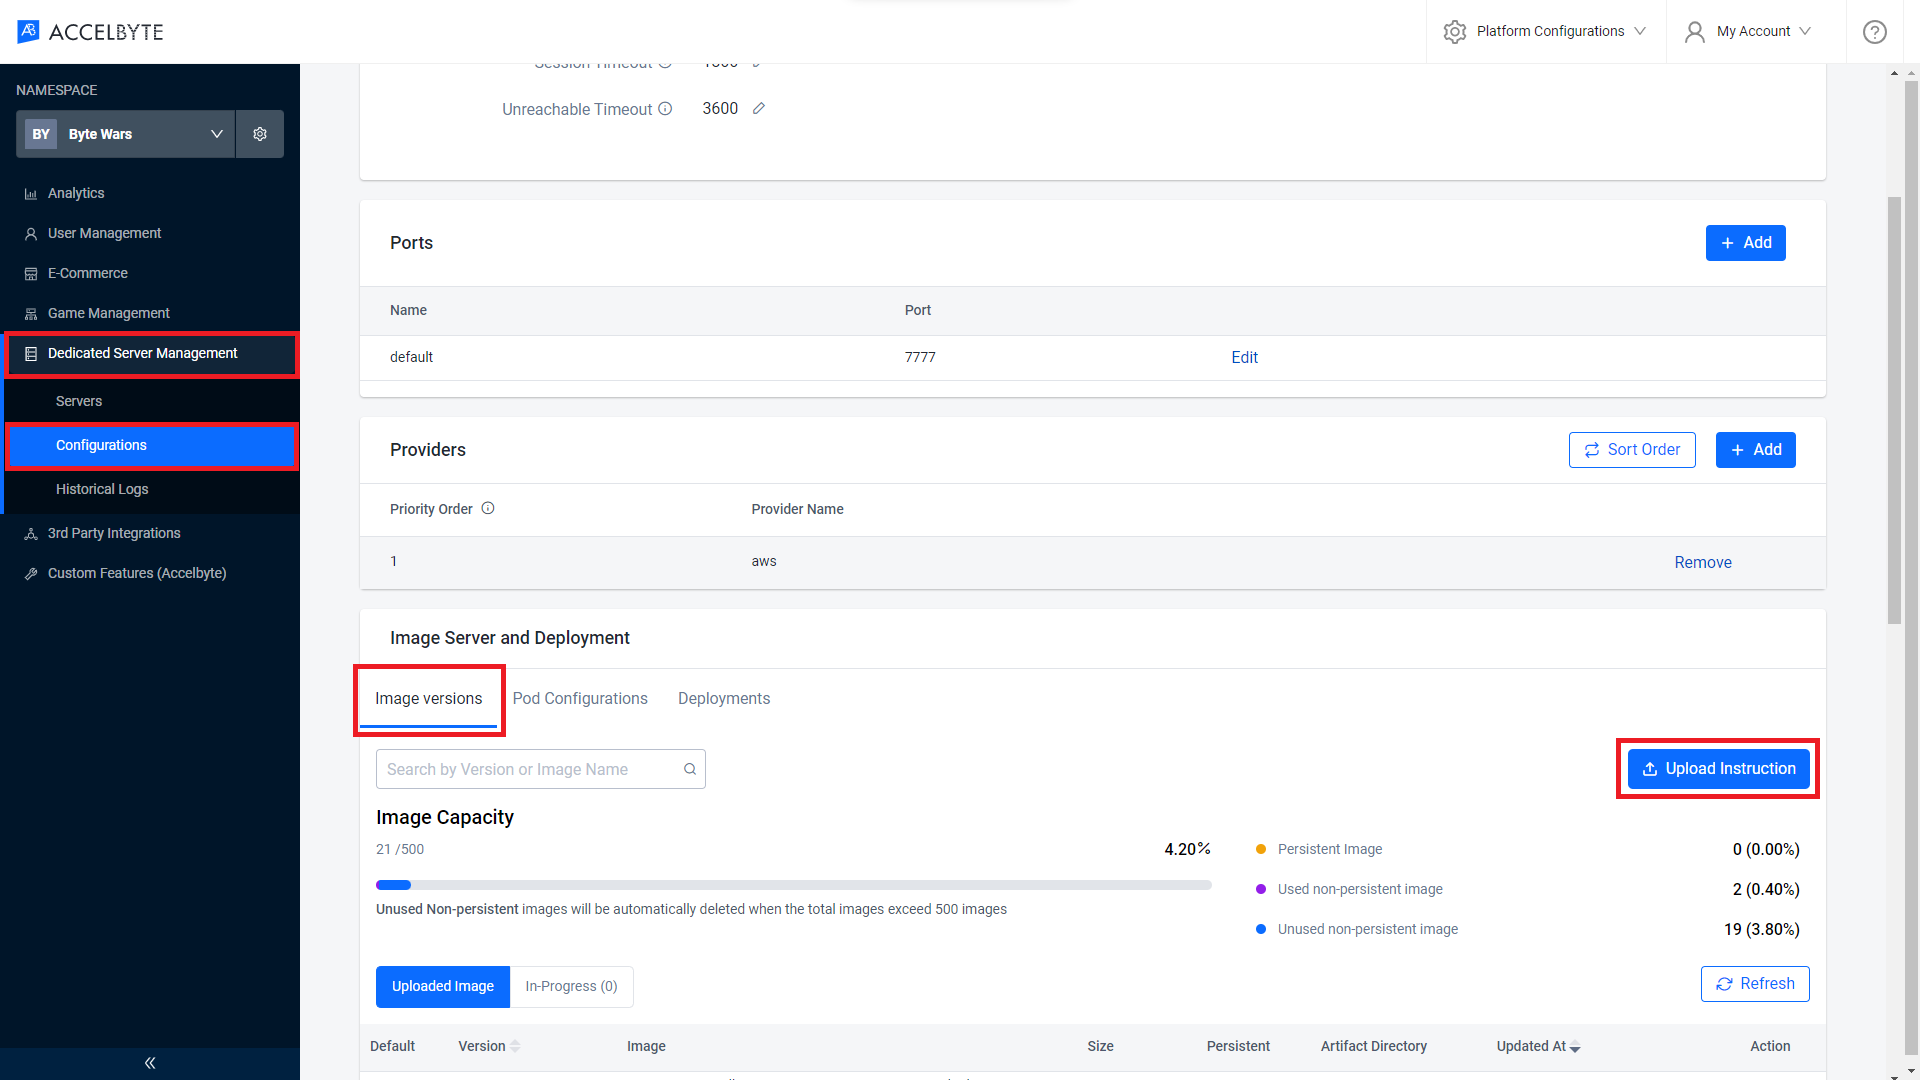
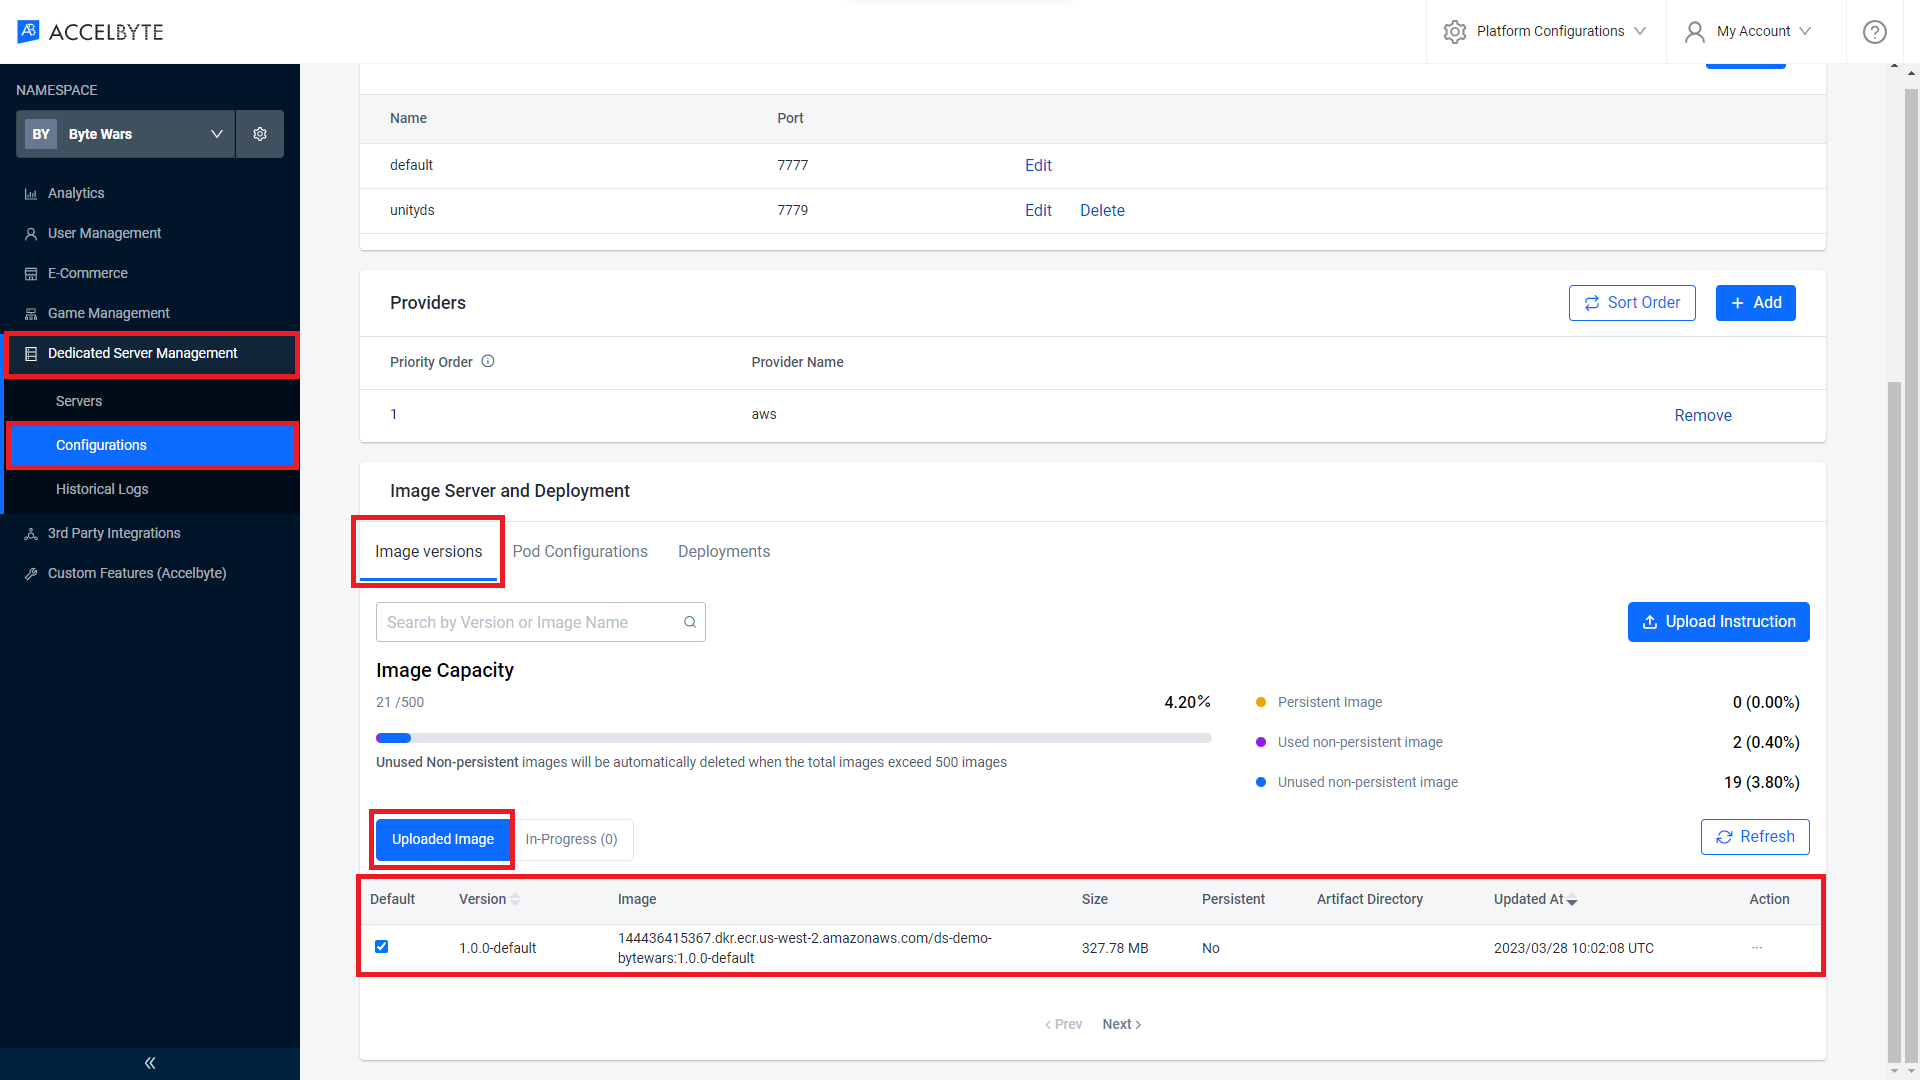
Next, open AccelByte's Demo Admin Portal dashboard. From the side menu panel, select Dedicated Server Management > Configuration > Image Versions > Upload Instructions.
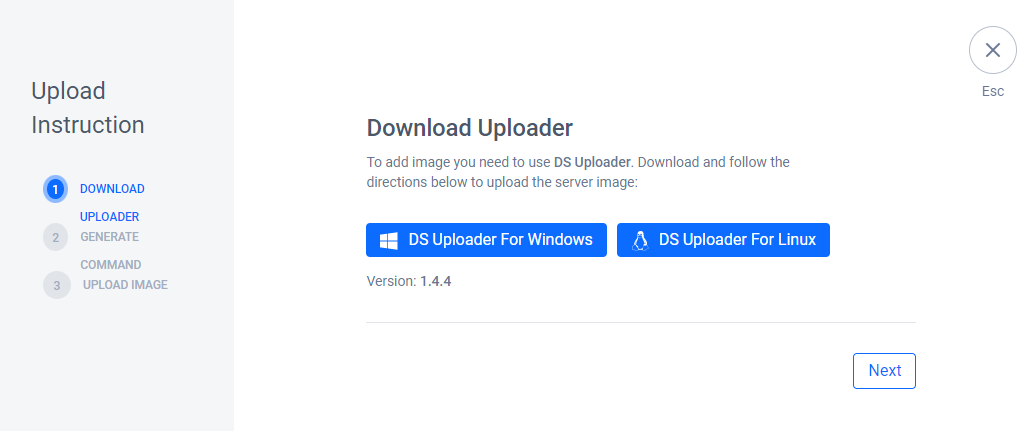
On the new screen, you need to download the DS Uploader executable. Download the Windows version then click the Next button.
In the next menu, you will see configuration fields to upload your dedicated server. Here are the details of each mandatory field.
- Version is a label to define your game server version. Since you can upload multiple dedicated servers, this label will distinguish them.
- Command is your game server's executable filename.
- Local Path is the local path folder where your game server's files are stored.
- S3 Directory is the AWS S3 bucket to store your dedicated servers. If the defined S3 bucket doesn't exist, it will be created automatically.

Next, you will be displayed with a Command Line Interface (CLI) code. This CLI is filled with configurations you just fill out earlier. But, you still need to replace the
client_idandclient_secretwith your DS-Uploader IAM client you have created in the previous tutorial sections, since those are unique and confidential. Once finished, copy the CLI and save it to your local computer. You will use this CLI to upload your dedicated server later.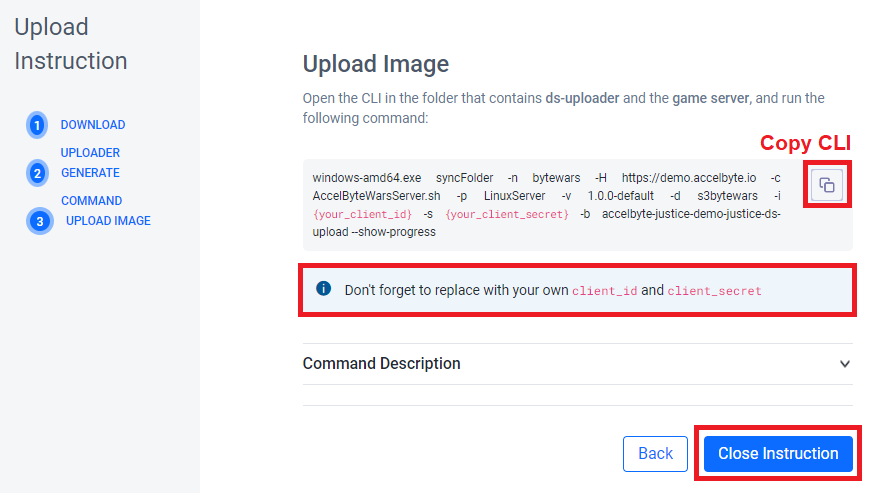 Note
NoteIf you followed the previous submodule tutorial sections, your DS-Uploader IAM client should be public (doesn't have client secret). Thus, omit the
-s {your_client_secret}from the CLI code.But if you set your DS-Uploader IAM client as confidential, then you must provide the client secret to the CLI code.
Next, you can start uploading the dedicated server. Place your DS Uploader executable file that you've downloaded earlier as your game server sibling folder.

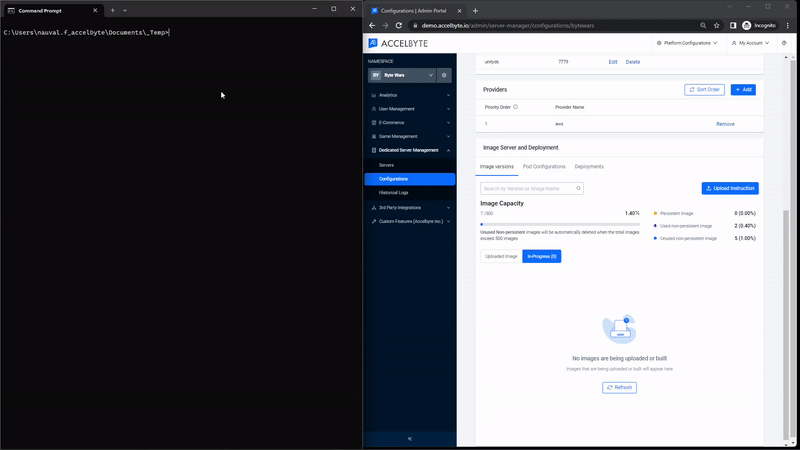
Then, you can run the DS Uploader executable file using a Windows Command Prompt and paste the CLI code you saved earlier. The uploading process will be displayed on your command line, but you can also view it on your Admin Portal dashboard via Dedicated Server Management > Configurations > Image Versions > In-Progress tab.
Once the uploading process finished, your new dedicated server image will be listed on Dedicated Server Management > Configurations > Image Versions > Uploaded Image.
Congratulations! You have successfully uploaded your dedicated server to Armada.
Deploy cloud dedicated server
In this section, you will learn how to configure Armada, so it can deploy your dedicated server.
Configure server pod
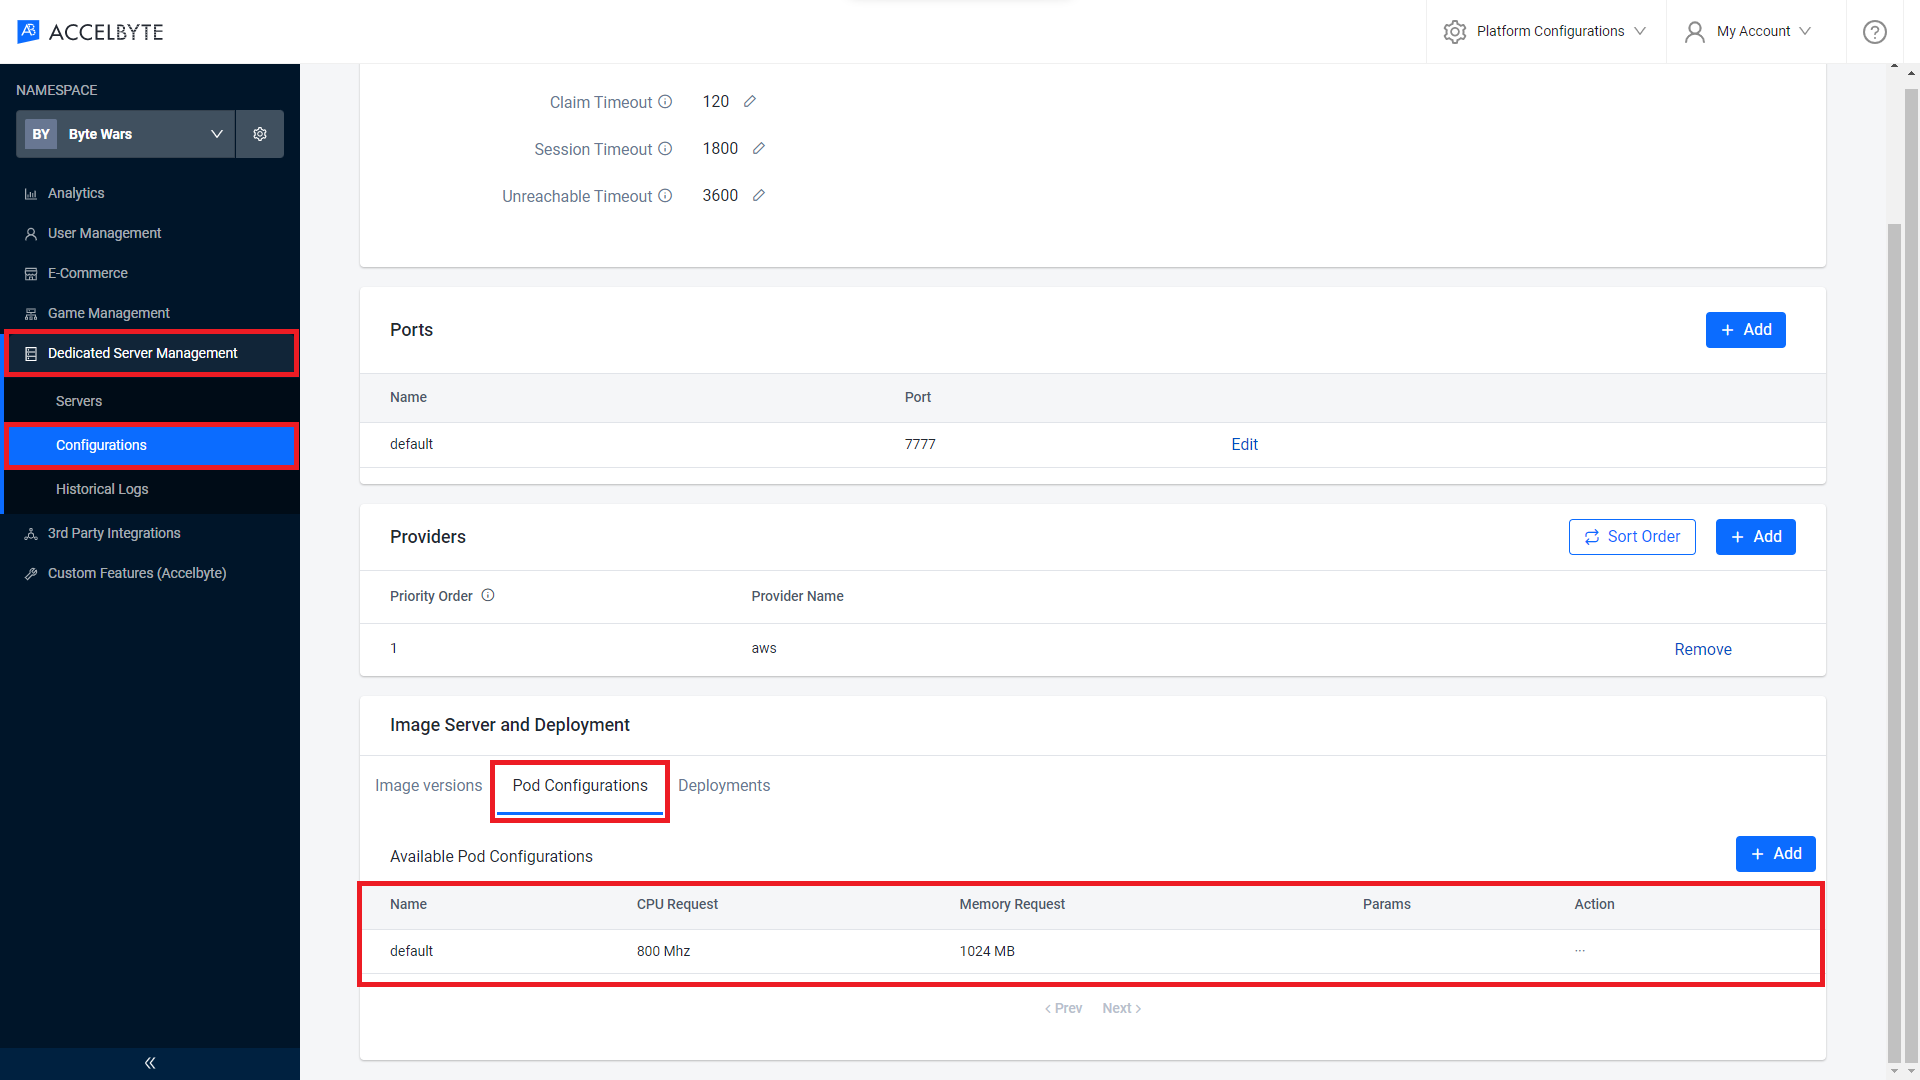
Open AccelByte's Demo Admin Portal dashboard, select Dedicated Server Management > Configurations scroll down to the Image Server and Deployment section and open the Pod Configurations tab. Then, click Create Configuration.

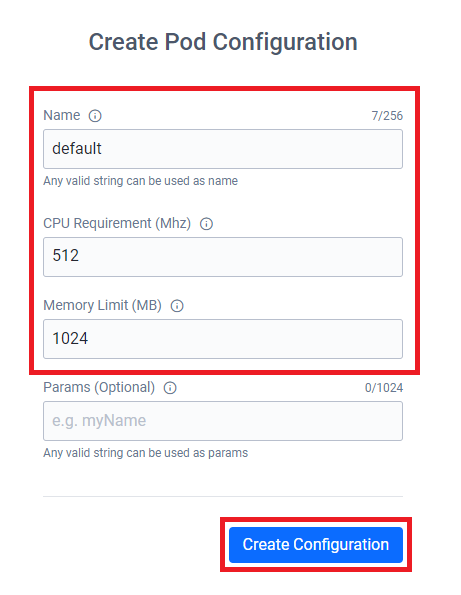
You will be redirected to the pod creation menu. Configure your new pod by filling out the mandatory fields. Once finished, click the Create button to create your pod.
- Name is your new pod name.
- CPU Requirement is the amount of CPU usage for your dedicated server to run.
- Memory Limit is the amount of memory for your dedicated server to run.
Your newly created pod should be displayed on your pod list.
Congratulations! You have successfully created a new pod for your game servers.
Configure server deployment
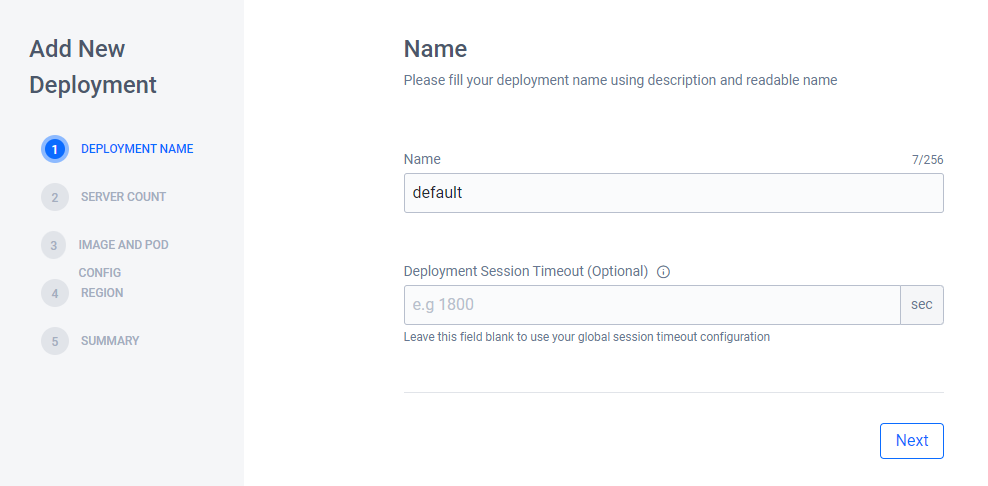
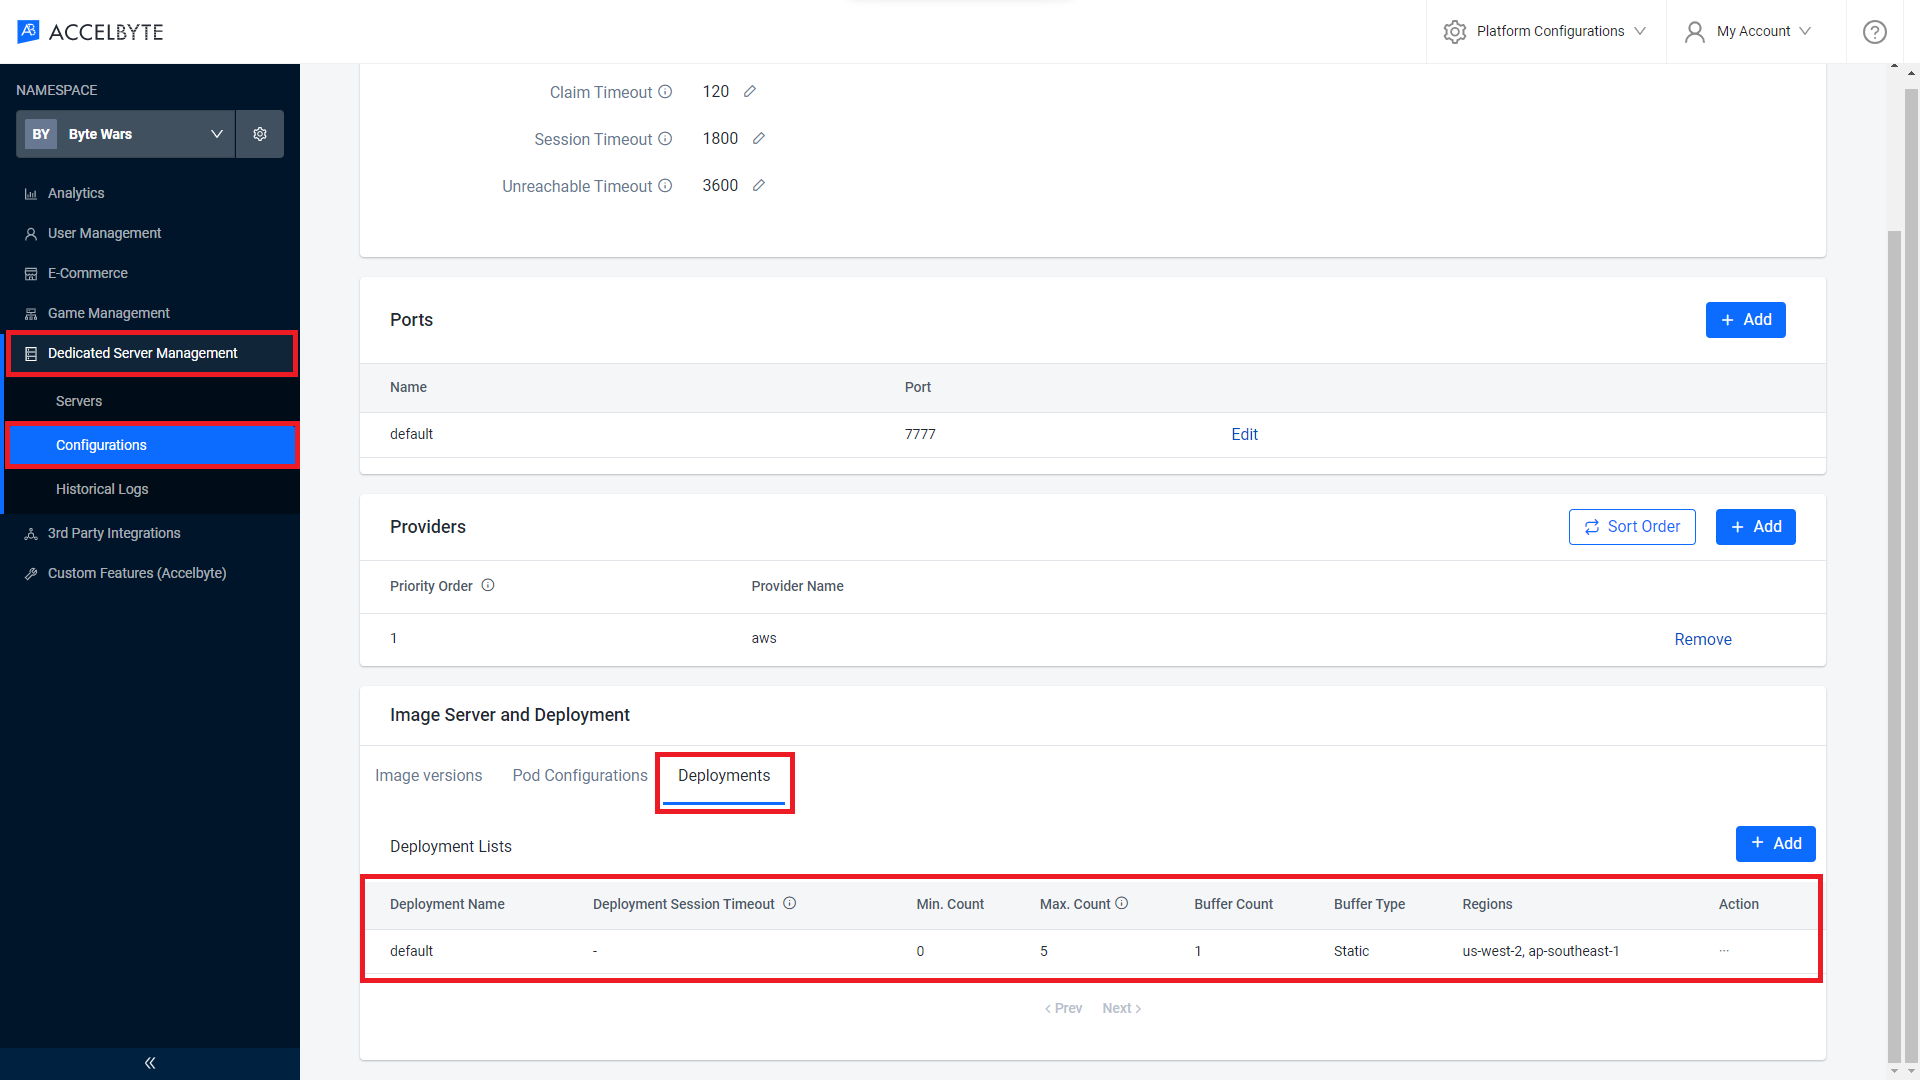
Open AccelByte's Demo Admin Portal dashboard, select Dedicated Server Management > Configurations scroll down to the Image Server and Deployment section and open the Deployments tab. Then, click New Deployment Configuration.

Then, you will be redirected to the deployment creation menu. First, you need to define your deployment name. Then, click the Next button.
Next, you need to define the server count. The
Min Countis the minimum server deployed at any time while theMax Countis the maximum server to be deployed. You can also define theBuffer Count, which is the number of servers that should be deployed and in its ready state at any time. For this tutorial, you should set the configurations like the following. Once finished, click the Next button.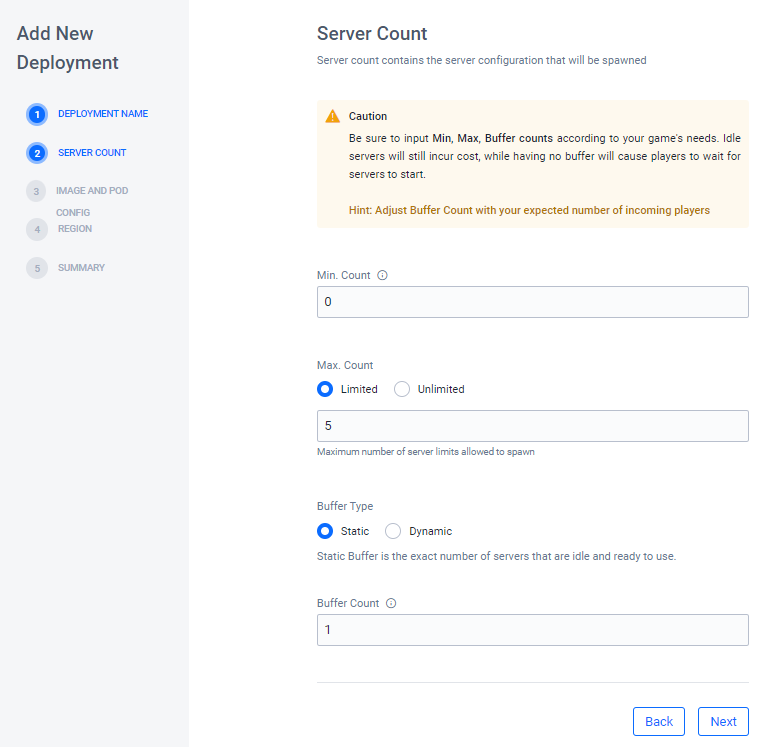 Note
NoteServer in ready state is server that is just deployed and is not claimed by session service. Meanwhile, server that have been claimed, will have busy state.
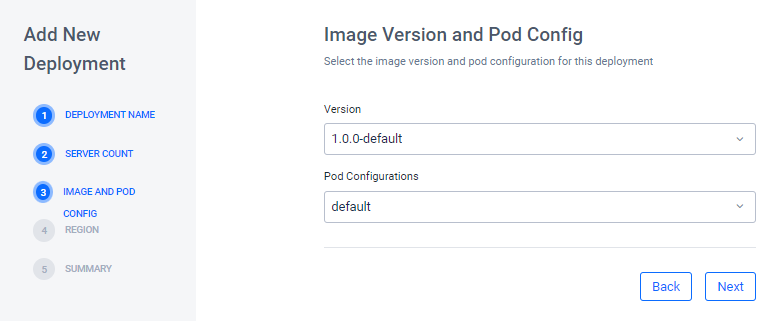
Now, you need to set the pod and default image version of your dedicated server. Let's set them based on the pod and game server version you created/uploaded earlier. Once finished, click the Next button.
Next, you need to define in which region your dedicated server should be deployed. Once finished, click the Next button.
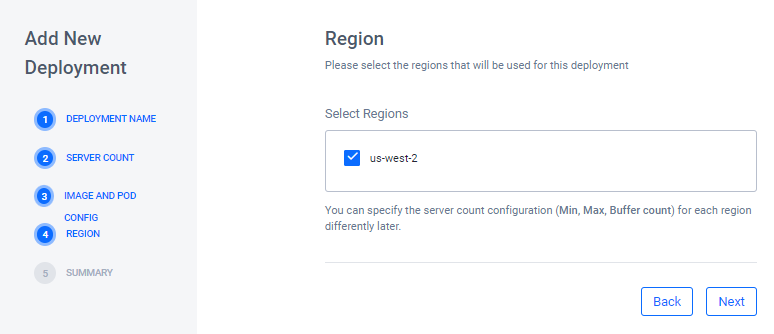
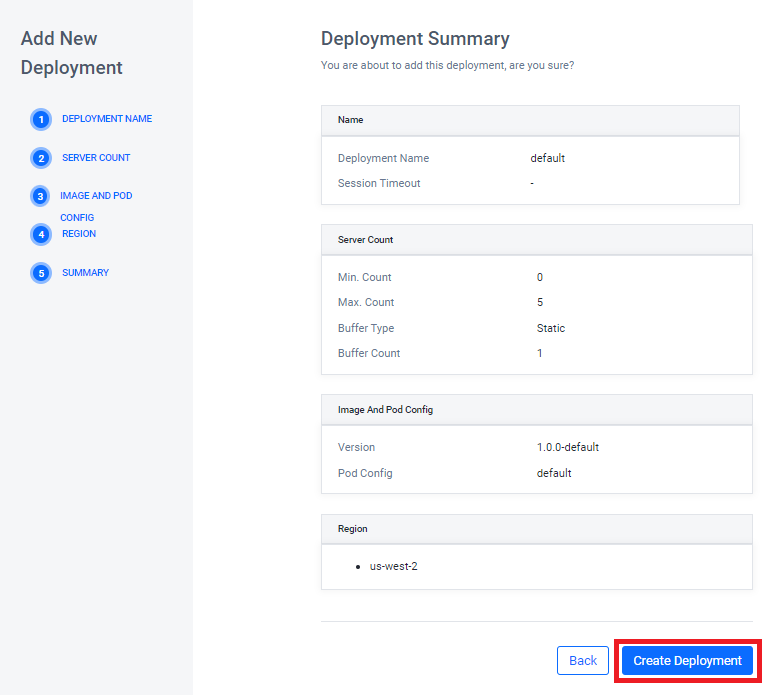
Finally, your deployment configurations summary will be displayed. Click on the Create Deployment button to finalize your deployment.
Now, your newly created deployment should be displayed on your deployment list.
Congratulations! You have successfully created a new deployment to deploy your game servers.
Testing cloud dedicated server
Now that you have set up all configurations needed, let's check if your cloud dedicated server has been successfully managed by Armada.
Open AccelByte's Demo Admin Portal dashboard, and select Dedicated Server Management > Servers > Server Overview.

In the previous section, you should have configured your deployment
Buffer Countto one. Thus, you should see at least one server is ready on the list.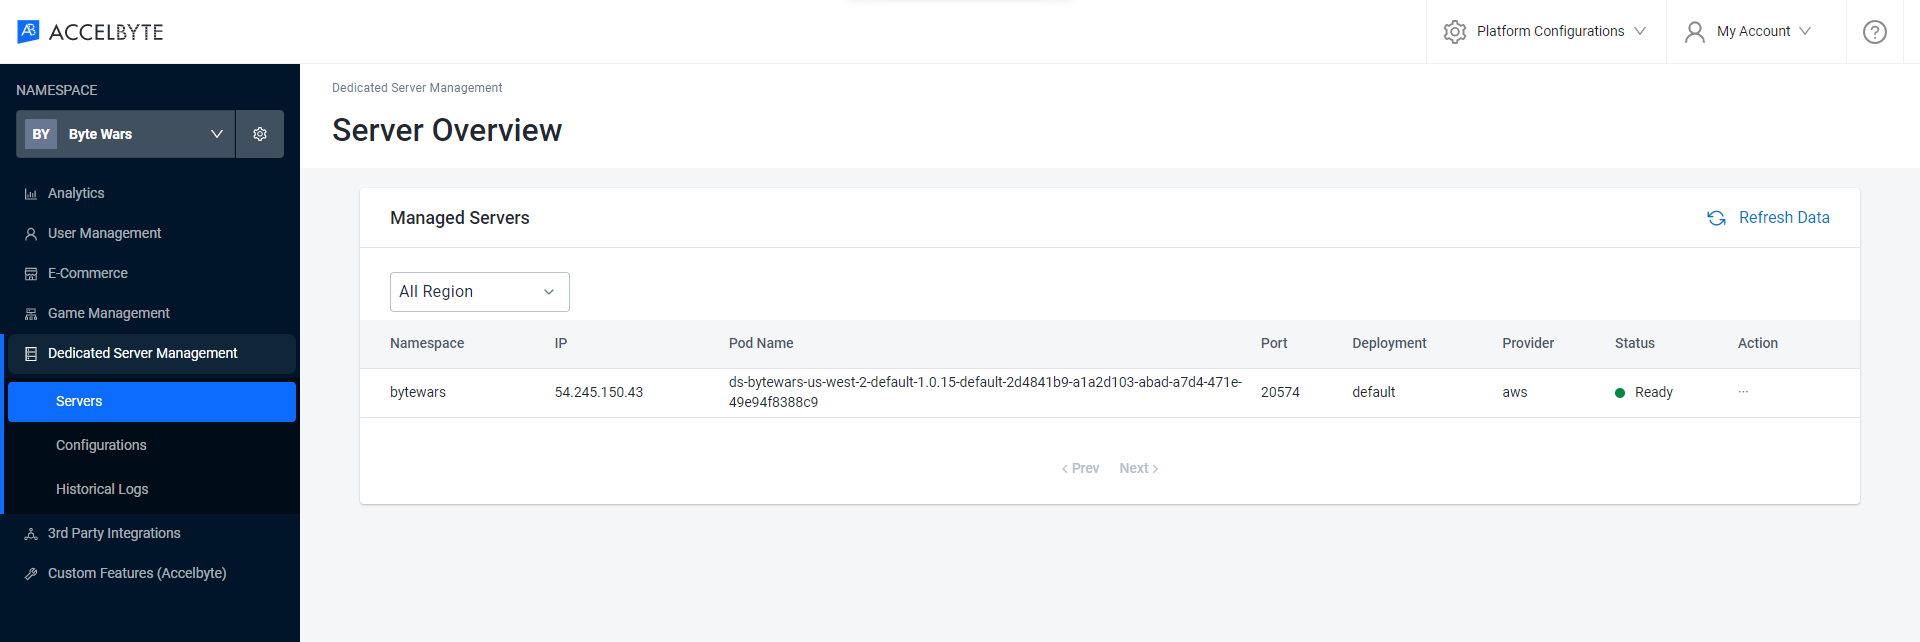
Congratulations! Your game dedicated server is now spawned and managed by Armada automatically.