Unreal Engine Module - Introduction to Multiplayer Session - Adding create session menu
What's on the menu
In this section, you will learn how to prepare a create session menu UI that you will use to send session creation and leave requests. But first, let's dig into what we have provided you with.
The create session menu itself is already created but requires additional codes before it can connect to AccelByte Online Sub-System (OSS).
Grab the files from the Resources section. The Create a Session menu consists of two parts:
- The C++ class
CreateSessionWidget_Starterwhere most of our implementation will be in.- Header file:
/Source/AccelByteWars/TutorialModules/Play/SessionEssentials/UI/CreateSessionWidget_Starter.h - CPP file:
/Source/AccelByteWars/TutorialModules/Play/SessionEssentials/UI/CreateSessionWidget_Starter.cpp
- Header file:
- The widget blueprint class
W_CreateSession_Starterthat was created and designed using Unreal Motion Graphics (UMG).- Widget Blueprint file:
/Content/TutorialModules/Play/UI/W_CreateSession_Starter.uasset
- Widget Blueprint file:
For more detailed info about UMG please go to UMG UI Designer.
Create a session menu has four states:
- Default: showing a Create Session button.
- Loading: showing a request was sent and is waiting for the response.
- Error: showing error message if the request was failed or an error response was received.
- Success: showing the created session's ID and a Leave button.
The state changes are possible using a combination between Widget Switcher, a component that's provided by the engine, and AccelByteWars Widget Switcher, a custom Widget Switcher with predefined child widgets to show empty, loading, error, and successful state.
For more detailed info about Widget Switcher please read more at Unreal Engine API Reference.
Here is the declaration of those widgets in the C++ header file:
private:
    UPROPERTY(BlueprintReadOnly, meta = (BindWidget, BlueprintProtected = true, AllowPrivateAccess = true))
    UWidgetSwitcher* Ws_ContentOuter;

    UPROPERTY(BlueprintReadOnly, meta = (BindWidget, BlueprintProtected = true, AllowPrivateAccess = true))
    UAccelByteWarsWidgetSwitcher* Ws_Processing;
We have provided utility function to change the state of those widgets. This function will handle switching the Widget Switcher's child and controller's focus.
void UCreateSessionWidget_Starter::SwitchContent(const EContentType Type)
{
    UWidget* ContentTarget = nullptr;
    UWidget* FocusTarget = nullptr;
    EAccelByteWarsWidgetSwitcherState ProcessingWidgetState = EAccelByteWarsWidgetSwitcherState::Empty;
    bool bEnableBackButton = true;

    switch (Type)
    {
    case EContentType::CREATE:
        ContentTarget = W_Selection;
        FocusTarget = Btn_CreateSession;
        break;
    case EContentType::LOADING:
        ContentTarget = Ws_Processing;
        ProcessingWidgetState = EAccelByteWarsWidgetSwitcherState::Loading;
        bEnableBackButton = false;
        break;
    case EContentType::SUCCESS:
        ContentTarget = Ws_Processing;
        ProcessingWidgetState = EAccelByteWarsWidgetSwitcherState::Not_Empty;
        FocusTarget = Btn_Leave;
        break;
    case EContentType::ERROR:
        ContentTarget = Ws_Processing;
        ProcessingWidgetState = EAccelByteWarsWidgetSwitcherState::Error;
        FocusTarget = Btn_Back;
        break;
    default: ;
    }

    Ws_ContentOuter->SetActiveWidget(ContentTarget);
    if (ProcessingWidgetState != EAccelByteWarsWidgetSwitcherState::Empty)
    {
        Ws_Processing->SetWidgetState(ProcessingWidgetState);
    }

    Btn_Back->SetIsEnabled(bEnableBackButton);
    bIsBackHandler = bEnableBackButton;

    if (FocusTarget)
    {
        FocusTarget->SetUserFocus(GetOwningPlayer());
    }
}
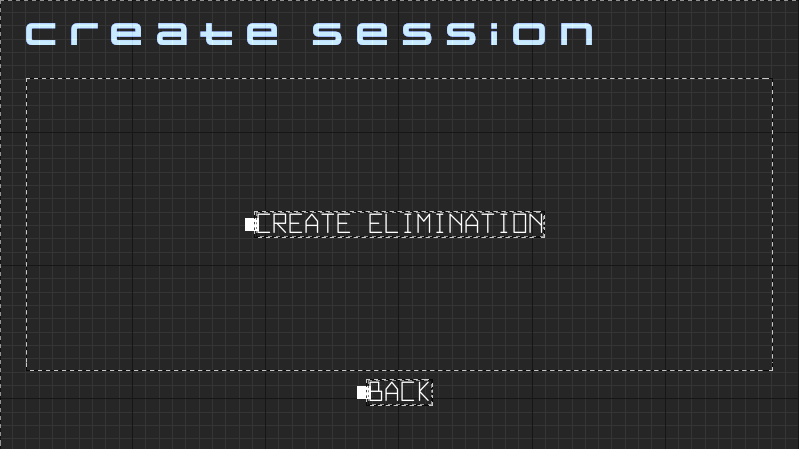
Default state
Default state displays a button called Btn_CreateSession and is bound to its C++ parent class.
It uses Common Button Base as the button type.
The code below is the button declaration in the header file class.
private:
    UPROPERTY(BlueprintReadOnly, meta = (BindWidget, BlueprintProtected = true, AllowPrivateAccess = true))
    UCommonButtonBase* Btn_CreateSession;
Here is the preview of the Default state:
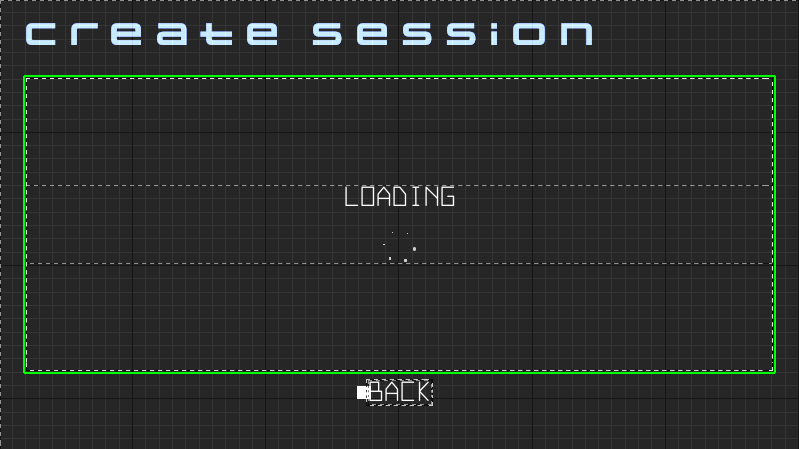
Loading state
Loading state is provided by Ws_Processing, the custom Widget Switcher. This state only comprised of a loading message.
To change the loading message, you just need to change the LoadingMessage variable and call SwitchContent to apply it.
Ws_Processing->LoadingMessage = TextChanged;
SwitchContent(EContentType::LOADING);
Here is the preview of the Loading state:
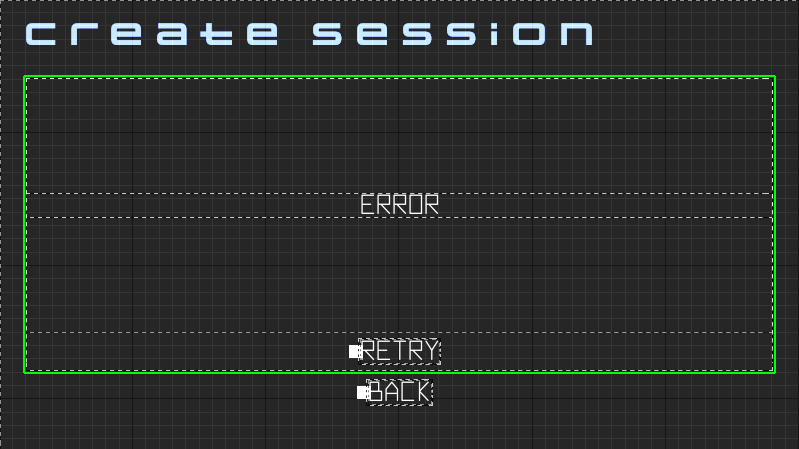
Error state
Error state is also provided by Ws_Processing, which consisted of an error message and a retry button.
The error message and the enabling of the retry button, can be change with these codes:
Ws_Processing->ErrorMessage = TextChanged;
Ws_Processing->bEnableRetryButton = bIsRetryButtonEnable;
SwitchContent(EContentType::ERROR);
Here is the preview of the Error state:
Success state
Success state comprised of a message that the Session has been successfully created, a text box called Tb_SessionId which will displays the created session's ID, and a Leave button called Btn_leave.
Here is the declaration of the text box and the button:
private:
    UPROPERTY(BlueprintReadOnly, meta = (BindWidget, BlueprintProtected = true, AllowPrivateAccess = true))
    UTextBlock* Tb_SessionId;

    UPROPERTY(BlueprintReadOnly, meta = (BindWidget, BlueprintProtected = true, AllowPrivateAccess = true))
    UCommonButtonBase* Btn_Leave;
And here is the preview of the Success state:

Ready the UI
In this section, you are going to prepare the UI for AccelByte Session integration.
First, you are going to declare and implement functions that will be used for the create session functionality. Open the
CreateSessionWidget_Starterclass header file in your favorite code editor. Add the following functions declarations.protected:
UFUNCTION()
void CreateSession();
UFUNCTION()
void OnCreateSessionComplete(FName SessionName, bool bSucceeded);Next, open the
CreateSessionWidget_Starterclass CPP file and add the following codes.void UCreateSessionWidget_Starter::CreateSession()
{
if (!SessionOnlineSession)
{
return;
}
// An event to validate to start the session, will be used on playing with party module
if (SessionOnlineSession->ValidateToStartSession.IsBound() &&
!SessionOnlineSession->ValidateToStartSession.Execute())
{
return;
}
Ws_Processing->LoadingMessage = TEXT_REQUESTING_SESSION_CREATION;
SwitchContent(EContentType::LOADING);
// TODO: request session creation
}
void UCreateSessionWidget_Starter::OnCreateSessionComplete(FName SessionName, bool bSucceeded)
{
// Abort if not a game session.
if (!SessionName.IsEqual(SessionOnlineSession->GetPredefinedSessionNameFromType(EAccelByteV2SessionType::GameSession)))
{
return;
}
if (bSucceeded)
{
// Get session id
const FNamedOnlineSession* OnlineSession = SessionOnlineSession->GetSession(SessionName);
Tb_SessionId->SetText(FText::FromString(OnlineSession->GetSessionIdStr()));
SwitchContent(EContentType::SUCCESS);
}
else
{
Ws_Processing->ErrorMessage = TEXT_FAILED_TO_CREATE_SESSION;
Ws_Processing->bShowRetryButtonOnError = true;
SwitchContent(EContentType::ERROR);
}
}You will now declare and implement functions that will be used for Leave Session functionality. Open
CreateSessionWidget_Starterclass header file and add the following functions declarations.protected:
UFUNCTION()
void LeaveSession();
UFUNCTION()
void OnLeaveSessionComplete(FName SessionName, bool bSucceeded);Open v
CreateSessionWidget_Starterclass CPP file and add the following codes for the implementation.void UCreateSessionWidget_Starter::LeaveSession()
{
if (!SessionOnlineSession)
{
return;
}
Ws_Processing->LoadingMessage = TEXT_LEAVING_SESSION;
SwitchContent(EContentType::LOADING);
// TODO: request leave session
}
void UCreateSessionWidget_Starter::OnLeaveSessionComplete(FName SessionName, bool bSucceeded)
{
// Abort if not a game session.
if (!SessionName.IsEqual(SessionOnlineSession->GetPredefinedSessionNameFromType(EAccelByteV2SessionType::GameSession)))
{
return;
}
if (bSucceeded)
{
SwitchContent(EContentType::CREATE);
}
else
{
Ws_Processing->ErrorMessage = TEXT_FAILED_TO_LEAVE_SESSION;
Ws_Processing->bShowRetryButtonOnError = false;
SwitchContent(EContentType::ERROR);
}
}With all the functions declared and defined, you need to bind those functions to the corresponding button. Still in
CreateSessionWidget_Starterclass CPP file, navigate toNativeOnActivatedand add the highlighted lines in the following code.void UCreateSessionWidget::NativeOnActivated()
{
Super::NativeOnActivated();
Btn_Back->OnClicked().AddUObject(this, &ThisClass::DeactivateWidget);
Btn_CreateSession->OnClicked().AddUObject(this, &ThisClass::CreateSession);
Btn_Leave->OnClicked().AddUObject(this, &ThisClass::LeaveSession);
Ws_Processing->OnRetryClicked.AddUObject(this, &ThisClass::CreateSession);
...
}You also need to unbind those functions when the widget closes. To do so, still in the CPP file, navigate to
NativeOnDeactivatedand add the highlighted lines in the following code.void UCreateSessionWidget_Starter::NativeOnDeactivated()
{
Super::NativeOnDeactivated();
Btn_Back->OnClicked().RemoveAll(this);
Btn_CreateSession->OnClicked().RemoveAll(this);
Btn_Leave->OnClicked().RemoveAll(this);
Ws_Processing->OnRetryClicked.RemoveAll(this);
...
}Now, build the AccelByteWars project and open it with Unreal Editor once it's done building.
In the Unreal Editor, from the Content Browser, navigates to
/Content/TutorialModules/Play/SessionEssentials/UI/and openW_CreateSession_Starter. Make sure that all widgets are bound properly in the Bind Widgets tab, stacked just beside the Hierarchy tab by default, and the Parent class is set toCreateSessionWidget_Starter.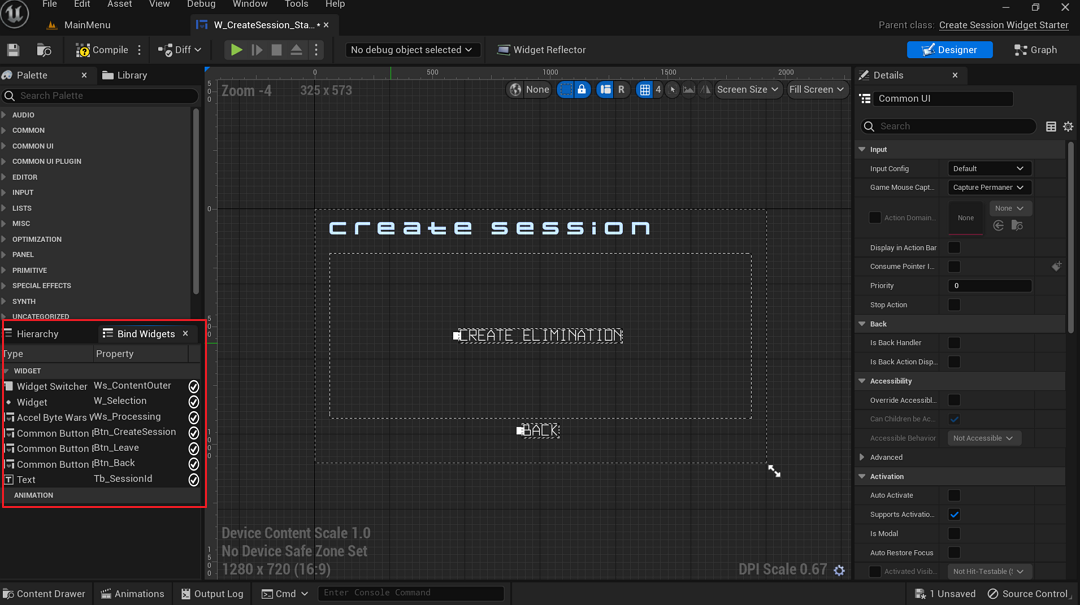
To test out the create a session widget, open
Content/TutorialModules/Play/SessionEssentials/DA_SessionEssentials.uassetand enable theIs Starter Mode Active. Save the Data Asset.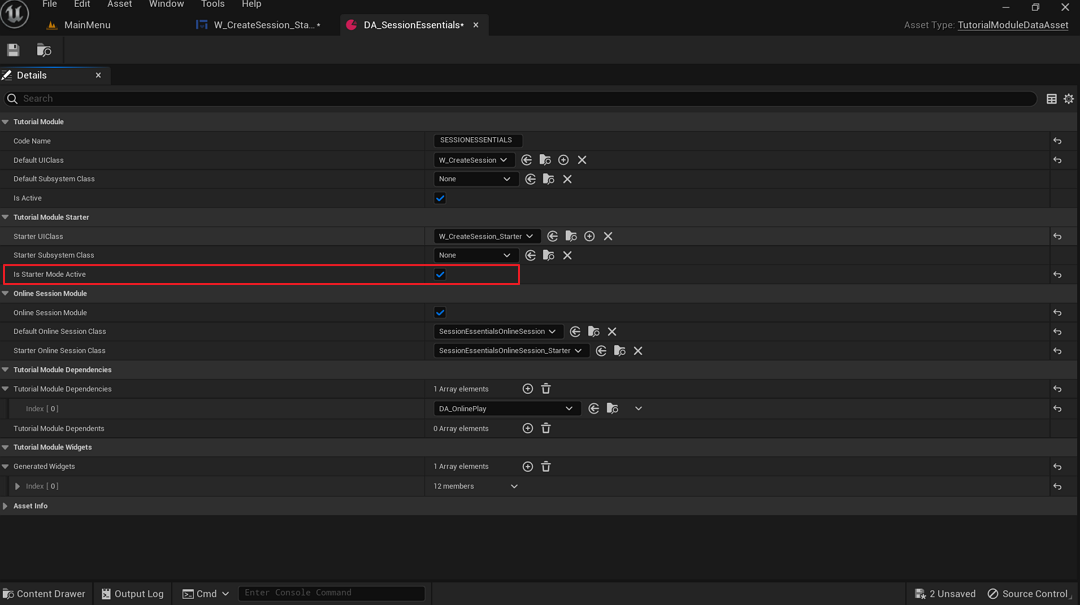
Hit Play in the editor, navigates to Online Play > Create a Session. The starter UI will be shown.
Congratulations! You have finish setting up the Create a Session menu for Session integration later.
Resources
- The files used in this tutorial section are available in the Byte Wars GitHub repository.
- AccelByteWars/Content/TutorialModules/Play/SessionEssentials/DA_SessionEssentials.uasset
- AccelByteWars/Content/TutorialModules/Play/SessionEssentials/UI/W_CreateSession_Starter.uasset
- AccelByteWars/Source/AccelByteWars/TutorialModules/Play/SessionEssentials/UI/CreateSessionWidget_Starter.h
- AccelByteWars/Source/AccelByteWars/TutorialModules/Play/SessionEssentials/UI/CreateSessionWidget_Starter.cpp